Panasonic DMREZ28 Dvd Recorder - English / Spanish - Page 60
Connection Options for Improved Playback Quality, Using an S Video Cable for Better Video
 |
View all Panasonic DMREZ28 manuals
Add to My Manuals
Save this manual to your list of manuals |
Page 60 highlights
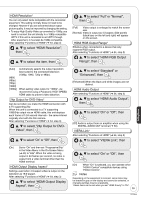
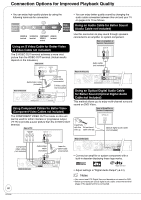
Connection Options for Improved Playback Quality • You can enjoy high-quality picture by using the following terminals for connection. Standard Quality Picture Highquality Picture VIDEO IN S VIDEO IN COMPONENT HDMI IN terminal terminal VIDEO IN terminal terminal Using an S Video Cable for Better Video (S Video Cable not included) The S VIDEO OUT terminal achieves a more vivid picture than the VIDEO OUT terminal. (Actual results depend on the television.) Rear of TV AUDIO IN VIDEO S VIDEO R L IN IN • You can enjoy better quality sound by changing the audio cable connection between this unit and your TV on pages 8 to 10 as follows. Using an Audio Cable for Better Sound (Audio Cable not included) Use this connection to play sound through speakers connected to an amplifier or system component. Rear of Amplifier or System Component AUDIO IN R L Red White Audio cable (not included) Rear of this unit Red White Red White Audio/video cable (included) Rear of this unit Red White Leave the yellow cable unconnected. S Video cable (not included) Using Component Cables for Better Video (Component Video Cables not included) The COMPONENT VIDEO OUT terminals on this unit can be used for either interlace or progressive output (➔ 77) to provide a purer picture than the S VIDEO OUT terminal. Rear of TV COMPONENT VIDEO IN Y PB PR AUDIO IN VIDEO R L IN Using an Optical Digital Audio Cable for Better Sound (Optical Digital Audio Cable not included) This method allows you to enjoy multi-channel surround sound on DVD-Video. Rear of Amplifier or System Component OPTICAL IN Insert fully with this Do not bend side up. cable sharply. Optical digital audio cable (not included) Red White Rear of this unit Component video cables (not included) Audio/video cable (included) Red White Leave the yellow cable unconnected. • Connect an amplifier or system component with a built-in decoder displaying these logo marks. Rear of this unit 60 RQT9046 • Adjust settings in "Digital Audio Output" (➔ 51). Notes • You cannot use DTS Digital Surround decoders not meant for DVD. • Before purchasing an optical digital audio cable, check the terminal shape of the equipment to be connected.
-
 1
1 -
2
-
3
-
4
-
5
-
6
-
7
-
8
-
9
-
10
-
11
-
12
-
13
-
14
-
15
-
16
-
17
-
18
-
19
-
20
-
21
-
22
-
23
-
24
-
25
-
26
-
27
-
28
-
29
-
30
-
31
-
32
-
33
-
34
-
35
-
36
-
37
-
38
-
39
-
40
-
41
-
42
-
43
-
44
-
45
-
46
-
47
-
48
-
49
-
50
-
51
-
52
-
53
-
54
-
 55
55 -
 56
56 -
 57
57 -
 58
58 -
 59
59 -
 60
60 -
 61
61 -
 62
62 -
 63
63 -
 64
64 -
 65
65 -
66
-
67
-
68
-
69
-
70
-
71
-
72
-
73
-
74
-
75
-
76
-
77
-
78
-
79
-
80
-
81
-
82
-
83
-
84
 |
 |
