Panasonic DMREZ28 Dvd Recorder - English / Spanish - Page 39
Still Pictures-Editing, Accessing the Album/Picture View, Album/Picture Operations
 |
View all Panasonic DMREZ28 manuals
Add to My Manuals
Save this manual to your list of manuals |
Page 39 highlights
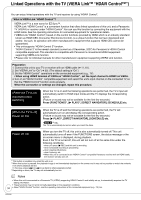
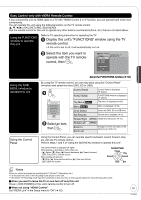
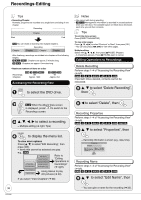
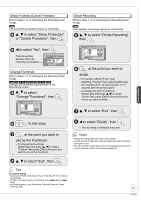
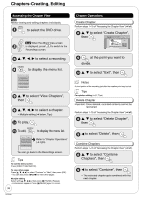
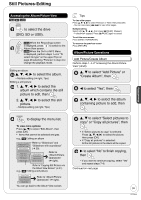
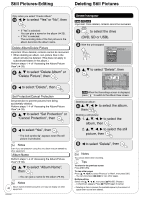
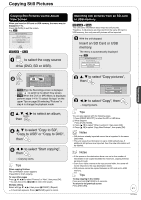
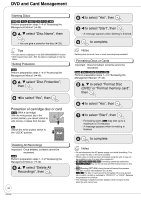
Still Pictures-Editing Advanced Editing Accessing the Album/Picture View RAM SD USB to select the drive (DVD, SD or USB). RAM When the Recordings screen is displayed, press to switch to the Album View screen. USB When the DivX or MP3 Menu is displayed, perform steps 1-4 in "To select file type" on the upper Tips on page 28 selecting "Pictures" in step 4 to change the playback mode. Editing an album: 3a e, r, w, q to select the album. - Multiple editing (➔ right, Tips) Editing a still picture: 3b 1. e, r, w, q to select the album which contains the still picture to edit, then 2. e, r, w, q to select the still picture. - Multiple editing (➔ right, Tips) Tips To view other pages Press [e, r, w, q] to select "Previous" or "Next", then press [OK]. - You can also press [u, i] to view other pages. Multiple editing Select with [e, r, w, q], then press [ h PAUSE]. (Repeat.) - A checkmark appears. Press [ h PAUSE] again to cancel. To exit the menu screen Press [DIRECT NAVIGATOR]. To return to the previous screen Press [RETURN]. Album/Picture Operations Add Picture/Create Album Perform steps 1−4 of "Accessing the Album/Picture View" (➔ left). e, r to select "Add Picture" or "Create Album", then w to select "Yes", then e, r, w, q to select the album containing picture to add, then to display the menu list. To view more options Press [e, r] to select "Edit Album", then press [OK]. • Items that cannot be selected are gray. e.g., SD Editing an album Slideshow w/SNDTRK SNDTRK Folder Start Slideshow Slideshow settings Add Picture Create Album Edit Album Copy to DVD Refer to "Slideshow" and "Slideshow with soundtrack" (➔ 30). Album Name Delete Album Set Protection Cancel Protection Refer to "Album/Picture Operations" (➔ right). Refer to "Copying Still Pictures via the Album View Screen" (➔ 41). e.g., SD Editing a still picture Delete Picture Set Protection Cancel Protection Album View Refer to "Album/Picture Operations" (➔ right). You can go back to the Album View screen. 8 e, r to select "Select pictures to copy" or "Copy all pictures", then • If "Select pictures to copy" is selected: Press [e, r, w, q] to select the picture, then press [OK]. • If "Copy all pictures" is selected: All the still pictures in the album will be copied. 9 q to select "No" to finish copying, then - If you want to continue copying, select "Yes" and repeat steps 7-8. Continued on next page. 39 RQT9046
-
 1
1 -
2
-
3
-
4
-
5
-
6
-
7
-
8
-
9
-
10
-
11
-
12
-
13
-
14
-
15
-
16
-
17
-
18
-
19
-
20
-
21
-
22
-
23
-
24
-
25
-
26
-
27
-
28
-
29
-
30
-
31
-
32
-
33
-
 34
34 -
 35
35 -
 36
36 -
 37
37 -
 38
38 -
 39
39 -
 40
40 -
 41
41 -
 42
42 -
 43
43 -
 44
44 -
45
-
46
-
47
-
48
-
49
-
50
-
51
-
52
-
53
-
54
-
55
-
56
-
57
-
58
-
59
-
60
-
61
-
62
-
63
-
64
-
65
-
66
-
67
-
68
-
69
-
70
-
71
-
72
-
73
-
74
-
75
-
76
-
77
-
78
-
79
-
80
-
81
-
82
-
83
-
84
 |
 |
