Pfaff creative 2144 Owner's Manual - Page 46
screen, color, changing, Automatic, positioning, selection
 |
View all Pfaff creative 2144 manuals
Add to My Manuals
Save this manual to your list of manuals |
Page 46 highlights
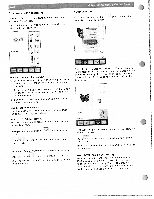
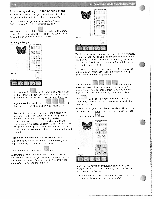
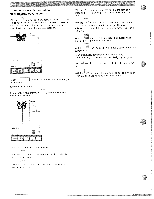
On screen color changing Touch the • icon. The window has three fields in where you can make changes. If you confirm your input, this command affects all three fields and the window is closed. Hoop selection To change hoop size, touch the i icon. A pop-up with the availabe hoop sizes appear. T rt1 LU &3 ki L%/ I Top field I Select color segment 1 Select cursor the color segment you wish to change. using arrows. Only the selected color in the design the is displayed. 2. To embroider a single color the Top field. Press the foot segment. select that color control after choosing the in color to be sewn. 3. If you set the cursor to M, the machine embroiders all areas in the same color, Touch the desired hoop size to select it. on the screen within the selected hoop. of the selected hoop size are visible on the embroidery field (in this sample, the The design appear The measurements the screen below 225x140 mm hoop is selected). Middle field I Change color Use the cursor arrows to choose the new color, you want the selected color segment to have. ..s. 40 mn Bottom field I Color intensity Use the cursor arrows to adjust the shade of a color in a selected segment. Save your change by touching closed. the window is then Touch . the window is closed without any changes being saved. Note: After the embroidering has started the cursor arrow must be reset to • or M when changing the colors!! After the first stitch. no additional changes can be made for the parameters. (jhe 80x80 hoop is available as an optional accessory from your Pfatf dealer). Touch the window is closed without any changes . being saved, Make sure to attach a hoop with the same size as displayed on the screen. Automatic hoop positioning WPfahfefncryeoaut;vpere2s1s 4t4hepfeorofot rcmontthreolctaolibstraarttioenmobnrociedemr,oryeour to position the hoop correctly. When calibrating, embroidery hoop size attached to the embroidry ne unit must be the same as the hoop size shown on the screen,
-
 1
1 -
2
-
3
-
4
-
5
-
6
-
7
-
8
-
9
-
10
-
11
-
12
-
13
-
14
-
15
-
16
-
17
-
18
-
19
-
20
-
21
-
22
-
23
-
24
-
25
-
26
-
27
-
28
-
29
-
30
-
31
-
32
-
33
-
34
-
35
-
36
-
37
-
38
-
39
-
40
-
 41
41 -
 42
42 -
 43
43 -
 44
44 -
 45
45 -
 46
46 -
 47
47 -
 48
48 -
 49
49 -
 50
50 -
 51
51 -
52
-
53
-
54
-
55
-
56
-
57
-
58
-
59
-
60
-
61
-
62
-
63
-
64
-
65
-
66
-
67
-
68
-
69
-
70
-
71
-
72
-
73
-
74
-
75
-
76
-
77
-
78
-
79
-
80
-
81
-
82
-
83
-
84
-
85
-
86
-
87
-
88
-
89
-
90
-
91
-
92
-
93
-
94
-
95
-
96
-
97
-
98
-
99
-
100
-
101
-
102
-
103
-
104
-
105
-
106
-
107
-
108
-
109
-
110
-
111
-
112
-
113
-
114
-
115
-
116
-
117
-
118
-
119
-
120
-
121
-
122
-
123
-
124
-
125
-
126
-
127
-
128
-
129
-
130
-
131
-
132
-
133
-
134
-
135
-
136
-
137
-
138
-
139
-
140
-
141
-
142
-
143
-
144
-
145
-
146
-
147
-
148
-
149
-
150
-
151
-
152
-
153
-
154
-
155
-
156
 |
 |
