Pfaff creative 2144 Owner's Manual - Page 79
Presettings, context
 |
View all Pfaff creative 2144 manuals
Add to My Manuals
Save this manual to your list of manuals |
Page 79 highlights
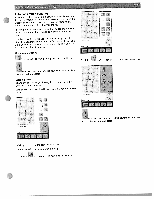
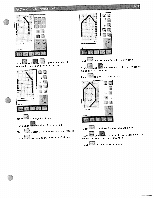
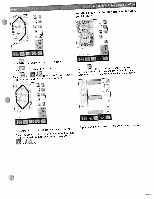
Using the Hoop adapter ) You need a hoop adapter to be able to use the following hoops: the creative cap hoop the 80 x 80 mm square embroidery hoop the buttonhole hoop You need to attach the hoop adapter to the embroidery unit for extension of the indicated hoops. When identifying the hoop. only the adapter is recognized. The additionally attached hoop size must be selected. If the hoop adapter is attached to the embroidery unit, the following window opens after hoop identification. Presettings in the context menu Engaging and disengaging the grid -r :r__ r- I 4t I For more exact positioning of embrioderies and stitches in the hoop you can activiate the grid on the work space. If you touch the "Grid on" icon in the Context menu the grid is displayed, and the icon is shown as actively selected. Moving the hoop This function allows you to move the embroidery hoop to a specific position of the embroidery unit. Touch the respective icon to indicate which hoop is attached to the adapter. After selecting the proper hoop the corresponding embroidery field is shown on the screen. If you touch "Park position" the embroidery unit moves to the optimal position for turning the emboidery arm for easier removal of the embroidery unit. If you touch "Change bobbin position" the embroidery unit moves to the optimal position for removing the bobbin case. When you press the foot control, the hoop moves back to the currently embroidered stitch. If you touch 'Sew position' the embroidery arm moves to the optimal position for sewing with the embroidery unit attached. You return to the embroidery position by pressing the foot control before leaving the embroidery menu or by selecting a design in "Embroidery! Card" or in the "Embroidery Combination".
-
 1
1 -
2
-
3
-
4
-
5
-
6
-
7
-
8
-
9
-
10
-
11
-
12
-
13
-
14
-
15
-
16
-
17
-
18
-
19
-
20
-
21
-
22
-
23
-
24
-
25
-
26
-
27
-
28
-
29
-
30
-
31
-
32
-
33
-
34
-
35
-
36
-
37
-
38
-
39
-
40
-
41
-
42
-
43
-
44
-
45
-
46
-
47
-
48
-
49
-
50
-
51
-
52
-
53
-
54
-
55
-
56
-
57
-
58
-
59
-
60
-
61
-
62
-
63
-
64
-
65
-
66
-
67
-
68
-
69
-
70
-
71
-
72
-
73
-
 74
74 -
 75
75 -
 76
76 -
 77
77 -
 78
78 -
 79
79 -
 80
80 -
 81
81 -
 82
82 -
 83
83 -
 84
84 -
85
-
86
-
87
-
88
-
89
-
90
-
91
-
92
-
93
-
94
-
95
-
96
-
97
-
98
-
99
-
100
-
101
-
102
-
103
-
104
-
105
-
106
-
107
-
108
-
109
-
110
-
111
-
112
-
113
-
114
-
115
-
116
-
117
-
118
-
119
-
120
-
121
-
122
-
123
-
124
-
125
-
126
-
127
-
128
-
129
-
130
-
131
-
132
-
133
-
134
-
135
-
136
-
137
-
138
-
139
-
140
-
141
-
142
-
143
-
144
-
145
-
146
-
147
-
148
-
149
-
150
-
151
-
152
-
153
-
154
-
155
-
156
 |
 |
