Pfaff creative 2144 Owner's Manual - Page 56
stitchpoint
 |
View all Pfaff creative 2144 manuals
Add to My Manuals
Save this manual to your list of manuals |
Page 56 highlights
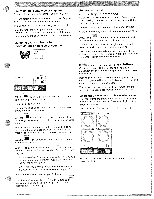
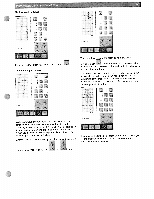
Placing single stitches I ( I * 4j For every further stitch you want to place. touch To move single stitches a 4 ) 4+ When you have moved the stitch point to the desired fl position, touch 'V to confirm the stitch. The last stitch of the sequence is marked with blue and the last stitch point is marked with a red frame. The dotted line, the cursor line, at the end of the last stitch shows where the following stitch will be added (if the x coordinate of the last stitch is not the same as the first stitch). This ensures that the fabric is fed evenly when you sew out your stitch pattern. ii cl 4 L 4L With your stylus or your finger you can work with your stitches directly on the work space by dragging and dropping a selected stitchpoint. To position a stitchpoint just touch it on the screen and drag it to the desired position. When you do this you will change the stitch width and the stitch length of the selected stitch. Another way to move the stitchpoint of a selected stitch and - uIu UI If you place the last stitch exactly at the same position (x coordinate) as the first one of your stitch pattern the dotted cursor line will not be sewn. for fine adjustment is to use the and icons. I
-
 1
1 -
2
-
3
-
4
-
5
-
6
-
7
-
8
-
9
-
10
-
11
-
12
-
13
-
14
-
15
-
16
-
17
-
18
-
19
-
20
-
21
-
22
-
23
-
24
-
25
-
26
-
27
-
28
-
29
-
30
-
31
-
32
-
33
-
34
-
35
-
36
-
37
-
38
-
39
-
40
-
41
-
42
-
43
-
44
-
45
-
46
-
47
-
48
-
49
-
50
-
 51
51 -
 52
52 -
 53
53 -
 54
54 -
 55
55 -
 56
56 -
 57
57 -
 58
58 -
 59
59 -
 60
60 -
 61
61 -
62
-
63
-
64
-
65
-
66
-
67
-
68
-
69
-
70
-
71
-
72
-
73
-
74
-
75
-
76
-
77
-
78
-
79
-
80
-
81
-
82
-
83
-
84
-
85
-
86
-
87
-
88
-
89
-
90
-
91
-
92
-
93
-
94
-
95
-
96
-
97
-
98
-
99
-
100
-
101
-
102
-
103
-
104
-
105
-
106
-
107
-
108
-
109
-
110
-
111
-
112
-
113
-
114
-
115
-
116
-
117
-
118
-
119
-
120
-
121
-
122
-
123
-
124
-
125
-
126
-
127
-
128
-
129
-
130
-
131
-
132
-
133
-
134
-
135
-
136
-
137
-
138
-
139
-
140
-
141
-
142
-
143
-
144
-
145
-
146
-
147
-
148
-
149
-
150
-
151
-
152
-
153
-
154
-
155
-
156
 |
 |
