Pfaff creative 2144 Owner's Manual - Page 74
embroidery - software
 |
View all Pfaff creative 2144 manuals
Add to My Manuals
Save this manual to your list of manuals |
Page 74 highlights
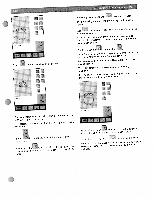
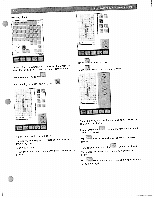
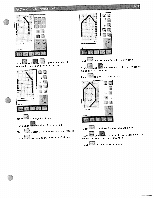
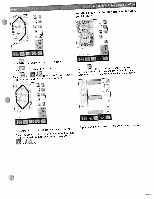
Automatic stitch building Stchrmeeaasltleivwsetiintscgohfmtpwaaactrtheeirnoners,aoerc.gerem.a9btirvmoeimdceasrrtydit,cdhceeassnig, nbmseaccxroiemsattbieticdnheewdsitthforothme create borders with different corner shapes. For that purpose one or tripled or more and then several pattern edges are doubled, positioned within the embroidery hoop. In order to should be programs join the single pattern edges exactly, the grid activated. See page 928. Of course, all available and functions of the embroidery combination can also be used with this function. Description of icons Use this con to change the general stitch settings. 0 't CA Touch the ,,, - , 4 . - + icon to open the parameter setting window. Use the - / + symbols to set how many times a stitch pattern is to be repeated. Working Steps There are different ways of using this program to create your own border designs. One possibility is described below using a 9 mm decorative stitch. 0 - 1 . (. 1 I '3 ,., Use the - / + symbols to select how many times the stitch pattern is to be repeated. Call up the stitch in the processing screen. Place the stitch in the center of the hoop. Touch the icon to open the multifunction window.
-
 1
1 -
2
-
3
-
4
-
5
-
6
-
7
-
8
-
9
-
10
-
11
-
12
-
13
-
14
-
15
-
16
-
17
-
18
-
19
-
20
-
21
-
22
-
23
-
24
-
25
-
26
-
27
-
28
-
29
-
30
-
31
-
32
-
33
-
34
-
35
-
36
-
37
-
38
-
39
-
40
-
41
-
42
-
43
-
44
-
45
-
46
-
47
-
48
-
49
-
50
-
51
-
52
-
53
-
54
-
55
-
56
-
57
-
58
-
59
-
60
-
61
-
62
-
63
-
64
-
65
-
66
-
67
-
68
-
 69
69 -
 70
70 -
 71
71 -
 72
72 -
 73
73 -
 74
74 -
 75
75 -
 76
76 -
 77
77 -
 78
78 -
 79
79 -
80
-
81
-
82
-
83
-
84
-
85
-
86
-
87
-
88
-
89
-
90
-
91
-
92
-
93
-
94
-
95
-
96
-
97
-
98
-
99
-
100
-
101
-
102
-
103
-
104
-
105
-
106
-
107
-
108
-
109
-
110
-
111
-
112
-
113
-
114
-
115
-
116
-
117
-
118
-
119
-
120
-
121
-
122
-
123
-
124
-
125
-
126
-
127
-
128
-
129
-
130
-
131
-
132
-
133
-
134
-
135
-
136
-
137
-
138
-
139
-
140
-
141
-
142
-
143
-
144
-
145
-
146
-
147
-
148
-
149
-
150
-
151
-
152
-
153
-
154
-
155
-
156
 |
 |
