Pioneer PDP-505HD Owner's Manual - Page 10
Main unit - speakers
 |
View all Pioneer PDP-505HD manuals
Add to My Manuals
Save this manual to your list of manuals |
Page 10 highlights
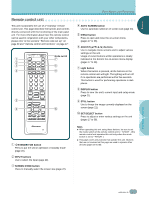
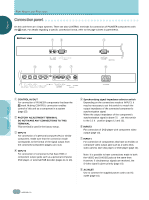
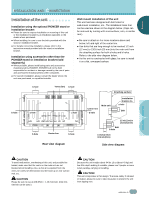
ENGLISH PART NAMES AND FUNCTIONS M○a○in○u○n○it ○ ○ ○ ○ ○ ○ Main unit 12 Operation panel on the main unit ○ ○ ○ ○ ○ ○ ○ ○ ○ ○ STANDBY/ON INPUT MENU ADJUST 4 5 6 7 ○ ○ ○ ○ ○ ○ ○ ○ ○ ○ ○ ○ ○ SET 8 S.MODE 9 RETURN 0 ○ ○ ○ ○ ○ ○ ○ ○ PART NAMES AND FUNCTIONS ○ ○ 3 Note ○ When optional speakers have been connected, ○ ○ the operation panel on the main unit will not be ○ operable. ○ ○ ○ Main unit 1 Main power switch Use to switch the main power of the unit on and off. 2 STANDBY/ON indicator This indicator is red during standby mode, and turns to green when the unit is in the operation mode (page 20). 3 Remote control sensor Point the remote control toward the remote sensor to operate the unit (page 50). Operation panel on the main unit 4 STANDBY/ON button Press to put the display in operation or standby mode (page 20). 5 INPUT button Press to select input (page 20). ○ ○ ○ ○ ○ ○ ○ ○ ○ ○ ○ ○ ○ ○ ○ ○ ○ ○ ○ ○ ○ ○ ○ ○ ○ ○ ○ ○ ○ ○ ○ ○ ○ ○ ○ 6 MENU button Press to open and close the on-screen menu (pages 17 to 38). 7 ADJUST (5/∞/2/3) buttons Use to navigate menu screens and to adjust various settings on the unit. Usage of cursor buttons within operations is clearly indicated in the on-screen display (pages 17 to 38). 8 SET button Press to adjust or enter various settings on the unit (pages 17 to 38). 9 S.MODE button Press to manually select the screen size (page 22). 0 RETURN button Press to reset the unit to factory set defaults (page 49). ○ ○ 6 En
-
 1
1 -
2
-
3
-
4
-
 5
5 -
 6
6 -
 7
7 -
 8
8 -
 9
9 -
 10
10 -
 11
11 -
 12
12 -
 13
13 -
 14
14 -
 15
15 -
16
-
17
-
18
-
19
-
20
-
21
-
22
-
23
-
24
-
25
-
26
-
27
-
28
-
29
-
30
-
31
-
32
-
33
-
34
-
35
-
36
-
37
-
38
-
39
-
40
-
41
-
42
-
43
-
44
-
45
-
46
-
47
-
48
-
49
-
50
-
51
-
52
-
53
-
54
-
55
-
56
-
57
-
58
-
59
-
60
-
61
-
62
-
63
-
64
-
65
-
66
-
67
-
68
-
69
-
70
-
71
-
72
-
73
-
74
-
75
-
76
-
77
-
78
-
79
-
80
-
81
-
82
-
83
-
84
-
85
-
86
-
87
-
88
-
89
-
90
-
91
-
92
-
93
-
94
-
95
-
96
-
97
-
98
-
99
-
100
-
101
-
102
-
103
-
104
-
105
-
106
-
107
-
108
-
109
-
110
-
111
-
112
-
113
-
114
-
115
-
116
-
117
-
118
-
119
-
120
-
121
-
122
 |
 |
