Pioneer PDP-505HD Owner's Manual - Page 35
Adjusting the picture quality
 |
View all Pioneer PDP-505HD manuals
Add to My Manuals
Save this manual to your list of manuals |
Page 35 highlights
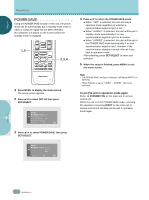
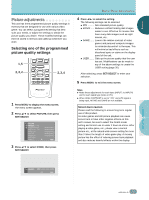
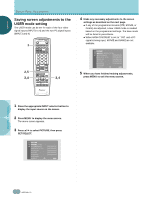
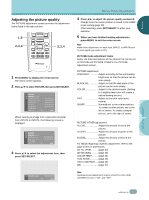
ENGLISH DISPLAY PANEL ADJUSTMENTS Adjusting the picture quality The PICTURE adjustment screen provides the adjustment items listed in the right column. 1,5 2,3,4 CH VOL MUTING RECEIVER EDIT/ LEARN SOURCE POWER DVD TOP MENU MENU 1 8 % % TV/SAT/DTV/DVD MENU % SAT/DTV GUIDE SET/ SELECT % FAVORITES 7 3 VCR REC ¶ 4 (SAT)/DTV INFO ¡ ¢ 2,3,4 CU-PDP008 Î PLASMA DISPLAY REMOTE CONTROL UNIT 1 Press MENU to display the menu screen. The menu screen appears. 2 Press 5/∞ to select PICTURE, then press SET/SELECT. PICTURE MOD E : S T D CON T RA S T BLACK LVL . COLOR T I NT SHARP OTHER EX I T USE: END: MENU When viewing an image from a personal computer from INPUT3 or INPUT4, the following screen is displayed. PICTURE MOD E : S T D CON T RA S T BLACK LVL . OTHER EXI T USE: END: MENU 3 Press 5/∞ to select the adjustment item, then press SET/SELECT. ○ ○ ○ ○ ○ ○ ○ ○ ○ ○ ○ ○ ○ ○ ○ ○ ○ ○ ○ ○ ○ ○ ○ ○ ○ ○ ○ ○ ○ ○ ○ ○ ○ ○ ○ ○ ○ ○ ○ ○ ○ ○ ○ ○ ○ ○ ○ ○ ○ ○ ○ ○ ○ ○ ○ ○ ○ ○ ○ ○ ○ ○ ○ ○ ○ ○ ○ ○ ○ ○ ○ ○ ○ ○ 4 Press 2/3 to adjust the picture quality as desired. Change from the center position is saved to the USER mode setting (page 30). After selecting, press SET/SELECT to enter your selection. 5 When you have finished making adjustments, press MENU to exit the menu screen. Note Make these adjustments for each input (INPUT1 to INPUT4) and for each signal type (video or PC). PICTURE mode adjustment items Below are brief descriptions of the options that can be set at PICTURE and PICTURE OTHER in the PICTURE adjustment screen. PICTURE adjustment: CONTRAST Adjust according to the surrounding brightness so that the picture can be seen clearly. BLACK LVL Adjust so that the dark parts of the picture can be seen clearly. COLOR Adjust to the desired depth. (Setting to a slightly deep color will create a natural looking picture.) TINT Adjust so that skin color looks normal. SHARP Normally set to the center position. To create a softer picture, set to the left of center. To create a sharper picture, set to the right of center. PICTURE OTHER adjustment: R LEVEL Adjust the amount of red in the picture. G LEVEL Adjust the amount of green in the picture. B LEVEL Adjust the amount of blue in the picture. For details regarding a specific adjustment, refer to the page written in parenthesis. 3D Y/C LEVEL ......... (page 32) 3D NR LEVEL page 33) COLOR TEMP ......... (page 34) FILM MODE page 35) HIGH CONTRAST .... (page 36) ABL page 37) ○ ○ ○ CON T RA S T USE: END: MENU ○ ○ ○ ○ Note Separate picture adjustments may be stored for when HIGH CONTRAST is set to "ON" and "OFF". DISPLAY PANEL ADJUSTMENTS ○ ○ 31 En
-
 1
1 -
2
-
3
-
4
-
5
-
6
-
7
-
8
-
9
-
10
-
11
-
12
-
13
-
14
-
15
-
16
-
17
-
18
-
19
-
20
-
21
-
22
-
23
-
24
-
25
-
26
-
27
-
28
-
29
-
 30
30 -
 31
31 -
 32
32 -
 33
33 -
 34
34 -
 35
35 -
 36
36 -
 37
37 -
 38
38 -
 39
39 -
 40
40 -
41
-
42
-
43
-
44
-
45
-
46
-
47
-
48
-
49
-
50
-
51
-
52
-
53
-
54
-
55
-
56
-
57
-
58
-
59
-
60
-
61
-
62
-
63
-
64
-
65
-
66
-
67
-
68
-
69
-
70
-
71
-
72
-
73
-
74
-
75
-
76
-
77
-
78
-
79
-
80
-
81
-
82
-
83
-
84
-
85
-
86
-
87
-
88
-
89
-
90
-
91
-
92
-
93
-
94
-
95
-
96
-
97
-
98
-
99
-
100
-
101
-
102
-
103
-
104
-
105
-
106
-
107
-
108
-
109
-
110
-
111
-
112
-
113
-
114
-
115
-
116
-
117
-
118
-
119
-
120
-
121
-
122
 |
 |
