Pioneer PDP-505HD Owner's Manual - Page 11
Remote control unit
 |
View all Pioneer PDP-505HD manuals
Add to My Manuals
Save this manual to your list of manuals |
Page 11 highlights
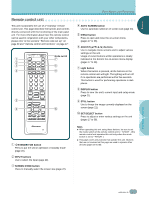
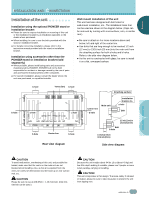
ENGLISH PART NAMES AND FUNCTIONS ○ R○e○mo○t○e c○o○nt○ro○l ○un○it ○ ○ This unit incorporates the use of a "learning" remote control unit. This page describes the buttons and controls directly connected with the functioning of the main panel unit. For more information about how this remote control can be used in conjunction with your other components, please refer to the sections "Remote code set up" on page 39 and "Remote control unit functions" on page 42". 1 2 3 4 5 6 TV CBL DTVDVD /VCR /SAT /LD STANDBY/ON INPUT 1 23 SCREEN MODE AUTO STILL 4 DISPLAY POWER AUDIO INPUT RECEIVER CC CLEAR DTV VIEW MODE 123 456 789 ¶ 0 CH ENTER CH RETURN CH VOL MUTING RECEIVER EDIT/ LEARN SOURCE POWER DVD TOP MENU MENU 1 8 % % TV/SAT/DTV/DVD MENU % SAT/DTV GUIDE SET/ SELECT % FAVORITES 7 3 VCR REC ¶ 4 (SAT) /DTV INFO ¡ ¢ Mode switch 7 8 9 0 ○ ○ ○ ○ ○ ○ ○ ○ ○ ○ ○ ○ ○ ○ ○ ○ ○ ○ ○ ○ ○ ○ ○ ○ ○ ○ ○ ○ ○ ○ ○ ○ ○ ○ ○ ○ ○ ○ ○ ○ ○ ○ ○ ○ ○ ○ ○ ○ 4 AUTO SCREEN button Use for automatic selection of screen size (page 23). 5 MENU button Press to open and close the on-screen menu (pages 17 to 38). 6 ADJUST (5/∞/2 /3) buttons Use to navigate menu screens and to adjust various settings on the unit. Usage of cursor buttons within operations is clearly indicated at the bottom the on-screen menu display (pages 17 to 38). 7 Light button When this button is pressed, all the buttons on the remote control unit will light. The lighting will turn off if no operations are performed within five seconds. This button is used for performing operations in dark places. 8 DISPLAY button Press to view the unit's current input and setup mode (page 21). 9 STILL button Use to freeze the image currently displayed on the screen (page 21). 0 SET/SELECT button Press to adjust or enter various settings on the unit (pages 17 to 38). ○ ○ ○ CU-PDP008 Î PLASMA DISPLAY REMOTE CONTROL UNIT 1 STANDBY/ON button Press to put the unit in operation or standby mode (page 20). 2 INPUT buttons Use to select the input (page 20). 3 SCREEN MODE button Press to manually select the screen size (page 22). ○ ○ ○ ○ ○ ○ ○ ○ ○ ○ ○ ○ ○ ○ ○ ○ ○ ○ ○ ○ ○ ○ Notes ÷ When operating this unit using these buttons, be sure to set the mode switch of the remote control unit to "TV/VCR". (The remote control unit operates this unit only when the mode switch is set to "TV/VCR".) ÷ This page covers only buttons that operate this unit. Buttons that are not covered on this page are used to operate other devices (pages 39 to 48). PART NAMES AND FUNCTIONS ○ ○ ○ ○ ○ ○ ○ En 7
-
 1
1 -
2
-
3
-
4
-
5
-
 6
6 -
 7
7 -
 8
8 -
 9
9 -
 10
10 -
 11
11 -
 12
12 -
 13
13 -
 14
14 -
 15
15 -
 16
16 -
17
-
18
-
19
-
20
-
21
-
22
-
23
-
24
-
25
-
26
-
27
-
28
-
29
-
30
-
31
-
32
-
33
-
34
-
35
-
36
-
37
-
38
-
39
-
40
-
41
-
42
-
43
-
44
-
45
-
46
-
47
-
48
-
49
-
50
-
51
-
52
-
53
-
54
-
55
-
56
-
57
-
58
-
59
-
60
-
61
-
62
-
63
-
64
-
65
-
66
-
67
-
68
-
69
-
70
-
71
-
72
-
73
-
74
-
75
-
76
-
77
-
78
-
79
-
80
-
81
-
82
-
83
-
84
-
85
-
86
-
87
-
88
-
89
-
90
-
91
-
92
-
93
-
94
-
95
-
96
-
97
-
98
-
99
-
100
-
101
-
102
-
103
-
104
-
105
-
106
-
107
-
108
-
109
-
110
-
111
-
112
-
113
-
114
-
115
-
116
-
117
-
118
-
119
-
120
-
121
-
122
 |
 |
