Pioneer PDP-505HD Owner's Manual - Page 21
Setup after connection - tv
 |
View all Pioneer PDP-505HD manuals
Add to My Manuals
Save this manual to your list of manuals |
Page 21 highlights
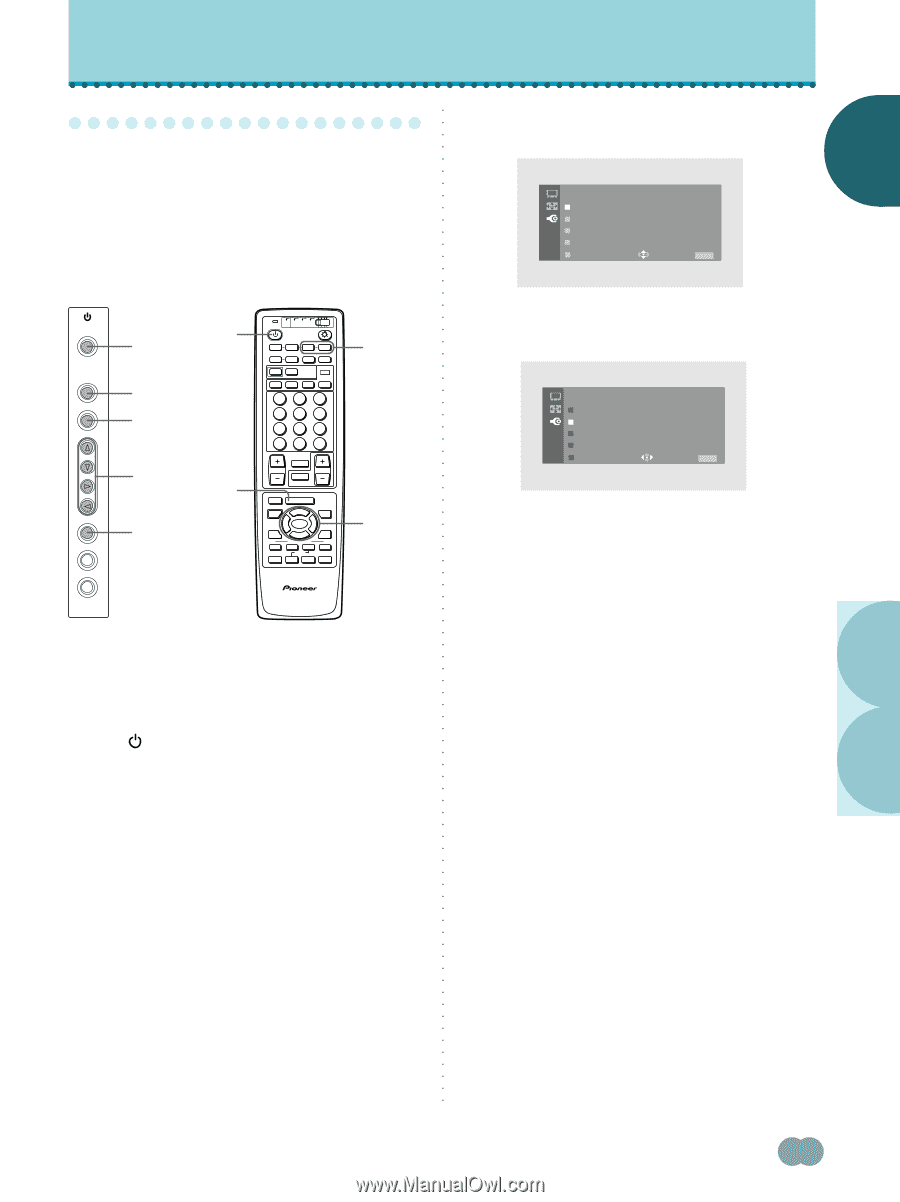
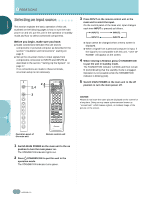
ENGLISH SETTING UP THE SYSTEM ○ S○e○tu○p a○ft○er○c○on○n○ec○ti○on 5 Press 5/∞ to select SET UP, then press SET/SELECT. ○ ○ ○ After components have been connected to INPUT3 or INPUT4, on-screen setup is necessary. Follow the procedure described below and make settings as they apply to the type of components connected. (Procedures are written in reference to the remote control unit unless the button or control is only present on the main unit.) ○ ○ ○ ○ ○ ○ ○ ○ ○ ○ SET UP P OWE R S A V E : O F F S I GNAL : PC G ON SYNC : OF F I NPUT LABEL EXI T USE: END: MENU ○ ○ STANDBY/ON INPUT MENU ADJUST SET S.MODE RETURN 2 2 3 4,10 5,6,7 8,9 4,10 5,6,7 8,9 TV CBL DTVDVD /VCR /SAT /LD STANDBY/ON INPUT 1 23 SCREEN MODE AUTO STILL 4 DISPLAY POWER AUDIO INPUT RECEIVER C C CLEAR DTV VIEW MODE 123 456 789 ¶ 0 CH ENTER CH RETURN CH VOL MUTING RECEIVER EDIT/ LEARN SOURCE POWER DVD TOP MENU MENU 1 8 % % TV/SAT/DTV/DVD MENU % SAT/DTV GUIDE SET/ SELECT % (SAT)/DTV INFO FAVORITES 7 3 VCR REC ¶ 4 ¡ ¢ 3 5,6,7 8,9 CU-PDP008 Î PLASMA DISPLAY REMOTE CONTROL UNIT 1 Switch MAIN POWER on the main unit to the on position to turn the main power on. The STANDBY/ON indicator lights red. 2 Press STANDBY/ON to put the unit in the operation mode. The STANDBY/ON indicator turns green. 3 Select INPUT3 or INPUT4. 4 Press MENU to display the menu screen. The menu screen appears. ○ ○ ○ ○ ○ ○ ○ ○ ○ ○ ○ ○ ○ ○ ○ ○ ○ ○ ○ ○ ○ ○ ○ ○ ○ ○ ○ ○ ○ ○ ○ ○ ○ ○ ○ ○ ○ ○ ○ ○ ○ ○ ○ ○ ○ ○ ○ ○ 6 Press 5/∞ to select SIGNAL, then press SET/SELECT. SET UP P OWE R S A V E : O F F S I GNAL : V I DEO PC G ON SYNC : OF F I NPUT LABEL EXI T USE: END: MENU 7 Press 2/3 to select the input signal. When a personal computer is connected, set to "PC". When a component other than a personal computer is connected, set to "VIDEO". After selecting, press SET/SELECT to enter your selection. Note Steps 6 to 7 are necessary when inputting a signal of horizontal frequency 31.5kHz/vertical frequency 60Hz. For signals of other frequencies, settings are done automatically, and therefore cannot be performed. SETTING UP THE SYSTEM ○ ○ ○ ○ ○ ○ ○ ○ ○ ○ ○ ○ ○ ○ ○ ○ ○ ○ ○ 17 En
-
 1
1 -
2
-
3
-
4
-
5
-
6
-
7
-
8
-
9
-
10
-
11
-
12
-
13
-
14
-
15
-
 16
16 -
 17
17 -
 18
18 -
 19
19 -
 20
20 -
 21
21 -
 22
22 -
 23
23 -
 24
24 -
 25
25 -
 26
26 -
27
-
28
-
29
-
30
-
31
-
32
-
33
-
34
-
35
-
36
-
37
-
38
-
39
-
40
-
41
-
42
-
43
-
44
-
45
-
46
-
47
-
48
-
49
-
50
-
51
-
52
-
53
-
54
-
55
-
56
-
57
-
58
-
59
-
60
-
61
-
62
-
63
-
64
-
65
-
66
-
67
-
68
-
69
-
70
-
71
-
72
-
73
-
74
-
75
-
76
-
77
-
78
-
79
-
80
-
81
-
82
-
83
-
84
-
85
-
86
-
87
-
88
-
89
-
90
-
91
-
92
-
93
-
94
-
95
-
96
-
97
-
98
-
99
-
100
-
101
-
102
-
103
-
104
-
105
-
106
-
107
-
108
-
109
-
110
-
111
-
112
-
113
-
114
-
115
-
116
-
117
-
118
-
119
-
120
-
121
-
122
 |
 |