Pioneer PDP-505HD Owner's Manual - Page 31
Labeling the inputs
 |
View all Pioneer PDP-505HD manuals
Add to My Manuals
Save this manual to your list of manuals |
Page 31 highlights
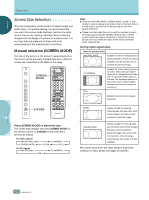
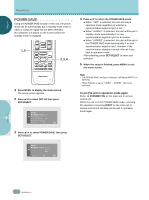
ENGLISH OPERATIONS L○ab○e○lin○g○th○e○in○p○ut○s This function enables you to apply a label of up to 8 characters for each of the 4 inputs. 1,9 MUTING RECEIVER EDIT/ LEARN SOURCE POWER DVD TOP MENU MENU 1 % % TV/SAT/DTV/DVD MENU % SAT/DTV GUIDE SET/ SELECT % (SAT)/DTV INFO FAVORITES 7 3 ¡ 2,3,4,5, 6,7,8 1 Press MENU to display the menu screen. The menu screen appears. 2 Press 5/∞ to select SET UP, then press SET/SELECT. ○ ○ ○ ○ ○ ○ ○ ○ ○ ○ ○ ○ ○ ○ ○ ○ ○ ○ ○ ○ ○ ○ ○ ○ 6 Press 5/∞ to select LABEL, then press SET/SELECT. The character window opens, and the cursor is moved to the bottom right corner of the character window. SET UP I N P U T L A B E L LABEL : I NPUT3 A B C D E F GH I J K LMN O P QR S T U VWX Y Z 1 2 34567890 / -_. EX I T USE: END: MENU 7 Press 5/∞/2/3 to navigate the cursor around the character window. Press SET/SELECT to add a character to the label. ○ ○ ○ SET UP P OWE R S A V E : O F F S I GNAL : PC G ON SYNC : OF F I NPUT LABEL EXI T USE: END: MENU ○ ○ ○ ○ ○ ○ ○ SET UP I N P U T L A B E L LABEL : A I NPUT3 A B C D E F GH I J K LMN O P QR S T U VWX Y Z 1 2 34567890 / -_. EX I T USE: END: MENU ○ ○ ○ 3 Press 5/∞ to select INPUT LABEL, then press SET/SELECT. ○ ○ ○ Each time SET/SELECT is pressed, the currently selected character is added to the label to create a label of up to 8 characters long. ○ ○ ○ ○ OPERATIONS SET UP I N P U T L A B E L I NPUT : I NPUT4 LABEL : I NPUT4 EXI T USE: END: MENU 4 Press 5/∞ to select INPUT, then press SET/SELECT. SET UP I N P U T L A B E L I NPUT : I NPUT1 I NPUT2 I NPUT3 EXI T I NPUT4 USE: END: MENU 5 Press 5/∞ to select the input you want to create a label for, then press SET/SELECT. When the input is changed on the menu screen, the currently selected input is also changed. SET UP I N P U T L A B E L I NPUT : I NPUT3 LABEL : I NPUT3 EXI T USE: END: MENU ○ ○ ○ ○ ○ ○ ○ ○ ○ ○ ○ ○ ○ ○ ○ ○ ○ ○ ○ ○ ○ ○ ○ ○ ○ ○ ○ ○ ○ ○ ○ ○ ○ ○ ○ ○ ○ ○ ○ SET UP I N P U T L A B E L LABEL :AAAAAAAA A B C D E F GH I J K LMN O P QR S T U VWX Y Z 1 2 34567890 / -_. EX I T USE: END: MENU 8 When the label is finished, move the cursor position to the bottom right corner of the character window and press SET/SELECT. The character window disappears. The input and its corresponding label are displayed. SET UP I N P U T L A B E L I NPUT : I NPUT3 LABEL :AAAAAAAA EXI T USE: END: MENU 9 When the setup is finished, press MENU to exit the menu screen. Note When these characters are selected in the character window, the following occurs. : A space is input. : The character input mode is exited. 27 En
-
 1
1 -
2
-
3
-
4
-
5
-
6
-
7
-
8
-
9
-
10
-
11
-
12
-
13
-
14
-
15
-
16
-
17
-
18
-
19
-
20
-
21
-
22
-
23
-
24
-
25
-
 26
26 -
 27
27 -
 28
28 -
 29
29 -
 30
30 -
 31
31 -
 32
32 -
 33
33 -
 34
34 -
 35
35 -
 36
36 -
37
-
38
-
39
-
40
-
41
-
42
-
43
-
44
-
45
-
46
-
47
-
48
-
49
-
50
-
51
-
52
-
53
-
54
-
55
-
56
-
57
-
58
-
59
-
60
-
61
-
62
-
63
-
64
-
65
-
66
-
67
-
68
-
69
-
70
-
71
-
72
-
73
-
74
-
75
-
76
-
77
-
78
-
79
-
80
-
81
-
82
-
83
-
84
-
85
-
86
-
87
-
88
-
89
-
90
-
91
-
92
-
93
-
94
-
95
-
96
-
97
-
98
-
99
-
100
-
101
-
102
-
103
-
104
-
105
-
106
-
107
-
108
-
109
-
110
-
111
-
112
-
113
-
114
-
115
-
116
-
117
-
118
-
119
-
120
-
121
-
122
 |
 |
