Pioneer PDP-505HD Owner's Manual - Page 32
Understanding the MENU screens
 |
View all Pioneer PDP-505HD manuals
Add to My Manuals
Save this manual to your list of manuals |
Page 32 highlights
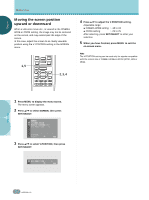
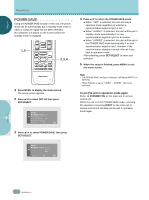
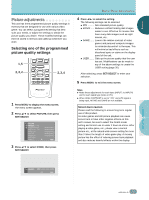
ENGLISH DISPLAY PANEL ADJUSTMENTS U○n○de○rs○ta○n○di○ng○th○e○M○E○N○U ○sc○re○e○ns○ ○ Pressing the MENU button on the remote control unit opens the MAIN MENU screen. The MAIN MENU screen is the primary starting screen for all internal system adjustments and functions divided up into the PICTURE adjustment screen, SCREEN adjustment screen, and SET UP screen. Select the desired menu item using 5/∞ on the remote control unit or the main unit, then press SET/SELECT to perform the desired operations and settings. ○ ○ ○ ○ ○ ○ ○ ○ ○ ○ ○ ○ ○ ○ ○ ○ ○ 2 Press 5/∞ to select the appropriate submenu and press SET/SELECT. ÷ Use the PICTURE adjustment screen to modify the actual video image that appears on the screen (pages 29 to 37). PICTURE SCREEN SET UP . ○ ○ When a video signal is input, and the on-screen menu is displayed, the SCREEN MODE is changed to "FULL". When the on-screen menu is turned off, or if the SCREEN adjustment menu is selected, the screen returns to the SCREEN MODE that had been previously displayed. To use the menu screens 1,3 2 CH RETURN CH VOL MUTING RECEIVER EDIT/ LEARN TV/SAT/DTV/DVD MENU SOURCE SAT/DTV POWER % GUIDE DVD SET/ SELECT 2 TOP MENU (SAT)/DTV MENU % INFO FAVORITES 1 7 3 ¡ VCR REC 8 ¶ 4¢ ○ ○ ○ ○ ○ ○ ○ ○ ○ ○ ○ ○ ○ ○ ○ ○ ○ ○ ○ ○ ○ ○ ○ ○ ○ ○ USE: END: MENU ÷ Use the SCREEN adjustment screen to make the settings and adjustments of the screen according to the input signal (pages 23, 24, and 38). PICTURE SCREEN SET UP . USE: END: MENU ÷ Use the SET UP screen to make various settings or to coordinate this unit with externally connected components (pages 17 to 19, 26, and 27). ○ ○ ○ CU-PDP008 Î PLASMA DISPLAY REMOTE CONTROL UNIT 1 Press MENU to display the menu screen. The menu screen appears. ○ ○ ○ ○ ○ ○ ○ ○ ○ ○ PICTURE SCREEN SET UP . USE: END: MENU ○ ○ ○ PICTURE SCREEN SET UP . USE: END: MENU ○ ○ ○ ○ ○ ○ ○ ○ ○ ○ ○ ○ ○ ○ ○ ○ ○ 3 To close the menu screen, press MENU. On screen indicators USE: Indicates in light blue the buttons that can be used in the currently displayed menu screen . END: End is for turning off the menu screen by pressing the MENU button. EXIT: To return to the previous menu screen, use the 5 or ∞ button to move to EXIT and then press SET/SELECT. DISPLAY PANEL ADJUSTMENTS % % ○ ○ ○ ○ ○ 28 En
-
 1
1 -
2
-
3
-
4
-
5
-
6
-
7
-
8
-
9
-
10
-
11
-
12
-
13
-
14
-
15
-
16
-
17
-
18
-
19
-
20
-
21
-
22
-
23
-
24
-
25
-
26
-
 27
27 -
 28
28 -
 29
29 -
 30
30 -
 31
31 -
 32
32 -
 33
33 -
 34
34 -
 35
35 -
 36
36 -
 37
37 -
38
-
39
-
40
-
41
-
42
-
43
-
44
-
45
-
46
-
47
-
48
-
49
-
50
-
51
-
52
-
53
-
54
-
55
-
56
-
57
-
58
-
59
-
60
-
61
-
62
-
63
-
64
-
65
-
66
-
67
-
68
-
69
-
70
-
71
-
72
-
73
-
74
-
75
-
76
-
77
-
78
-
79
-
80
-
81
-
82
-
83
-
84
-
85
-
86
-
87
-
88
-
89
-
90
-
91
-
92
-
93
-
94
-
95
-
96
-
97
-
98
-
99
-
100
-
101
-
102
-
103
-
104
-
105
-
106
-
107
-
108
-
109
-
110
-
111
-
112
-
113
-
114
-
115
-
116
-
117
-
118
-
119
-
120
-
121
-
122
 |
 |
