Pioneer PRO-1130HD Owner's Manual - Page 18
Preparation - stand
 |
View all Pioneer PRO-1130HD manuals
Add to My Manuals
Save this manual to your list of manuals |
Page 18 highlights
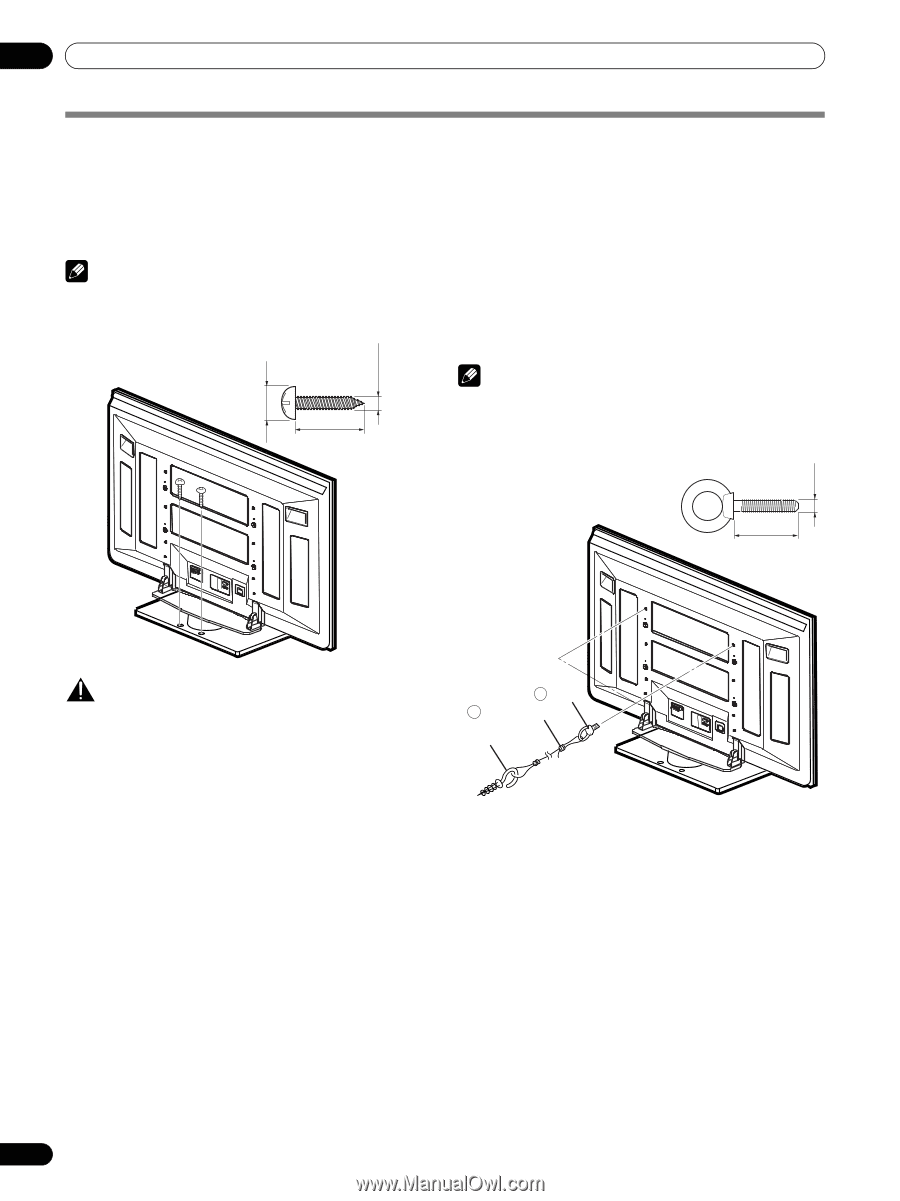
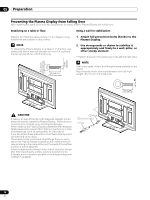
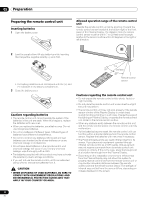
05 Preparation Preventing the Plasma Display from Falling Over After installing the stand, be sure to take special care to ensure that the Plasma Display will not fall over. Stabilizing on a table or floor Using a wall for stabilization Stabilize the Plasma Display as shown in the diagram using screws that are available on the market. NOTE To stabilize the Plasma Display on a table or on the floor, use screws that have a nominal diameter of 6 mm (1/4 inch) and that are at least 20 mm (13/16 inch) long. 20 mm min. (13/16 inch min.) 1. Attach fall-prevention bolts (hooks) to the Plasma Display. 2. Use strong cords or chains to stabilize it appropriately and firmly to a wall, pillar, or other sturdy element. • Perform this work in the same way on the left and right sides. NOTE Use hooks, ropes, chains, and fittings that are available on the market. Recommended hook: Nominal diameter 8 mm (3/8 inch) Length 12 to 15 mm (1/2 to 5/8 inch) 9 to 15 mm (3/8 to 5/8 inch) 6 mm (1/4 inch) M8 12 to 15 mm (1/2 to 5/8 inch) CAUTION A table or an area of the floor with adequate strength should always be used to support the Plasma Display. Failure to do so could result in personal injury and physical damage. When installing the Plasma Display, please take the necessary safety measures to prevent it from falling or overturning in case of emergencies, such as earthquakes, or of accidents. If you do not take these precautions, the Plasma Display could fall down and cause injury. The screws, hooks, chains and other fittings that you use to secure the Plasma Display to prevent it from overturning will vary according to the composition and thickness of the surface to which it will be attached. Select the appropriate screws, hooks, chains, and other fittings after first inspecting the surface carefully to determine its thickness and composition and after consulting a professional installer if necessary. 1 Hook 2 Cord or chain Fitting 18 En
-
 1
1 -
2
-
3
-
4
-
5
-
6
-
7
-
8
-
9
-
10
-
11
-
12
-
 13
13 -
 14
14 -
 15
15 -
 16
16 -
 17
17 -
 18
18 -
 19
19 -
 20
20 -
 21
21 -
 22
22 -
 23
23 -
24
-
25
-
26
-
27
-
28
-
29
-
30
-
31
-
32
-
33
-
34
-
35
-
36
-
37
-
38
-
39
-
40
-
41
-
42
-
43
-
44
-
45
-
46
-
47
-
48
-
49
-
50
-
51
-
52
-
53
-
54
-
55
-
56
-
57
-
58
-
59
-
60
-
61
-
62
-
63
-
64
-
65
-
66
-
67
-
68
-
69
-
70
-
71
-
72
-
73
-
74
-
75
-
76
-
77
-
78
-
79
-
80
-
81
-
82
-
83
-
84
-
85
-
86
-
87
-
88
-
89
-
90
-
91
-
92
-
93
-
94
-
95
-
96
-
97
-
98
-
99
-
100
 |
 |