Pioneer PRO-1130HD Owner's Manual - Page 69
Using HDMI Input
 |
View all Pioneer PRO-1130HD manuals
Add to My Manuals
Save this manual to your list of manuals |
Page 69 highlights
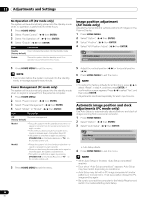
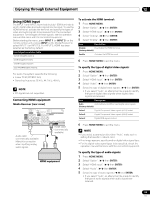
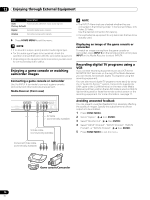
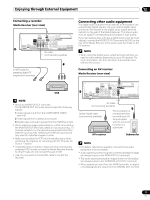
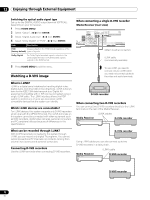
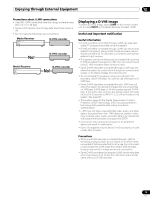
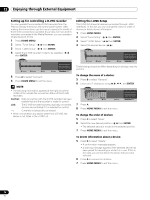
Enjoying through External Equipment 12 Using HDMI Input The INPUT 1 and INPUT 3 terminals include HDMI terminals to which digital video and audio signals can be input. To use the HDMI terminal, activate the terminal and specify the types of video and audio signals to be received from the connected equipment. For the types of these signals, see the operation manual that came with the connected equipment. Before starting the menu, press INPUT 1 (or INPUT 3) on the remote control unit or press INPUT on the Media Receiver to select INPUT 1 (or INPUT 3). For INPUT 3, HDMI has been selected as the factory default. Input signal correlation table 1920[email protected]/60Hz 720[email protected]/60Hz 1280[email protected]/60Hz 720(1440)[email protected]/60Hz For audio, the system supports the following: • Linear PCM (STEREO 2ch) • Sampling frequency: 32 kHz, 44.1 kHz, 48 kHz NOTE • PC signals are not supported. Connecting HDMI equipment Media Receiver (rear view) MONITOR OUT ANT/ CABLE A IN INPUT 2 G-LINK INPUT 3 S400 (TS) R-AUDIO-L OPTICAL DIGITAL OUT SUB WOOFER Cable CARD ERVICE ONLY R-AUDIO-L VIDEO S-VIDEO INPUT 1 Y CB / PB COMPONENT VIDEO CR / PR INPUT 1 INPUT 3 HDMI BLACK SYSTE HDMI cable (commercially available) Audio cable (commercially available) Make this connection when inputting analog audio signals. HDMI equipment To activate the HDMI terminal: 1 Press HOME MENU. 2 Select "Option". ( / then ENTER) 3 Select "HDMI Input". ( / then ENTER) 4 Select "Setting". ( / then ENTER) 5 Select "Enable". ( / then ENTER) Item Description Disable Deactivates the HDMI terminal. (factory default) Enable Activates the HDMI terminal. 6 Press HOME MENU to exit the menu. To specify the type of digital video signals: 1 Press HOME MENU. 2 Select "Option". ( / then ENTER) 3 Select "HDMI Input". ( / then ENTER) 4 Select "Video". ( / then ENTER) 5 Select the type of digital video signals. ( / then ENTER) • If you select "Auto", an attempt will be made to identify the type of digital video signals when digital video signals are received. Item Description Auto Automatically identifies input digital video signals. (factory default) Color-1 Digital Component Video signals (4:2:2) locked Color-2 Digital Component Video signals (4:4:4) locked Color-3 Digital RGB signals locked 6 Press HOME MENU to exit the menu. NOTE • If you select a parameter other than "Auto", make such a setting that results in natural color. • If no image appears, specify another digital video signal type. • For the digital video signal types to be specified, check the operation manual that came with the connected equipment. To specify the type of audio signals: 1 Press HOME MENU. 2 Select "Option". ( / then ENTER) 3 Select "HDMI Input". ( / then ENTER) 4 Select "Audio". ( / then ENTER) 5 Select the type of audio signals. ( / then ENTER) • If you select "Auto", an attempt will be made to identify the type of audio signals when audio signals are received. 69 En
-
 1
1 -
2
-
3
-
4
-
5
-
6
-
7
-
8
-
9
-
10
-
11
-
12
-
13
-
14
-
15
-
16
-
17
-
18
-
19
-
20
-
21
-
22
-
23
-
24
-
25
-
26
-
27
-
28
-
29
-
30
-
31
-
32
-
33
-
34
-
35
-
36
-
37
-
38
-
39
-
40
-
41
-
42
-
43
-
44
-
45
-
46
-
47
-
48
-
49
-
50
-
51
-
52
-
53
-
54
-
55
-
56
-
57
-
58
-
59
-
60
-
61
-
62
-
63
-
 64
64 -
 65
65 -
 66
66 -
 67
67 -
 68
68 -
 69
69 -
 70
70 -
 71
71 -
 72
72 -
 73
73 -
 74
74 -
75
-
76
-
77
-
78
-
79
-
80
-
81
-
82
-
83
-
84
-
85
-
86
-
87
-
88
-
89
-
90
-
91
-
92
-
93
-
94
-
95
-
96
-
97
-
98
-
99
-
100
 |
 |