RCA HD61LPW42 User Guide & Warranty - Page 25
Why You Should Connect the G-LINK Cable
 |
UPC - 034909312742
View all RCA HD61LPW42 manuals
Add to My Manuals
Save this manual to your list of manuals |
Page 25 highlights
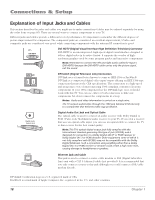
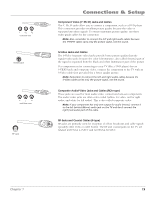
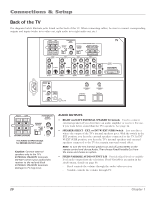
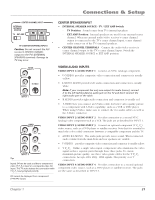
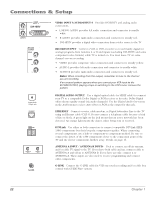
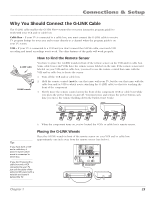
Connections & Setup Why You Should Connect the G-LINK Cable The G-LINK cable enables the GUIDE Plus+ system (the on-screen interactive program guide) to work with your VCR and/or cable box. Cable Box - If your TV is connected to a cable box, you must connect the G-LINK cable to receive TV program listings for your area and to tune directly to a channel when the program guide is on your TV screen. VCR - If your TV is connected to a VCR and you don't connect the G-LINK cable, one-touch VCR recording and timed recordings won't work. The other features of the guide will work properly. G-LINK cable G-LINK wands How to Find the Remote Sensor You have to place the G-LINK wands in front of the remote sensor on the VCR and/or cable box. Some cable boxes and VCRs have the remote sensor labeled on the unit. If the remote sensor isn't labeled on your VCR and/or cable box, you need to use the remote control that came with the VCR and/or cable box to locate the sensor. 1. Turn off the VCR and/or cable box. 2. Hold the remote control (not the one that came with your TV, but the one that came with the cable box and/or VCR to which you're attaching the G-LINK cable) so that it is touching the front of the component. 3. Slowly move the remote control across the front of the component (VCR or cable box) while you press the power button on and off. You must press and release the power button each time you move the remote (holding down the button won't work). VCR CABLE BOX CHANNEL 03 4. When the component turns on, you've located the VCR's or cable box's remote sensor. Placing the G-LINK Wands Tips If you have both a VCR and a cable box, it doesn't matter which wand is connected to which box. If you don't have both a cable box and a VCR connected to your TV, just coil the cable of the extra G-LINK wand with a twist tie and leave it behind the TV. Place the G-LINK wands in front of the remote sensor on your VCR and/or cable box approximately one inch away from the remote sensor (see below). RIGHT LEFT FIXED/VARIABLE AUDIO OUTPUT SPEAKER SELECT INT W/ R EXT EXT SURR CENTER CHANNEL INPUT INTERNAL SPEAKER SOURCE EXTERNAL AMPLIFIER MAXIMUM POWER RATING! (60 WATTS into 8 OHMS) TV EXT AMP EXTERNAL SPEAKERS VIDEO INPUT 1 L VIDEO INPUT 2 VIDEO INPUT 3 VIDEO INPUT 4 V V V PR V PR L/MONO S-VIDEO L/MONO S-VIDEO L/MONO PB L/MONO PB L/MONO R AUDIO INPUT 1 R AUDIO INPUT 2 R AUDIO INPUT 3 YR AUDIO INPUT 4 YR AUDIO INPUT 5 TV VIDEO INPUT 5 DVI-HDTV RECORD OUTPUT VIDEO AUDIO R L DIGITAL AUDIO OUTPUT G-LINK ANTENNA A INPUT ETHERNET ANTENNA B INPUT TV (back panel) Connect to G-LINK jack on the back of the TV . SENSOR VCR SENSOR CHANNEL 03 Chapter 1 23
-
 1
1 -
2
-
3
-
4
-
5
-
6
-
7
-
8
-
9
-
10
-
11
-
12
-
13
-
14
-
15
-
16
-
17
-
18
-
19
-
 20
20 -
 21
21 -
 22
22 -
 23
23 -
 24
24 -
 25
25 -
 26
26 -
 27
27 -
 28
28 -
 29
29 -
 30
30 -
31
-
32
-
33
-
34
-
35
-
36
-
37
-
38
-
39
-
40
-
41
-
42
-
43
-
44
-
45
-
46
-
47
-
48
-
49
-
50
-
51
-
52
-
53
-
54
-
55
-
56
-
57
-
58
-
59
-
60
-
61
-
62
-
63
-
64
-
65
-
66
-
67
-
68
-
69
-
70
-
71
-
72
-
73
-
74
-
75
-
76
-
77
-
78
-
79
-
80
-
81
-
82
-
83
-
84
-
85
-
86
-
87
-
88
-
89
-
90
-
91
-
92
-
93
-
94
-
95
-
96
 |
 |
