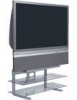
RCA HD61LPW42 User Guide & Warranty - Page 68
Green Stretch, Contrast Expand, Film Mode, Horizontal Position, Vertical Position
 |
UPC - 034909312742
View all RCA HD61LPW42 manuals
Add to My Manuals
Save this manual to your list of manuals |
Page 68 highlights
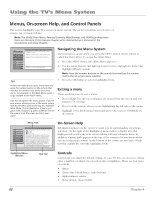
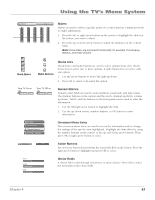
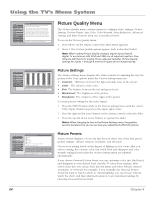
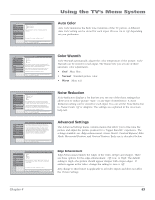
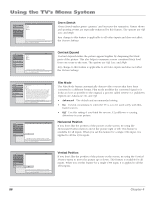
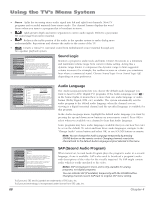
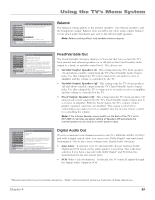
Using the TV's Menu System 0 Go Back 1 Edge Enhancement 2 Green Stretch 3 Contrast Expand 4 Film Mode 5 Horizontal Position 6 Vertical Position Main Menu Picture Quality Advanced Settings Antenna A Off Low High A change in this screen is applied to all inputs. Press or to point to an option, then press OK to select it. Press to return to the menu. Green Stretch Green Stretch makes green "greener" and increases the saturation. Nature shows and sporting events are especially enhanced by this feature. The options are Off, Low, and High. Any change to this feature is applicable to all video inputs and does not affect the Picture Settings. 0 Go Back 1 Edge Enhancement 2 Green Stretch 3 Contrast Expand 4 Film Mode 5 Horizontal Position 6 Vertical Position Main Menu Picture Quality Advanced Settings Antenna A Off Low High A change in this screen is applied to all inputs. Press or to point to an option, then press OK to select it. Press to return to the menu. Contrast Expand Contrast Expand makes the picture appear brighter by deepening the black parts of the picture. This also helps to maintain a more consistent black level from one scene to the next. The options are Off, Low, and High. Any change to this feature is applicable to all video inputs and does not affect the Picture Settings. 0 Go Back 1 Edge Enhancement 2 Green Stretch 3 Contrast Expand 4 Film Mode 5 Horizontal Position 6 Vertical Position Main Menu Picture Quality Advanced Settings Antenna A Advanced On Off Film Mode detects the frame rate at which a film or video source was recorded and adjusts the picture accordingly. The Advanced setting (recommended) enables Film Mode only when it's likely to improve movie playback quality. The On setting is intended for use with sources that are expected to be film based (like DVDs). Film Mode is enabled more often by the On setting than by Advanced setting. The Off setting turns off film mode upconversion and motion adaptive deinterlacing is used on all video. A change in this screen is applied to all inputs. Press or to point to an option, then press OK to select it. Press to return to the menu. 0 Go Back 1 Edge Enhancement 2 Green Stretch 3 Contrast Expand 4 Film Mode 5 Horizontal Position 6 Vertical Position Main Menu Picture Quality Advanced Settings Antenna A A change in this screen is applied to Antenna A - Digital. Press or to point to an option, then press OK to select it. Press to return to the menu. Film Mode The Film Mode feature automatically detects video sources that have been converted to a different format. Film mode modifies the converted signal so it looks as close as possible to the original, a process called reverse 3:2 pulldown. Options are Advanced, On, and Off. • Advanced The default and recommended setting. • On Used in circumstances when the TV is is to be used solely with filmbased sources. • Off Use this setting if you think the reverse 3:2 pulldown is causing distortions in your picture. Horizontal Position If you don't like the position of the picture on the screen, try using the Horizontal Position menu to move the picture right or left. This feature is available for all inputs. When you set this feature for a single 1394 input, it is applied to all the 1394 inputs. 0 Go Back 1 Edge Enhancement 2 Green Stretch 3 Contrast Expand 4 Film Mode 5 Horizontal Position 6 Vertical Position Main Menu Picture Quality Advanced Settings Antenna A A change in this screen is applied to Antenna A - Digital. Press or to point to an option, then press OK to select it. Press to return to the menu. Vertical Position If you don't like the position of the picture on the screen, try using the Vertical Position menu to move the picture up or down. This feature is available for all inputs. When you set this feature for a single 1394 input, it is applied to all the 1394 inputs. 66 Chapter 4
-
 1
1 -
2
-
3
-
4
-
5
-
6
-
7
-
8
-
9
-
10
-
11
-
12
-
13
-
14
-
15
-
16
-
17
-
18
-
19
-
20
-
21
-
22
-
23
-
24
-
25
-
26
-
27
-
28
-
29
-
30
-
31
-
32
-
33
-
34
-
35
-
36
-
37
-
38
-
39
-
40
-
41
-
42
-
43
-
44
-
45
-
46
-
47
-
48
-
49
-
50
-
51
-
52
-
53
-
54
-
55
-
56
-
57
-
58
-
59
-
60
-
61
-
62
-
 63
63 -
 64
64 -
 65
65 -
 66
66 -
 67
67 -
 68
68 -
 69
69 -
 70
70 -
 71
71 -
 72
72 -
 73
73 -
74
-
75
-
76
-
77
-
78
-
79
-
80
-
81
-
82
-
83
-
84
-
85
-
86
-
87
-
88
-
89
-
90
-
91
-
92
-
93
-
94
-
95
-
96
 |
 |
