RCA HD61LPW42 User Guide & Warranty - Page 74
Auto Tuning, Setup DTVLink®, Special Features, Ethernet Setup - error codes
 |
UPC - 034909312742
View all RCA HD61LPW42 manuals
Add to My Manuals
Save this manual to your list of manuals |
Page 74 highlights
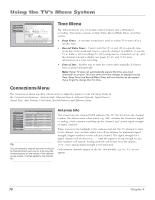
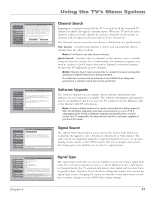
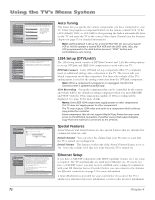
Using the TV's Menu System 0 Go Back 1 Antenna Info 2 Channel Search 3 Software Upgrade 4 Signal Source 5 Signal Type 6 Auto Tuning 7 1394 Setup 8 Special Features 9 Ethernet Setup Main Menu Connections Select which input or channel should be automatically tuned when a button listed below is pressed on the remote control. VCR Front Input VCR2 (Aux default) Front Input DVD Front Input Tip: If you indicated in GUIDE Plus+ Setup that you have a cable box, set the Auto Tuning for SAT-CABLE to "Not Connected". SAT-CABLE (Satellite or Cable Box) Front Input Press OK to select the channel or input that is tuned when the VCR key is pressed on the remote. 0 Go Back 1 Antenna Info 2 Channel Search 3 Software Upgrade 4 Signal Source 5 Signal Type 6 Auto Tuning 7 1394 Setup 8 Special Features 9 Ethernet Setup Main Menu Connections The 1394 Setup menu has screens for setting up DTV Link and IEEE-1394 devices to work with the TV. •DTVLink Connect: Set an analog input for a DTVLink device. •1394 Recording: Pick a device to receive remote commands. Press OK or to access the 1394 Setup menu. 0 Go Back 1 TIneixtitahl eCrheannel 2 Initial Volume Main Menu Connections Special Features Select what should occur when power is restored to the TV: Off: Initial Channel is disabled On: Go to last input or channel selected On: Go to Antenna A (Air) Channel 999 Sub-channel 999 Press or to point to an option, then press OK to select it. Press to return to the menu. 0 Go Back 1 Host Name 2 IP Address 3 Proxy Server 4 Reset All Main Menu Connections Ethernet Setup Some Internet Service Providers (phone/cable company) may require you to provide them with your TV's Ethernet MAC (Media Access Control) address and assign you with a device host name to enter below. This is usually NOT required if connecting to an ISP through an Ethernet gateway device (e.g. router) supporting NAT/PAT, sometimes referred to as a DSL/Cable Modem router. This is your device's MAC address: 00 11 22 33 44 55 If your Ethernet gateway device supports DHCP, the Domain Name will appear here: domain.name.here. If required, enter the device hose name below: Use the keyboard or the remote's arrow keys to enter the host name. This may be the only setup you need to do. Auto Tuning This menu lets you specify the various components you have connected to your TV. It lets you program a component button on the remote control (VCR, VCR2 (AUX default), DVD, or SAT/CAB) so that pressing the button automatically turns on the TV and turns the TV to the correct Video Input Channel (see the Features chapter on page 55 for detailed information). Note: AUX by default is set up for a second RCA VCR. Or, you can program VCR or AUX to operate a second RCA VCR with the 2001 code. Also, any VCR programmed to the AUX button becomes "VCR2" button and controllable by auto tuning. 1394 Setup (DTVLink®) The 1394 Setup menu consists of DTVLink Connect and 1394 Recording options to set up DTVLink and IEEE-1394 components to work with your TV. DTVLink Connect Some DTVLink set-top components (IEA-775 compliant) need an additional analog video connection to the TV. The screen tells you which component needs this connection. You then select which of the TV's analog inputs is used for the analog connection from the DTVLink component. Note: When a component is plugged in or unplugged, the DTVLink Connect screen is updated automatically. 1394 Recording Set up the component that can be controlled by the remote and which will be the default recording component when you press RECORD and STOP. Only the 1394 components capable of 1394 recording will be displayed. See page 60 for more details. Notes: Some IEEE-1394 components supply power to other components. This TV does not supply power to other components. The TV only outputs 1394 video and audio to a component which enforces copy-protection measures. Some components that do not support Digital Copy Protection may cause errors on the DTVLink connection if another source that supports Digital Copy Protected material is connected to the DTVLink. Special Features Initial Channel and Initial Volume are two special features that are intended for commercial/retail use only. Initial Channel You can select the channel that your TV tunes to each time the TV is turned on or plugged in. Initial Volume This features works only if the Initial Channel feature is set to On. Select the volume level that you want when the TV is turned on. Ethernet Setup If you have a NAT/PAT component with DHCP capability (router, etc.), no setup is required. The TV automatically sets itself up for Ethernet use. If you do not have a NAT/PAT router, you may need to establish some settings in conjunction with your ISP (Internet Service Provider) before you can connect to the Internet. See Ethernet connection on page 15 for more information. A Reset All selection is provided for your convenience if you move the TV to another city and must enter new information, or enter some incorrect information. 72 Chapter 4
-
 1
1 -
2
-
3
-
4
-
5
-
6
-
7
-
8
-
9
-
10
-
11
-
12
-
13
-
14
-
15
-
16
-
17
-
18
-
19
-
20
-
21
-
22
-
23
-
24
-
25
-
26
-
27
-
28
-
29
-
30
-
31
-
32
-
33
-
34
-
35
-
36
-
37
-
38
-
39
-
40
-
41
-
42
-
43
-
44
-
45
-
46
-
47
-
48
-
49
-
50
-
51
-
52
-
53
-
54
-
55
-
56
-
57
-
58
-
59
-
60
-
61
-
62
-
63
-
64
-
65
-
66
-
67
-
68
-
 69
69 -
 70
70 -
 71
71 -
 72
72 -
 73
73 -
 74
74 -
 75
75 -
 76
76 -
 77
77 -
 78
78 -
 79
79 -
80
-
81
-
82
-
83
-
84
-
85
-
86
-
87
-
88
-
89
-
90
-
91
-
92
-
93
-
94
-
95
-
96
 |
 |
