Ricoh CL3000e Manual - Page 3
Connecting The Power, Installing The Toner, Cartridge, Loading Paper, Selecting The Panel - printer
 |
UPC - 026649201172
View all Ricoh CL3000e manuals
Add to My Manuals
Save this manual to your list of manuals |
Page 3 highlights
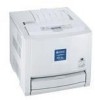
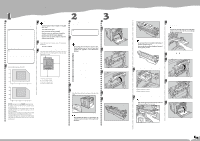
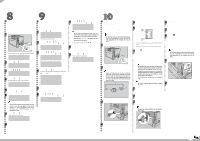
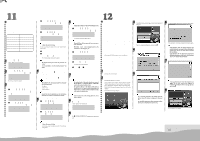
INSTALLING THE TONER CARTRIDGE Open the upper left cover of the printer. Take out the toner cartridge. ZHBH441E Hold the toner cartridge horizontally as illustrated, and then shake it back and forth about 10 times. ZHBH460E In the illustration, black cartridge is used as an example. Important Ì Do not open the shutter on the bottom of the toner cartridge. Toner may spill. Remove the adhesive tapes. ZHBH470E Check the toner color and location are correct, and then insert the toner cartridge vertically and slowly. You can check the location for each toner cartridge by reading the labels on the printer. ZHBH481E In the illustration, yellow cartridge is used as an example. Push the toner cartridge in the direction of the arrow to fasten the toner cartridge. ZHBH491E Repeat steps to , to install the other color toner cartridges. Close the upper left cover of the printer. LOADING PAPER Caution • When pulling the paper tray out, be careful not to pull it strongly. If you do, the tray might fall and cause personal injury. Pull the paper tray out of the printer until it stops. After that, lift it slightly, and then pull it out completely. Place it on a flat surface. ZHBY010E Note Ì You cannot pull the Tray 1 out if the Bypass Tray is open. Remove the adhesive tape and packing material. ZHBY920E Press "Push", and then adjust the rear guide to the paper size you want to load. Load paper into the paper tray with the print side up. Important Ì Make sure that the top of the stack is not higher than the limit mark inside the tray. Ì The front and side guides should be set exactly to the paper size to avoid paper misfeeds. Ì Do not load different kinds of paper in the tray. Slide the paper tray completely into the printer. SELECTING THE PANEL DISPLAY LANGUAGE Follow the procedure to select a language. Note Ì You can select one of the following languages: English, German, French, Italian, Dutch, Swedish, Norwegian, Danish, Spanish, Finnish, Portuguese, Czech, Polish or Hungarian. Ì The default setting is English. Ì If you want to use the English panel display, it is not necessary for you to take the following procedures. Turn on the printer. CONNECTING THE POWER CORD Warning • It is dangerous to handle the plug with wet hands. Doing this may result in receiving an electric shock. Caution • When you pull the plug out of the socket, grip the plug, not the cord, to avoid damaging the cord and causing a fire or an electric shock. Important Ì Be sure to connect the power plug to the socket or the wall outlet firmly. Ì The printer power must be off when plugging in and out the power cord. Confirm that the printer's power switch is off. If it is on, turn it off. ZHBH740E After the machine warms up, "Ready" appears on the panel display. Ready Press the {Menu} key. ZHBH500E Note Ì If the toner cartridge is not set properly, you cannot close the upper left cover of this printer. ZHBY040E Adjust the side guides to the paper size you want to load. ZHBH730E Attach the power cord to the socket on the back of the printer. ZHBS010E The following message appears on the panel display. Menu: Paper Input Press the {v} or {w} key to display "Language". Menu: Language Press the {Enter #} key. The following message appears on the panel display. Language: *English Press the {v} or {w} key to display the language you want to select. Press the {Enter #} key. "Menu" appears on the panel display. Menu: Language Press the {On Line} key. "Ready" appears on the panel display. Ready ZHBH910E ZHBY060E ZHBH030E Plug the other end securely into the wall outlet. Go to sheet 2/2. Sheet 1/2
-
 1
1 -
 2
2 -
 3
3 -
 4
4 -
 5
5 -
 6
6 -
 7
7 -
 8
8 -
 9
9 -
10
-
11
-
12
-
13
-
14
-
15
-
16
-
17
-
18
-
19
-
20
-
21
-
22
-
23
-
24
-
25
-
26
-
27
-
28
-
29
-
30
-
31
-
32
-
33
-
34
-
35
-
36
-
37
-
38
-
39
-
40
-
41
-
42
-
43
-
44
-
45
-
46
-
47
-
48
-
49
-
50
-
51
-
52
-
53
-
54
-
55
-
56
-
57
-
58
-
59
-
60
-
61
-
62
-
63
-
64
-
65
-
66
-
67
-
68
-
69
-
70
-
71
-
72
-
73
-
74
-
75
-
76
-
77
-
78
-
79
-
80
-
81
-
82
-
83
-
84
-
85
-
86
-
87
-
88
-
89
-
90
-
91
-
92
-
93
-
94
-
95
-
96
-
97
-
98
-
99
-
100
-
101
-
102
-
103
-
104
-
105
-
106
-
107
-
108
-
109
-
110
-
111
-
112
-
113
-
114
-
115
-
116
-
117
-
118
-
119
-
120
-
121
-
122
-
123
-
124
-
125
-
126
-
127
-
128
-
129
-
130
-
131
-
132
-
133
-
134
-
135
-
136
-
137
-
138
-
139
-
140
-
141
-
142
-
143
-
144
-
145
-
146
-
147
-
148
-
149
-
150
-
151
-
152
-
153
-
154
-
155
-
156
-
157
-
158
-
159
-
160
-
161
-
162
-
163
-
164
-
165
-
166
-
167
-
168
-
169
-
170
-
171
-
172
-
173
-
174
-
175
-
176
-
177
-
178
-
179
-
180
-
181
-
182
-
183
-
184
-
185
-
186
-
187
-
188
-
189
-
190
-
191
-
192
-
193
-
194
-
195
-
196
-
197
-
198
-
199
-
200
-
201
-
202
-
203
-
204
-
205
-
206
-
207
-
208
-
209
-
210
-
211
-
212
-
213
-
214
-
215
-
216
-
217
-
218
-
219
-
220
-
221
-
222
-
223
-
224
-
225
-
226
-
227
-
228
-
229
-
230
-
231
-
232
-
233
-
234
-
235
-
236
-
237
-
238
-
239
-
240
-
241
-
242
-
243
-
244
-
245
-
246
-
247
-
248
-
249
-
250
-
251
-
252
-
253
-
254
-
255
-
256
-
257
-
258
-
259
-
260
-
261
-
262
-
263
-
264
-
265
-
266
-
267
-
268
-
269
-
270
-
271
-
272
-
273
-
274
-
275
-
276
-
277
-
278
-
279
-
280
-
281
-
282
-
283
-
284
-
285
-
286
-
287
-
288
-
289
-
290
-
291
-
292
-
293
-
294
-
295
-
296
-
297
-
298
-
299
-
300
-
301
-
302
-
303
-
304
-
305
-
306
-
307
-
308
-
309
-
310
-
311
-
312
-
313
-
314
-
315
-
316
-
317
-
318
-
319
-
320
-
321
-
322
-
323
-
324
-
325
-
326
-
327
-
328
-
329
-
330
-
331
-
332
-
333
-
334
-
335
-
336
-
337
-
338
-
339
-
340
-
341
-
342
-
343
-
344
-
345
-
346
-
347
-
348
-
349
-
350
-
351
-
352
-
353
-
354
-
355
-
356
-
357
-
358
-
359
-
360
-
361
-
362
-
363
-
364
-
365
-
366
-
367
-
368
-
369
-
370
-
371
-
372
-
373
-
374
-
375
-
376
-
377
-
378
-
379
-
380
-
381
-
382
-
383
-
384
-
385
-
386
-
387
-
388
-
389
-
390
-
391
-
392
-
393
-
394
-
395
-
396
-
397
-
398
-
399
-
400
-
401
-
402
-
403
-
404
-
405
-
406
-
407
-
408
-
409
-
410
-
411
-
412
-
413
-
414
-
415
-
416
-
417
-
418
-
419
-
420
-
421
-
422
-
423
-
424
-
425
-
426
-
427
-
428
-
429
-
430
-
431
-
432
-
433
-
434
-
435
-
436
-
437
-
438
-
439
-
440
-
441
-
442
-
443
-
444
-
445
-
446
-
447
-
448
-
449
-
450
-
451
-
452
-
453
-
454
-
455
-
456
-
457
-
458
-
459
-
460
-
461
-
462
-
463
-
464
-
465
-
466
-
467
-
468
-
469
-
470
-
471
-
472
-
473
-
474
-
475
-
476
-
477
-
478
-
479
-
480
-
481
-
482
-
483
-
484
-
485
-
486
-
487
-
488
-
489
-
490
-
491
-
492
-
493
-
494
-
495
-
496
-
497
-
498
-
499
-
500
-
501
-
502
-
503
-
504
-
505
-
506
-
507
-
508
-
509
-
510
-
511
-
512
-
513
-
514
-
515
-
516
-
517
-
518
-
519
-
520
-
521
-
522
-
523
-
524
-
525
-
526
-
527
-
528
-
529
-
530
-
531
-
532
-
533
-
534
-
535
-
536
-
537
-
538
-
539
-
540
-
541
-
542
-
543
-
544
-
545
-
546
-
547
-
548
-
549
-
550
-
551
-
552
-
553
-
554
-
555
-
556
-
557
-
558
-
559
-
560
-
561
-
562
-
563
-
564
-
565
-
566
-
567
-
568
-
569
-
570
-
571
-
572
-
573
-
574
-
575
-
576
-
577
-
578
-
579
-
580
-
581
-
582
-
583
-
584
-
585
-
586
-
587
-
588
-
589
-
590
-
591
-
592
-
593
-
594
-
595
-
596
-
597
-
598
-
599
-
600
-
601
-
602
-
603
-
604
-
605
-
606
-
607
-
608
-
609
-
610
-
611
-
612
-
613
-
614
-
615
-
616
-
617
-
618
-
619
-
620
-
621
-
622
-
623
-
624
-
625
-
626
-
627
-
628
-
629
-
630
-
631
-
632
-
633
-
634
-
635
-
636
-
637
-
638
-
639
-
640
-
641
-
642
-
643
-
644
-
645
-
646
-
647
-
648
-
649
-
650
-
651
-
652
-
653
-
654
-
655
-
656
-
657
-
658
-
659
-
660
-
661
-
662
-
663
-
664
-
665
-
666
-
667
-
668
-
669
-
670
-
671
-
672
-
673
-
674
-
675
-
676
-
677
-
678
-
679
-
680
-
681
-
682
-
683
-
684
-
685
-
686
-
687
-
688
-
689
-
690
-
691
 |
 |