Ricoh Priport HQ7000 Network Guide - Page 47
To quit, To start, Select the context specified using NIB Setup Tool Step
 |
View all Ricoh Priport HQ7000 manuals
Add to My Manuals
Save this manual to your list of manuals |
Page 47 highlights
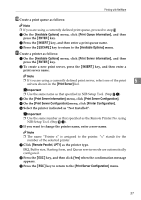
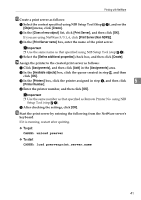
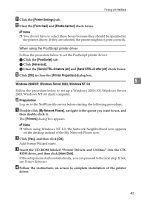
Printing with NetWare M Create a print server as follows: A Select the context specified using NIB Setup Tool (Step G-B), and on the [Object] menu, click [Create]. B In the [Class of new object] list, click [Print Server], and then click [OK]. If you are using NetWare 5/5.1, 6, click [Print Server (Non NDPS)]. C In the [Print Server name] box, enter the name of the print server. Important ❒ Use the same name as that specified using NIB Setup Tool (step G-B). D Select the [Define additional properties] check box, and then click [Create]. N Assign the printer to the created print server as follows: A Click [Assignments], and then click [Add] in the [Assignments] area. B In the [Available objects] box, click the queue created in step J, and then click [OK]. C In the [Printers] box, click the printer assigned in step B, and then click 5 [Printer Number]. D Enter the printer number, and then click [OK]. Important ❒ Use the same number as that specified as Remote Printer No. using NIB Setup Tool (step G-G). E After checking the settings, click [OK]. O Start the print server by entering the following from the NetWare server's keyboard. If it is running, restart after quitting. ❖ To quit CAREE: unload pserver ❖ To start CAREE: load pserverprint_server_name 41
-
 1
1 -
2
-
3
-
4
-
5
-
6
-
7
-
8
-
9
-
10
-
11
-
12
-
13
-
14
-
15
-
16
-
17
-
18
-
19
-
20
-
21
-
22
-
23
-
24
-
25
-
26
-
27
-
28
-
29
-
30
-
31
-
32
-
33
-
34
-
35
-
36
-
37
-
38
-
39
-
40
-
41
-
 42
42 -
 43
43 -
 44
44 -
 45
45 -
 46
46 -
 47
47 -
 48
48 -
 49
49 -
 50
50 -
 51
51 -
 52
52 -
53
-
54
-
55
-
56
-
57
-
58
-
59
-
60
-
61
-
62
-
63
-
64
-
65
-
66
-
67
-
68
-
69
-
70
-
71
-
72
-
73
-
74
-
75
-
76
-
77
-
78
-
79
-
80
-
81
-
82
-
83
-
84
-
85
-
86
-
87
-
88
-
89
-
90
-
91
-
92
-
93
-
94
-
95
-
96
-
97
-
98
-
99
-
100
-
101
-
102
-
103
-
104
-
105
-
106
-
107
-
108
-
109
-
110
-
111
-
112
-
113
-
114
-
115
-
116
-
117
-
118
-
119
-
120
-
121
-
122
-
123
-
124
-
125
-
126
-
127
-
128
-
129
-
130
 |
 |
