Ricoh Priport HQ7000 Network Guide - Page 53
SmartDeviceMonitor for Client - Options, To be Monitored, Displayed on Task Bar
 |
View all Ricoh Priport HQ7000 manuals
Add to My Manuals
Save this manual to your list of manuals |
Page 53 highlights
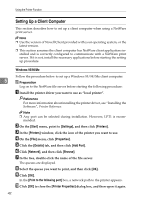
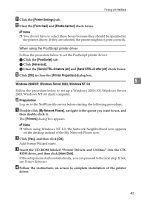
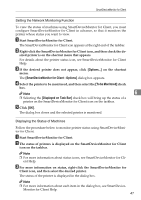
SmartDeviceMonitor for Client Setting the Network Monitoring Function To view the status of machines using SmartDeviceMonitor for Client, you must configure SmartDeviceMonitor for Client in advance, so that it monitors the printer whose status you want to view. A Start SmartDeviceMonitor for Client. The SmartDeviceMonitor for Client icon appears at the right end of the taskbar. B Right-click the SmartDeviceMonitor for Client icon, and then check the de- sired printer is on the shortcut menu that appears. For details about the printer status icon, see SmartDeviceMonitor for Client Help. C If the desired printer does not appear, click [Options...] on the shortcut menu. The [SmartDeviceMonitor for Client - Options] dialog box appears. D Select the printer to be monitored, and then select the [To be Monitored] check box. Note 6 ❒ Selecting the [Displayed on Task Bar] check box will bring up the status of a printer on the SmartDeviceMonitor for Client icon on the taskbar. E Click [OK]. The dialog box closes and the selected printer is monitored. Displaying the Status of Machines Follow the procedure below to monitor printer status using SmartDeviceMonitor for Client. A Start SmartDeviceMonitor for Client. B The status of printers is displayed on the SmartDeviceMonitor for Client icon on the taskbar. Note ❒ For more information about status icons, see SmartDeviceMonitor for Cli- ent Help. C For more information on status, right-click the SmartDeviceMonitor for Client icon, and then select the desired printer. The status of the printer is displayed in the dialog box. Note ❒ For more information about each item in the dialog box, see SmartDevice- Monitor for Client Help. 47
-
 1
1 -
2
-
3
-
4
-
5
-
6
-
7
-
8
-
9
-
10
-
11
-
12
-
13
-
14
-
15
-
16
-
17
-
18
-
19
-
20
-
21
-
22
-
23
-
24
-
25
-
26
-
27
-
28
-
29
-
30
-
31
-
32
-
33
-
34
-
35
-
36
-
37
-
38
-
39
-
40
-
41
-
42
-
43
-
44
-
45
-
46
-
47
-
 48
48 -
 49
49 -
 50
50 -
 51
51 -
 52
52 -
 53
53 -
 54
54 -
 55
55 -
 56
56 -
 57
57 -
 58
58 -
59
-
60
-
61
-
62
-
63
-
64
-
65
-
66
-
67
-
68
-
69
-
70
-
71
-
72
-
73
-
74
-
75
-
76
-
77
-
78
-
79
-
80
-
81
-
82
-
83
-
84
-
85
-
86
-
87
-
88
-
89
-
90
-
91
-
92
-
93
-
94
-
95
-
96
-
97
-
98
-
99
-
100
-
101
-
102
-
103
-
104
-
105
-
106
-
107
-
108
-
109
-
110
-
111
-
112
-
113
-
114
-
115
-
116
-
117
-
118
-
119
-
120
-
121
-
122
-
123
-
124
-
125
-
126
-
127
-
128
-
129
-
130
 |
 |
