Samsung SCH-U820 User Manual (user Manual) (ver.f7) (English) - Page 51
Contacts, My Name Card, TXT Message, Picture, Message, Video Message, Bluetooth, Creating My Name Card - transfer contacts
 |
View all Samsung SCH-U820 manuals
Add to My Manuals
Save this manual to your list of manuals |
Page 51 highlights
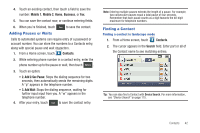
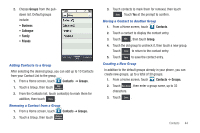
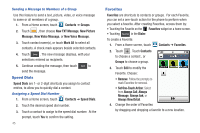
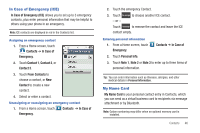
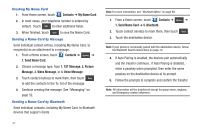
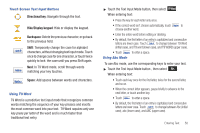
Creating My Name Card 1. From Home screen, touch Contacts ➔ My Name Card. 2. In most cases, your telephone number is entered by default. Touch Edit to enter additional fields. 3. When finished, touch Save to save the Name Card. Sending a Name Card by Message Send individual contact entries, including My Name Card, to recipient(s) as an attachment to a message. 1. From a Home screen, touch Contacts ➔ Options ➔ 1. Send Name Card. 2. Choose a message type, from 1. TXT Message, 2. Picture Message, 3. Video Message, or 4. Voice Message. 3. Touch contact name(s) to mark them, then touch Done to add the contacts to the To: list of the message. 4. Continue creating the message. See "Messaging" on page 52. Sending a Name Card by Bluetooth Send individual contacts, including My Name Card, to Bluetooth devices that support vCards. Note: For more information, see "Bluetooth Menu" on page 68. 1. From a Home screen, touch Contacts ➔ Options ➔ 1. Send Name Card ➔ 5. Bluetooth. 2. Touch contact name(s) to mark them, then touch Done . 3. Touch the destination device. Note: If your phone is not already paired with the destination device, follow the Bluetooth Search instructions on page 70. 4. If Auto Pairing is enabled, the devices pair automatically and the transfer continues. If Auto Pairing is disabled, enter a passkey when prompted, then enter the same passkey on the destination device at its prompt. 5. Follow the prompts to complete and confirm the transfer. Note: All information will be transferred except for group name, ringtone, and Emergency contact reference. 47
-
 1
1 -
2
-
3
-
4
-
5
-
6
-
7
-
8
-
9
-
10
-
11
-
12
-
13
-
14
-
15
-
16
-
17
-
18
-
19
-
20
-
21
-
22
-
23
-
24
-
25
-
26
-
27
-
28
-
29
-
30
-
31
-
32
-
33
-
34
-
35
-
36
-
37
-
38
-
39
-
40
-
41
-
42
-
43
-
44
-
45
-
 46
46 -
 47
47 -
 48
48 -
 49
49 -
 50
50 -
 51
51 -
 52
52 -
 53
53 -
 54
54 -
 55
55 -
 56
56 -
57
-
58
-
59
-
60
-
61
-
62
-
63
-
64
-
65
-
66
-
67
-
68
-
69
-
70
-
71
-
72
-
73
-
74
-
75
-
76
-
77
-
78
-
79
-
80
-
81
-
82
-
83
-
84
-
85
-
86
-
87
-
88
-
89
-
90
-
91
-
92
-
93
-
94
-
95
-
96
-
97
-
98
-
99
-
100
-
101
-
102
-
103
-
104
-
105
-
106
-
107
-
108
-
109
-
110
-
111
-
112
-
113
-
114
-
115
-
116
-
117
-
118
-
119
-
120
-
121
-
122
-
123
-
124
-
125
-
126
-
127
-
128
-
129
-
130
-
131
-
132
-
133
-
134
-
135
-
136
-
137
-
138
-
139
-
140
-
141
-
142
-
143
-
144
-
145
-
146
-
147
-
148
-
149
-
150
-
151
-
152
-
153
-
154
-
155
-
156
-
157
-
158
-
159
-
160
-
161
 |
 |
