Samsung SGH-A637 User Manual (user Manual) (ver.f8) (English) - Page 109
Applications, Tools, Using the Camera, Taking Photos, Camera Options, My Stuff, Camera
 |
View all Samsung SGH-A637 manuals
Add to My Manuals
Save this manual to your list of manuals |
Page 109 highlights
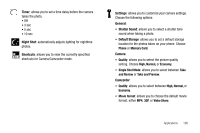
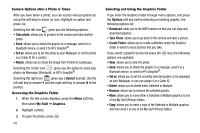
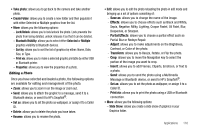
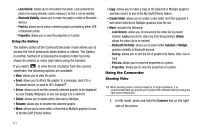
Section 12: Applications The on-board applications (such as camera, camcorder, calendar, and alarms) can be supplemented with additional applications which can be purchased through the AT&T Mall. ᮣ When the Idle screen displays, press the Menu soft key, then select My Stuff ➔ Tools. Tools Tools are feature options that allow you to use your handset for a variety of non-phone related activities. To access any of the tools, perform the following: ᮣ When the Idle screen displays, press the Menu soft key, then select My Stuff ➔ Tools. Using the Camera Taking Photos Note: When taking a photo in direct sunlight or in bright conditions, shadows may appear on the photo. 1. In Idle mode, press and hold the Camera key on the right side of the phone. 2. Adjust the image by aiming the camera at the subject. 3. To take the photo, press . Note: Your camera produces photos in JPEG format. The number that appears in the lower-left of the screen indicates the current number of pictures have been saved to the selected media and an approximate number of total pictures which can be taken at the current image size. 4. Or before taking the photo, use the Navigation keys to access camera option icons. 5. Once the photo has been taken, press photo directly to a message. to attach the 6. Press the Camera key to return to the picture viewer. 7. You can use the keypad to quickly change the camera options using the camera shortcut keys. Camera Options Camera options are represented by icons across the top of the screen. To access the options, press the soft key. The Camera mode icon becomes highlighted. Use the Navigation keys to highlight the desired option icon and the preferred value. To save your selection, press . Applications 106
-
 1
1 -
2
-
3
-
4
-
5
-
6
-
7
-
8
-
9
-
10
-
11
-
12
-
13
-
14
-
15
-
16
-
17
-
18
-
19
-
20
-
21
-
22
-
23
-
24
-
25
-
26
-
27
-
28
-
29
-
30
-
31
-
32
-
33
-
34
-
35
-
36
-
37
-
38
-
39
-
40
-
41
-
42
-
43
-
44
-
45
-
46
-
47
-
48
-
49
-
50
-
51
-
52
-
53
-
54
-
55
-
56
-
57
-
58
-
59
-
60
-
61
-
62
-
63
-
64
-
65
-
66
-
67
-
68
-
69
-
70
-
71
-
72
-
73
-
74
-
75
-
76
-
77
-
78
-
79
-
80
-
81
-
82
-
83
-
84
-
85
-
86
-
87
-
88
-
89
-
90
-
91
-
92
-
93
-
94
-
95
-
96
-
97
-
98
-
99
-
100
-
101
-
102
-
103
-
 104
104 -
 105
105 -
 106
106 -
 107
107 -
 108
108 -
 109
109 -
 110
110 -
 111
111 -
 112
112 -
 113
113 -
 114
114 -
115
-
116
-
117
-
118
-
119
-
120
-
121
-
122
-
123
-
124
-
125
-
126
-
127
-
128
-
129
-
130
-
131
-
132
-
133
-
134
-
135
-
136
-
137
-
138
-
139
-
140
-
141
-
142
-
143
-
144
-
145
-
146
-
147
-
148
-
149
-
150
-
151
-
152
-
153
-
154
-
155
-
156
-
157
-
158
-
159
-
160
-
161
-
162
-
163
-
164
-
165
-
166
 |
 |