Samsung SPH-M560 User Manual (user Manual) (ver.f10) (English) - Page 119
Registering Your Sprint Picture Mail Account
 |
View all Samsung SPH-M560 manuals
Add to My Manuals
Save this manual to your list of manuals |
Page 119 highlights
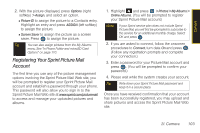
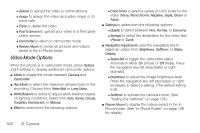
Camera 2. With the picture displayed, press Options (right softkey) > Assign, and select an option. Ⅲ Picture ID to assign the picture to a Contacts entry. Highlight an entry and press ASSIGN (left softkey) to assign the picture. Ⅲ Screen Saver to assign the picture as a screen saver. Press to assign the picture. Tip You can also assign pictures from the My Albums menu. See "In Phone Folder and microSD Card Options" on page 110. Registering Your Sprint Picture Mail Account The first time you use any of the picture management options involving the Sprint Picture Mail Web site, you will be prompted to register your Sprint Picture Mail account and establish a password through your phone. This password will also allow you to sign in to the Sprint Picture Mail Web site at www.sprint.com/picturemail to access and manage your uploaded pictures and albums. 1. Highlight and press > Photos > My Albums > Online Albums. (You will be prompted to register your Sprint Picture Mail account.) Note If your Sprint service plan does not include Sprint Picture Mail, you will first be prompted to subscribe to the service for an additional monthly charge. Select OK and press . 2. If you are asked to connect, follow the onscreen procedures to Connect, turn data On and press . (Follow any registration prompts and complete your connection.) 3. Enter a password for your Picture Mail account and press . (You will be prompted to confirm your password.) 4. Please wait while the system creates your account. Tip Write down your Sprint Picture Mail password and keep it in a secure place. Once you have received confirmation that your account has been successfully registered, you may upload and share pictures and access the Sprint Picture Mail Web site. 2I. Camera 103
-
 1
1 -
2
-
3
-
4
-
5
-
6
-
7
-
8
-
9
-
10
-
11
-
12
-
13
-
14
-
15
-
16
-
17
-
18
-
19
-
20
-
21
-
22
-
23
-
24
-
25
-
26
-
27
-
28
-
29
-
30
-
31
-
32
-
33
-
34
-
35
-
36
-
37
-
38
-
39
-
40
-
41
-
42
-
43
-
44
-
45
-
46
-
47
-
48
-
49
-
50
-
51
-
52
-
53
-
54
-
55
-
56
-
57
-
58
-
59
-
60
-
61
-
62
-
63
-
64
-
65
-
66
-
67
-
68
-
69
-
70
-
71
-
72
-
73
-
74
-
75
-
76
-
77
-
78
-
79
-
80
-
81
-
82
-
83
-
84
-
85
-
86
-
87
-
88
-
89
-
90
-
91
-
92
-
93
-
94
-
95
-
96
-
97
-
98
-
99
-
100
-
101
-
102
-
103
-
104
-
105
-
106
-
107
-
108
-
109
-
110
-
111
-
112
-
113
-
 114
114 -
 115
115 -
 116
116 -
 117
117 -
 118
118 -
 119
119 -
 120
120 -
 121
121 -
 122
122 -
 123
123 -
 124
124 -
125
-
126
-
127
-
128
-
129
-
130
-
131
-
132
-
133
-
134
-
135
-
136
-
137
-
138
-
139
-
140
-
141
-
142
-
143
-
144
-
145
-
146
-
147
-
148
-
149
-
150
-
151
-
152
-
153
-
154
-
155
-
156
-
157
-
158
-
159
-
160
-
161
-
162
-
163
-
164
-
165
-
166
-
167
-
168
-
169
-
170
-
171
-
172
-
173
-
174
-
175
-
176
-
177
-
178
-
179
-
180
-
181
-
182
-
183
-
184
-
185
-
186
-
187
-
188
-
189
-
190
-
191
-
192
-
193
-
194
-
195
-
196
-
197
-
198
-
199
-
200
-
201
-
202
-
203
-
204
-
205
-
206
-
207
-
208
-
209
-
210
-
211
-
212
-
213
-
214
-
215
-
216
-
217
-
218
-
219
-
220
-
221
-
222
 |
 |
