Samsung SPH-M560 User Manual (user Manual) (ver.f10) (English) - Page 120
Camera Mode Options
 |
View all Samsung SPH-M560 manuals
Add to My Manuals
Save this manual to your list of manuals |
Page 120 highlights
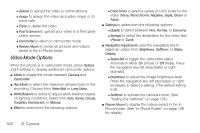
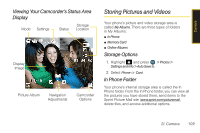
Camera Mode Options When the phone is in camera mode, press Options (right softkey) to display additional camera options: ⅷ Mode to toggle the mode between Camera and Camcorder. ⅷ Shooting Mode to select an option from the following: Ⅲ Single Shot to take a single shot. Ⅲ Series Shot to take multiple shots. (See "Taking Multiple Shots" on page 105.) Ⅲ Fun Frames to select your favorite fun picture frame to decorate your picture. (The default setting is None.) Ⅲ Mosaic to take up to 16 images (Off, 9, or 16) that are then combined into a single picture. Images are reduced down to a resolution of 640x480. Ⅲ Panorama to take up to 8 images that are then combined into a single panoramic picture. Press and hold . The center of each panoramic area is indicated with a red square, that must be centered within the white square on the LCD before the image is taken. Images are reduced down to a resolution of 320x240. Ⅲ Night Shot to activate low light image capture. Enabling this feature allows you to take better quality photos in low light conditions. ⅷ Resolution to select a picture's file size (2 M, 1.3 M, High, Med, or Low). ⅷ White Balance to adjust white balance based on changing conditions (Auto, Sunny, Cloudy, Tungsten, Fluorescent, or Manual). (The default setting is Auto.) ⅷ Metering to allow the phone to sample the area being photographed and then determine the best light levels. Choose from either Center (the center of the image is sampled and then used) or Spot (a specific area of the image is sampled). ⅷ Effect provides the Color Tones option that provides a wide variety of color tones for the picture. (The default setting is None.) ⅷ Settings to select Quality, Shutter Sound, or Storage. (See page 107 for details.) 104 2I. Camera
-
 1
1 -
2
-
3
-
4
-
5
-
6
-
7
-
8
-
9
-
10
-
11
-
12
-
13
-
14
-
15
-
16
-
17
-
18
-
19
-
20
-
21
-
22
-
23
-
24
-
25
-
26
-
27
-
28
-
29
-
30
-
31
-
32
-
33
-
34
-
35
-
36
-
37
-
38
-
39
-
40
-
41
-
42
-
43
-
44
-
45
-
46
-
47
-
48
-
49
-
50
-
51
-
52
-
53
-
54
-
55
-
56
-
57
-
58
-
59
-
60
-
61
-
62
-
63
-
64
-
65
-
66
-
67
-
68
-
69
-
70
-
71
-
72
-
73
-
74
-
75
-
76
-
77
-
78
-
79
-
80
-
81
-
82
-
83
-
84
-
85
-
86
-
87
-
88
-
89
-
90
-
91
-
92
-
93
-
94
-
95
-
96
-
97
-
98
-
99
-
100
-
101
-
102
-
103
-
104
-
105
-
106
-
107
-
108
-
109
-
110
-
111
-
112
-
113
-
114
-
 115
115 -
 116
116 -
 117
117 -
 118
118 -
 119
119 -
 120
120 -
 121
121 -
 122
122 -
 123
123 -
 124
124 -
 125
125 -
126
-
127
-
128
-
129
-
130
-
131
-
132
-
133
-
134
-
135
-
136
-
137
-
138
-
139
-
140
-
141
-
142
-
143
-
144
-
145
-
146
-
147
-
148
-
149
-
150
-
151
-
152
-
153
-
154
-
155
-
156
-
157
-
158
-
159
-
160
-
161
-
162
-
163
-
164
-
165
-
166
-
167
-
168
-
169
-
170
-
171
-
172
-
173
-
174
-
175
-
176
-
177
-
178
-
179
-
180
-
181
-
182
-
183
-
184
-
185
-
186
-
187
-
188
-
189
-
190
-
191
-
192
-
193
-
194
-
195
-
196
-
197
-
198
-
199
-
200
-
201
-
202
-
203
-
204
-
205
-
206
-
207
-
208
-
209
-
210
-
211
-
212
-
213
-
214
-
215
-
216
-
217
-
218
-
219
-
220
-
221
-
222
 |
 |
