Sharp AR-M280 AR-M280 AR-M350 AR-M450 Operation Manual (for multifunction - Page 46
Printing method of hold job list, JOB RETENTION FUNCTIONWHICH REQUIRES PRINT START OPERATION FROMTHE
 |
View all Sharp AR-M280 manuals
Add to My Manuals
Save this manual to your list of manuals |
Page 46 highlights
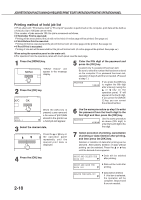
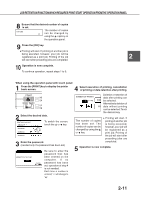
JOB RETENTION FUNCTIONWHICH REQUIRES PRINT START OPERATION FROMTHE OPERATION PANEL Printing method of hold job list If "Print after hold", "Print before hold" or "Proof print" operation is performed on the computer, print data will be held as a hold job. (Up to 100 jobs can be held.) If the number of jobs exceeds 100, the job is processed as follows. G If Hold After Print is executed: Printing will be executed but the job will not be held. (A notice page will be printed. See page xx.) G If Hold Before Print is executed: Printing will not be executed and the job will not be held. (A notice page will be printed. See page xx.) G If Proof Print is executed: Printing of one set will be executed but the job will not be held. (A notice page will be printed. See page xx.) When using the operation panel on the main unit: G For operation from the operation panel with touch panel, see the next page. 1 Press the [MENU] key. "PRINT HOLD" will appear in the message display. 2 Press the [OK] key. 5 Enter the fifth digit of the password and press the [OK] key. (needed only if a password has been set) Be sure to enter the number that has been entered on the computer. If no password has been set, operation of steps 5 and 6 is not needed. (Proceed to step 7.) PASSCODE If you press the [OK] key 0 to register the fifth digit after entering it using the or key on the operation panel, "0" will appear at the fourth digit. If you press the [BACK/ C] key, you can correct the entered number. ARAI WORD-1 When the [OK] key is pressed, a user name and a file name of print data stored in the printer as a hold job will appear. 3 Select the desired data. Press the or key on the operation panel repeatedly until the desired print data is displayed. 4 Press the [OK] key. 2-10 6 Use the same procedure as step 5 to enter the password from the fourth digit to the first digit and then press the [OK] key. PASSCODE Use the same procedure 0 as above (fifth digit) to enter the fourth digit to the first digit. 7 Select execution of printing, cancellation of printing or data retention after printing, and then press the [OK] key. Deletion or retention of data after printing can be selected. Alternatively deletion of data without printing can be selected. Press the or key until the desired choice appears PRINT AND DELETE THE DATA OK? G Data will be deleted after printing. PRINT AND SAVE THE DATA OK? G Data will be held after printing. DELETE THE DATA OK? G Data will be deleted. If this item is selected, the operation will be complete. Steps 8 and 9 are not needed.
-
 1
1 -
2
-
3
-
4
-
5
-
6
-
7
-
8
-
9
-
10
-
11
-
12
-
13
-
14
-
15
-
16
-
17
-
18
-
19
-
20
-
21
-
22
-
23
-
24
-
25
-
26
-
27
-
28
-
29
-
30
-
31
-
32
-
33
-
34
-
35
-
36
-
37
-
38
-
39
-
40
-
 41
41 -
 42
42 -
 43
43 -
 44
44 -
 45
45 -
 46
46 -
 47
47 -
 48
48 -
 49
49 -
 50
50 -
 51
51 -
52
-
53
-
54
-
55
-
56
-
57
-
58
-
59
-
60
-
61
-
62
-
63
-
64
-
65
-
66
-
67
-
68
-
69
-
70
-
71
-
72
-
73
-
74
-
75
-
76
-
77
-
78
-
79
-
80
-
81
-
82
-
83
-
84
-
85
-
86
-
87
-
88
-
89
-
90
-
91
-
92
-
93
-
94
-
95
-
96
-
97
-
98
-
99
-
100
-
101
-
102
-
103
-
104
-
105
-
106
-
107
-
108
-
109
-
110
-
111
-
112
-
113
-
114
-
115
-
116
-
117
-
118
 |
 |
