Sharp AR-M280 AR-M280 AR-M350 AR-M450 Operation Manual (for multifunction - Page 88
Using the saddle stitch finisher functions
 |
View all Sharp AR-M280 manuals
Add to My Manuals
Save this manual to your list of manuals |
Page 88 highlights
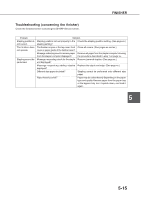
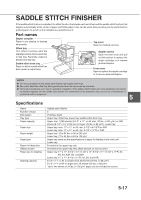
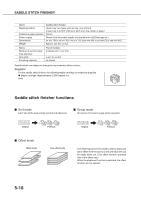
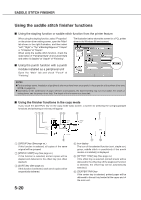
SADDLE STITCH FINISHER Using the saddle stitch finisher functions I Using the stapling function or saddle stitch function from the printer feature When using the stapling function, select "Properties" on the printer driver setting screen, open the "Main" tab shown in the right illustration, and then select "Left", "Right" or "Top" at Binding Edge and "1 Staple" or "2 Staples" at "Staple". When using the saddle stitch function, check the radio button of "Pamphlet Style" at Document Style and select "2 Staples" at "Staple" of "Finishing". The illustration below shows the screen for a PCL printer driver in the Windows 98 environment. I Using the punch function with a punch module installed as a peripheral unit Open the "Main" tab and check "Punch" at "Finishing". NOTES G For the settings above, installation of peripheral units must have been set properly in the properties of the printer driver (see NOTE on page 2-5). G Depending on the combination of paper selection and functions, the desired setting may not be possible. For details of setting items, see the printer driver help. The details of the functions are described. I Using the finisher functions in the copy mode If you touch the [OUTPUT] key on the copy mode basic screen, a screen for selecting the sort/group/staple functions and selecting an exit tray will appear. OUTPUT SORT STAPLE SORT GROUP OFFSET TRAY CENTER TRAY OFFSET OK PUNCH [GROUP] key (See page xx.) If this function is selected, all copies of the same original will be grouped. [STAPLE SORT] key (See page xx.) If this function is selected, sorted copies will be stapled and delivered to the offset tray. (not offset stacked) [SORT] key (See page xx.) If this function is selected, each set of copies will be sequentially delivered. 5-20 Icon display The icon of the selected function (sort, staple sort, group, saddle stitch or punch(only if the punch module is installed)) is displayed. [OFFSET TRAY] key (See page xx.) If the offset tray is selected, printed sheets will be delivered to the offset tray. (If the staple sort function is selected, the offset tray will be automatically selected.) [CENTER TRAY] key If the center tray is selected, printed paper will be delivered to the exit tray located at the upper part of the main unit.
-
 1
1 -
2
-
3
-
4
-
5
-
6
-
7
-
8
-
9
-
10
-
11
-
12
-
13
-
14
-
15
-
16
-
17
-
18
-
19
-
20
-
21
-
22
-
23
-
24
-
25
-
26
-
27
-
28
-
29
-
30
-
31
-
32
-
33
-
34
-
35
-
36
-
37
-
38
-
39
-
40
-
41
-
42
-
43
-
44
-
45
-
46
-
47
-
48
-
49
-
50
-
51
-
52
-
53
-
54
-
55
-
56
-
57
-
58
-
59
-
60
-
61
-
62
-
63
-
64
-
65
-
66
-
67
-
68
-
69
-
70
-
71
-
72
-
73
-
74
-
75
-
76
-
77
-
78
-
79
-
80
-
81
-
82
-
 83
83 -
 84
84 -
 85
85 -
 86
86 -
 87
87 -
 88
88 -
 89
89 -
 90
90 -
 91
91 -
 92
92 -
 93
93 -
94
-
95
-
96
-
97
-
98
-
99
-
100
-
101
-
102
-
103
-
104
-
105
-
106
-
107
-
108
-
109
-
110
-
111
-
112
-
113
-
114
-
115
-
116
-
117
-
118
 |
 |
