Sony DCR-DVD300 Operating Instructions - Page 100
Making a disc copy – Disc Dubbing, Making a disc copy
 |
UPC - 027242633155
View all Sony DCR-DVD300 manuals
Add to My Manuals
Save this manual to your list of manuals |
Page 100 highlights
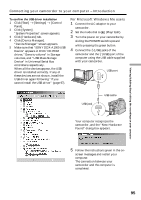
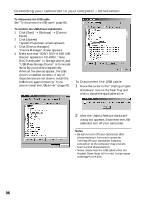
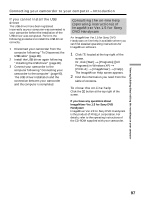
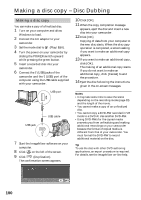
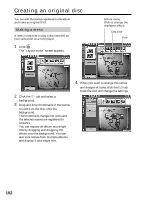
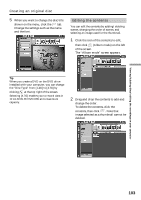
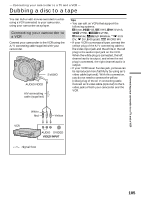
Making a disc copy - Disc Dubbing Making a disc copy You can make a copy of a finalized disc. 1 Turn on your computer and allow Windows to load. 2 Connect the AC adaptor to your camcorder. 3 Set the mode dial to (Play/Edit). 4 Turn the power on your camcorder by sliding the POWER switch upward while pressing the green button. 5 Insert a recorded disc into your camcorder. 6 Connect the (USB) jacks of the camcorder and the (USB) port of the computer using the USB cable supplied with your camcorder. USB port USB jack USB cable 7 Start the ImageMixer software on your computer. 8 Click on the left of the screen. 9 Click (Duplication). The confirmation screen appears. 10 Click [OK]. 11 When the copy completion message appears, eject the disc and insert a new disc into your camcorder. 12 Click [OK]. Copying of data from your computer to the new disc starts. When the disc copy operation is completed, a screen asking if you want to make an additional copy appears. 13 If you want to make an additional copy, click [OK]. The making of an additional copy starts. If you do not want to make an additional copy, click [Cancel] to end the procedure. 14 Eject the disc following the instructions given in the on-screen messages. Notes •It may take some time to save the scene depending on the recording mode (page 33) and the length of the movie. •You cannot make a copy of an unfinalized disc. •You cannot copy a DVD-RW recorded in VR mode to a DVD-R. Use another DVD-RW. •Using DVD-RWs for the copied media prevents you from unfinalizing and making additional recordings on your camcorder because the format of copied media is different from that of your camcorder. You must format the DVD-RW to record additional material on the disc. Tip To use the disc with other DVD authoring applications, an export procedure is required. For details, see the ImageMixer on-line help. 100
-
 1
1 -
2
-
3
-
4
-
5
-
6
-
7
-
8
-
9
-
10
-
11
-
12
-
13
-
14
-
15
-
16
-
17
-
18
-
19
-
20
-
21
-
22
-
23
-
24
-
25
-
26
-
27
-
28
-
29
-
30
-
31
-
32
-
33
-
34
-
35
-
36
-
37
-
38
-
39
-
40
-
41
-
42
-
43
-
44
-
45
-
46
-
47
-
48
-
49
-
50
-
51
-
52
-
53
-
54
-
55
-
56
-
57
-
58
-
59
-
60
-
61
-
62
-
63
-
64
-
65
-
66
-
67
-
68
-
69
-
70
-
71
-
72
-
73
-
74
-
75
-
76
-
77
-
78
-
79
-
80
-
81
-
82
-
83
-
84
-
85
-
86
-
87
-
88
-
89
-
90
-
91
-
92
-
93
-
94
-
 95
95 -
 96
96 -
 97
97 -
 98
98 -
 99
99 -
 100
100 -
 101
101 -
 102
102 -
 103
103 -
 104
104 -
 105
105 -
106
-
107
-
108
-
109
-
110
-
111
-
112
-
113
-
114
-
115
-
116
-
117
-
118
-
119
-
120
-
121
-
122
-
123
-
124
-
125
-
126
-
127
-
128
-
129
-
130
-
131
-
132
-
133
-
134
-
135
-
136
-
137
-
138
-
139
-
140
-
141
-
142
-
143
-
144
-
145
-
146
-
147
-
148
 |
 |
