Sony DCR-DVD300 Operating Instructions - Page 44
Adjusting the white balance manually, Notes, To cancel self-timer, OUTDOOR, INDOOR
 |
UPC - 027242633155
View all Sony DCR-DVD300 manuals
Add to My Manuals
Save this manual to your list of manuals |
Page 44 highlights
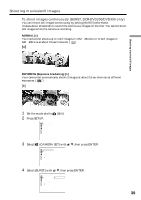
Shooting techniques to match your circumstances On shooting still images 1 Set the mode dial to (Still), then perform Steps 2 to 6 on the previous page . 2 Press PHOTO all the way down. Self-timer starts counting down with a beep. In the last 2 seconds of the countdown, the beep gets faster, then recording starts automatically 10 seconds after pressing PHOTO. Notes •When the self-timer recording is finished, the self-timer is automatically cancelled. •You can set self-timer during the standby only. •You cannot stop the count-down on shooting still images by pressing PHOTO. To cancel self-timer Set (CAMERA SET) - [SELFTIMER] to [OFF] in the SETUP display during the standby. 44 Adjusting the white balance manually Normally white balance is adjusted automatically. Adjust manually in the following cases: •When shooting at the place that the light condition changes such as a party hall. •When shooting a night scene and a neon sign. 1 Set the mode dial to (Movie) or (Still). 2 Press SETUP. 3 Select (MANUAL SET) with v/V, then press ENTER. MANUAL SET PROGRAM AE P EFFECT D EFFECT WHT BAL AUTO SHTR RETURN AUTO [ SETUP ] : END 4 Select [WHT BAL] with v/V, then press ENTER. MANUAL SET PROGRAM AE P EFFECT D EFFECT WHT BAL AUTO SHTR RETURN AUTO HOLD OUTDOOR INDOOR [ SETUP ] : END 5 Select the desired white balance with v/V, then press ENTER. HOLD : When recording a single-colored subject or background (OUTDOOR) : •When recording a sunset/sunrise, just after sunset, just before sunrise •When recording a neon signs, or fireworks •Under a color-matching fluorescent lamp n (INDOOR) : •Where lighting condition changes quickly •When recording in TV lighting in a studio •Under sodium lamps or mercury lamps 6 Press SETUP. The SETUP display disappears from the LCD display.
-
 1
1 -
2
-
3
-
4
-
5
-
6
-
7
-
8
-
9
-
10
-
11
-
12
-
13
-
14
-
15
-
16
-
17
-
18
-
19
-
20
-
21
-
22
-
23
-
24
-
25
-
26
-
27
-
28
-
29
-
30
-
31
-
32
-
33
-
34
-
35
-
36
-
37
-
38
-
 39
39 -
 40
40 -
 41
41 -
 42
42 -
 43
43 -
 44
44 -
 45
45 -
 46
46 -
 47
47 -
 48
48 -
 49
49 -
50
-
51
-
52
-
53
-
54
-
55
-
56
-
57
-
58
-
59
-
60
-
61
-
62
-
63
-
64
-
65
-
66
-
67
-
68
-
69
-
70
-
71
-
72
-
73
-
74
-
75
-
76
-
77
-
78
-
79
-
80
-
81
-
82
-
83
-
84
-
85
-
86
-
87
-
88
-
89
-
90
-
91
-
92
-
93
-
94
-
95
-
96
-
97
-
98
-
99
-
100
-
101
-
102
-
103
-
104
-
105
-
106
-
107
-
108
-
109
-
110
-
111
-
112
-
113
-
114
-
115
-
116
-
117
-
118
-
119
-
120
-
121
-
122
-
123
-
124
-
125
-
126
-
127
-
128
-
129
-
130
-
131
-
132
-
133
-
134
-
135
-
136
-
137
-
138
-
139
-
140
-
141
-
142
-
143
-
144
-
145
-
146
-
147
-
148
 |
 |
