Sony DCR-DVD300 Operating Instructions - Page 99
To save the scene on your, computer, To view the album, The selected scene is saved on your
 |
UPC - 027242633155
View all Sony DCR-DVD300 manuals
Add to My Manuals
Save this manual to your list of manuals |
Page 99 highlights
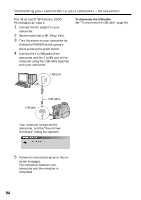
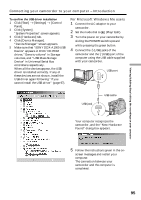
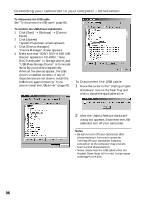
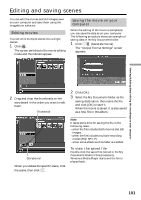
Viewing/dubbing discs/ editing the recordings on your computer Viewing scenes recorded on your computer 9 Double-click the scene to view from the thumbnails. The selected scene is temporarily copied to your computer and is displayed in the preview window. To return to the thumbnails list, click below right of the screen. To save the scene on your computer 1 Click the thumbnail of the scene to save. 2 Click . The selected scene is saved on your computer. Notes •It may take some time to save the scene depending on the recording mode (page 33) and the length of the movie. •Still images converted to a movie are not displayed. Tip An album is a unit to register and to manage the saved movies and still images saved from your camcorder to your computer. To view the album 1 Click . 2 Double-click the scene to view from the thumbnails. The selected scene is displayed. When you have selected a movie, click and start playback. To return to the thumbnails list, click at the top right of the screen. Notes •If you connect the USB cable before USB driver installation is complete, the USB driver will not be properly registered. Install the USB driver again following the steps in "If you cannot install the USB driver" (page 97). •When anything goes wrong with the operation, close all the software and restart them. 99
-
 1
1 -
2
-
3
-
4
-
5
-
6
-
7
-
8
-
9
-
10
-
11
-
12
-
13
-
14
-
15
-
16
-
17
-
18
-
19
-
20
-
21
-
22
-
23
-
24
-
25
-
26
-
27
-
28
-
29
-
30
-
31
-
32
-
33
-
34
-
35
-
36
-
37
-
38
-
39
-
40
-
41
-
42
-
43
-
44
-
45
-
46
-
47
-
48
-
49
-
50
-
51
-
52
-
53
-
54
-
55
-
56
-
57
-
58
-
59
-
60
-
61
-
62
-
63
-
64
-
65
-
66
-
67
-
68
-
69
-
70
-
71
-
72
-
73
-
74
-
75
-
76
-
77
-
78
-
79
-
80
-
81
-
82
-
83
-
84
-
85
-
86
-
87
-
88
-
89
-
90
-
91
-
92
-
93
-
 94
94 -
 95
95 -
 96
96 -
 97
97 -
 98
98 -
 99
99 -
 100
100 -
 101
101 -
 102
102 -
 103
103 -
 104
104 -
105
-
106
-
107
-
108
-
109
-
110
-
111
-
112
-
113
-
114
-
115
-
116
-
117
-
118
-
119
-
120
-
121
-
122
-
123
-
124
-
125
-
126
-
127
-
128
-
129
-
130
-
131
-
132
-
133
-
134
-
135
-
136
-
137
-
138
-
139
-
140
-
141
-
142
-
143
-
144
-
145
-
146
-
147
-
148
 |
 |