Sony DCR-DVD300 Operating Instructions - Page 21
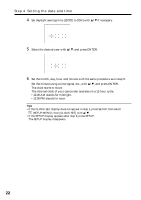
Step 4 Setting the date and time
 |
UPC - 027242633155
View all Sony DCR-DVD300 manuals
Add to My Manuals
Save this manual to your list of manuals |
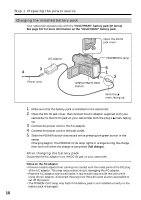
Page 21 highlights
Getting Started Step 4 Setting the date and time Set the date and time when you use your camcorder for the first time. Set the geographical area, then the daylight savings time, the year, the month, the day, the hour and then the minute, in that order. If you do not use your camcorder for about 3 months, the date and time settings may be cleared from memory (bars may appear) because the built-in rechargeable battery in your camcorder will have been discharged during that time. In that case, charge the built-in rechargeable battery by connecting the AC adaptor, and set the date and time again (page 16, 132). SETUP button POWER switch b/v/V/B/ENTER buttons 1 Open the LCD screen while pressing OPEN. 2 Turn the power on by sliding the POWER switch upward while pressing the green button. The CLOCK SET display appears. CLOCK SET AREA 26 GMT -5.0 New Yor k,Bogota DST OFF DATE Y M D : [ ENTER ] : NEXT ITEM 3 Select the desired geographical area with v/V, and press ENTER. CLOCK SET AREA 26 GMT -5.0 N ew Yo r k , B o g o t a DST OFF ON DATE Y M D : [ ENTER ] : NEXT ITEM 21
-
 1
1 -
2
-
3
-
4
-
5
-
6
-
7
-
8
-
9
-
10
-
11
-
12
-
13
-
14
-
15
-
 16
16 -
 17
17 -
 18
18 -
 19
19 -
 20
20 -
 21
21 -
 22
22 -
 23
23 -
 24
24 -
 25
25 -
 26
26 -
27
-
28
-
29
-
30
-
31
-
32
-
33
-
34
-
35
-
36
-
37
-
38
-
39
-
40
-
41
-
42
-
43
-
44
-
45
-
46
-
47
-
48
-
49
-
50
-
51
-
52
-
53
-
54
-
55
-
56
-
57
-
58
-
59
-
60
-
61
-
62
-
63
-
64
-
65
-
66
-
67
-
68
-
69
-
70
-
71
-
72
-
73
-
74
-
75
-
76
-
77
-
78
-
79
-
80
-
81
-
82
-
83
-
84
-
85
-
86
-
87
-
88
-
89
-
90
-
91
-
92
-
93
-
94
-
95
-
96
-
97
-
98
-
99
-
100
-
101
-
102
-
103
-
104
-
105
-
106
-
107
-
108
-
109
-
110
-
111
-
112
-
113
-
114
-
115
-
116
-
117
-
118
-
119
-
120
-
121
-
122
-
123
-
124
-
125
-
126
-
127
-
128
-
129
-
130
-
131
-
132
-
133
-
134
-
135
-
136
-
137
-
138
-
139
-
140
-
141
-
142
-
143
-
144
-
145
-
146
-
147
-
148
 |
 |
