Sony DCR-DVD300 Operating Instructions - Page 35
Notes, The CAPTURE indicator appears after the shutter sounds. Recording is
 |
UPC - 027242633155
View all Sony DCR-DVD300 manuals
Add to My Manuals
Save this manual to your list of manuals |
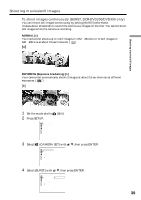
Page 35 highlights
Shooting movies/still images 7 Press and hold PHOTO down lightly, then check out the image. When the AE/AF lock indicator (z) stops flashing and remains on, your camcorder is ready for shooting. The brightness of the image and focus are adjusted, are targeted for the middle of the image, and are set. Number of recorded images FINE 0 -R VIDEO Shooting movies/still images When you press PHOTO of the Remote Commander, the image appeared on the LCD display is recorded at once. 8 Press PHOTO all the way down. The CAPTURE indicator appears after the shutter sounds. Recording is complete when the bar scroll indicator disappears. FINE -R VIDEO The image displayed when you pressed PHOTO all the way down in this step will be recorded. Notes •When the mode dial is set to (Still), the following functions do not work. - Wide mode - Digital zoom - SteadyShot - Super NightShot - Color Slow Shutter - Fader - Picture effect - Digital effect - The Sports lesson feature of [PROGRAM AE] (The indicator flashes.) •When the Access/Open lamp lights in red, data is being recorded on the disc. Take note of the following when data is being recorded, or the data and the disc may be damaged. - Do not shock or vibrate the camcorder. - Do not turn the power off. - Do not remove the battery pack or disconnect the AC adaptor. - Do not open the disc cover. •When you press PHOTO lightly in step 7, the image momentarily flickers. This is not a malfunction. •You can neither turn off the power nor press PHOTO while CAPTURE appears on the LCD display. •The time to access the disc for recording may vary depending on the type of still images. 35
-
 1
1 -
2
-
3
-
4
-
5
-
6
-
7
-
8
-
9
-
10
-
11
-
12
-
13
-
14
-
15
-
16
-
17
-
18
-
19
-
20
-
21
-
22
-
23
-
24
-
25
-
26
-
27
-
28
-
29
-
 30
30 -
 31
31 -
 32
32 -
 33
33 -
 34
34 -
 35
35 -
 36
36 -
 37
37 -
 38
38 -
 39
39 -
 40
40 -
41
-
42
-
43
-
44
-
45
-
46
-
47
-
48
-
49
-
50
-
51
-
52
-
53
-
54
-
55
-
56
-
57
-
58
-
59
-
60
-
61
-
62
-
63
-
64
-
65
-
66
-
67
-
68
-
69
-
70
-
71
-
72
-
73
-
74
-
75
-
76
-
77
-
78
-
79
-
80
-
81
-
82
-
83
-
84
-
85
-
86
-
87
-
88
-
89
-
90
-
91
-
92
-
93
-
94
-
95
-
96
-
97
-
98
-
99
-
100
-
101
-
102
-
103
-
104
-
105
-
106
-
107
-
108
-
109
-
110
-
111
-
112
-
113
-
114
-
115
-
116
-
117
-
118
-
119
-
120
-
121
-
122
-
123
-
124
-
125
-
126
-
127
-
128
-
129
-
130
-
131
-
132
-
133
-
134
-
135
-
136
-
137
-
138
-
139
-
140
-
141
-
142
-
143
-
144
-
145
-
146
-
147
-
148
 |
 |
