Sony DCR-DVD300 Operating Instructions - Page 101
Editing and saving scenes, Editing movies, Saving the movie on your computer
 |
UPC - 027242633155
View all Sony DCR-DVD300 manuals
Add to My Manuals
Save this manual to your list of manuals |
Page 101 highlights
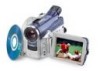
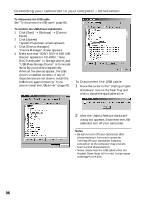
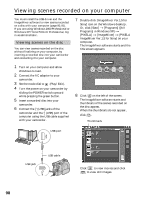
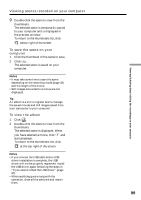
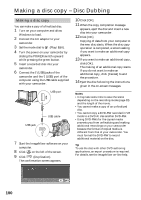
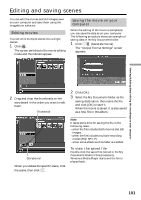
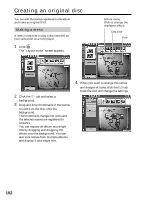
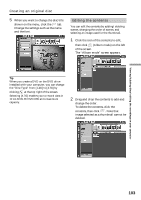
Editing and saving scenes You can edit the movies and still images save on your computer and save them using the ImageMixer software. Editing movies You can unite multiple scenes into a single scenes. 1 Click . The screen switches to the movie editing mode and thumbnails appear. Saving the movie on your computer When the editing of the movie is completed, you can save the data as on your computer. The following procedure shows an example of saving data in the My Documents folder. 1 Click (Generate movie). The "Output Format Settings" screen appears. Viewing/dubbing discs/ editing the recordings on your computer 2 Drag and drop the thumbnails on the storyboard in the order you want to edit them. Thumbnail 2 Click [OK]. 3 Select the My Documents folder as the saving destination, then name the file and click [OK] to save it. When the movie is saved, it is also saved as a new file in the album. Storyboard When you delete the specific scene, click the scene, then click . Note It takes some time for saving the file in the following cases: - when the file includes both movies and still images. - when the file includes multiple recording modes (HQ/SP/LP). - when some effects such as fader are added. To view the saved file Double-click the saved file (stored in the My Documents folder in this procedure). Windows Media Player starts and the file is played back. 101
-
 1
1 -
2
-
3
-
4
-
5
-
6
-
7
-
8
-
9
-
10
-
11
-
12
-
13
-
14
-
15
-
16
-
17
-
18
-
19
-
20
-
21
-
22
-
23
-
24
-
25
-
26
-
27
-
28
-
29
-
30
-
31
-
32
-
33
-
34
-
35
-
36
-
37
-
38
-
39
-
40
-
41
-
42
-
43
-
44
-
45
-
46
-
47
-
48
-
49
-
50
-
51
-
52
-
53
-
54
-
55
-
56
-
57
-
58
-
59
-
60
-
61
-
62
-
63
-
64
-
65
-
66
-
67
-
68
-
69
-
70
-
71
-
72
-
73
-
74
-
75
-
76
-
77
-
78
-
79
-
80
-
81
-
82
-
83
-
84
-
85
-
86
-
87
-
88
-
89
-
90
-
91
-
92
-
93
-
94
-
95
-
 96
96 -
 97
97 -
 98
98 -
 99
99 -
 100
100 -
 101
101 -
 102
102 -
 103
103 -
 104
104 -
 105
105 -
 106
106 -
107
-
108
-
109
-
110
-
111
-
112
-
113
-
114
-
115
-
116
-
117
-
118
-
119
-
120
-
121
-
122
-
123
-
124
-
125
-
126
-
127
-
128
-
129
-
130
-
131
-
132
-
133
-
134
-
135
-
136
-
137
-
138
-
139
-
140
-
141
-
142
-
143
-
144
-
145
-
146
-
147
-
148
 |
 |