Sony DCR-DVD300 Operating Instructions - Page 43
Shooting with the subject checking the image – Mirror mode, Self-timer recording, On shooting movies
 |
UPC - 027242633155
View all Sony DCR-DVD300 manuals
Add to My Manuals
Save this manual to your list of manuals |
Page 43 highlights
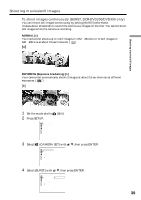
Shooting techniques to match your circumstances Shooting with the subject checking the image - Mirror mode The picture on the LCD display is a mirrorimage. However, the picture will be normal when recorded. 2 Self-timer recording You can also use the Remote Commander for this operation. PHOTO button Shooting movies/still images 3 1 Set the mode dial to (Movie) or (Still). 2 Extend the viewfinder. 3 Open and rotate the LCD screen 180 degrees. The indicator appears in the viewfinder and on the LCD display. When the mode dial is set to (Movie), Xz appears in the standby mode, and z appears in the recording mode. Some indicators appear mirrorreversed and others are not displayed. Note The viewfinder automatically turns off when using the LCD display, except in the mirror mode. START/ STOP button SETUP button On shooting movies 1 Set the mode dial to (Movie). 2 Press SETUP. 3 Select (CAMERA SET) with v/V, then press ENTER. 4 Select [SELFTIMER] withv/V, then press ENTER. CAMERA SET SELFTIMER D ZOOM 16 : 9WIDE STEADYSHOT N. S. LIGHT RETURN OFF ON [ SETUP ] : END 5 Select [ON] with v/V, then press ENTER. 6 Press SETUP. The SETUP display disappears from the LCD display and the (self-timer) indicator appears. 7 Press START/STOP. Self-timer starts counting down with a beep. In the last 2 seconds of the countdown, the beep gets faster, then recording starts automatically 10 seconds after pressing START/STOP. Tip To stop the countdown, press START/STOP. To restart the countdown, press START/STOP again. 43
-
 1
1 -
2
-
3
-
4
-
5
-
6
-
7
-
8
-
9
-
10
-
11
-
12
-
13
-
14
-
15
-
16
-
17
-
18
-
19
-
20
-
21
-
22
-
23
-
24
-
25
-
26
-
27
-
28
-
29
-
30
-
31
-
32
-
33
-
34
-
35
-
36
-
37
-
 38
38 -
 39
39 -
 40
40 -
 41
41 -
 42
42 -
 43
43 -
 44
44 -
 45
45 -
 46
46 -
 47
47 -
 48
48 -
49
-
50
-
51
-
52
-
53
-
54
-
55
-
56
-
57
-
58
-
59
-
60
-
61
-
62
-
63
-
64
-
65
-
66
-
67
-
68
-
69
-
70
-
71
-
72
-
73
-
74
-
75
-
76
-
77
-
78
-
79
-
80
-
81
-
82
-
83
-
84
-
85
-
86
-
87
-
88
-
89
-
90
-
91
-
92
-
93
-
94
-
95
-
96
-
97
-
98
-
99
-
100
-
101
-
102
-
103
-
104
-
105
-
106
-
107
-
108
-
109
-
110
-
111
-
112
-
113
-
114
-
115
-
116
-
117
-
118
-
119
-
120
-
121
-
122
-
123
-
124
-
125
-
126
-
127
-
128
-
129
-
130
-
131
-
132
-
133
-
134
-
135
-
136
-
137
-
138
-
139
-
140
-
141
-
142
-
143
-
144
-
145
-
146
-
147
-
148
 |
 |
