Sony DCR-DVD300 Operating Instructions - Page 79
ERASE?, To erase all the scenes at the same time, To cancel erasing
 |
UPC - 027242633155
View all Sony DCR-DVD300 manuals
Add to My Manuals
Save this manual to your list of manuals |
Page 79 highlights
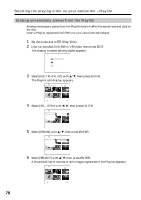
Using the disc in VR mode (DVD-RWs only) Selecting the playing order on your camcorder - Playlist 7 Select the scene to be erased with b/v/V/B, then press ENTER. The selected scene is marked with . Repeat this step to erase multiple scenes. EDIT EXEC. ERASE RET. 003 JAN 1 03 1/1 6:10PM Pressing N starts playback of the selected scene. Press x to return to the display to select other scenes. 8 Select [EXEC.] with b/v/V/B, then press ENTER. The confirmation display appears. EDIT ERASE ERASE? EXEC. RET. 9 Select [EXEC.] with b/B, then press ENTER. The selected scenes are erased from the Playlist. It returns to the Playlist edit display when the erasing is completed. To erase all the scenes at the same time Select [SELECT ALL] in step 6 then perform step 9. To cancel erasing Press EDIT in any step from 3 to 8. Tip Still images registered in a Playlist are converted to a movie file. If you erase still images from a Playlist, the converted movie file from still images still remains. To delete a converted movie file from the movie folder, see "Deleting movies/still images" (page 87). 79
-
 1
1 -
2
-
3
-
4
-
5
-
6
-
7
-
8
-
9
-
10
-
11
-
12
-
13
-
14
-
15
-
16
-
17
-
18
-
19
-
20
-
21
-
22
-
23
-
24
-
25
-
26
-
27
-
28
-
29
-
30
-
31
-
32
-
33
-
34
-
35
-
36
-
37
-
38
-
39
-
40
-
41
-
42
-
43
-
44
-
45
-
46
-
47
-
48
-
49
-
50
-
51
-
52
-
53
-
54
-
55
-
56
-
57
-
58
-
59
-
60
-
61
-
62
-
63
-
64
-
65
-
66
-
67
-
68
-
69
-
70
-
71
-
72
-
73
-
 74
74 -
 75
75 -
 76
76 -
 77
77 -
 78
78 -
 79
79 -
 80
80 -
 81
81 -
 82
82 -
 83
83 -
 84
84 -
85
-
86
-
87
-
88
-
89
-
90
-
91
-
92
-
93
-
94
-
95
-
96
-
97
-
98
-
99
-
100
-
101
-
102
-
103
-
104
-
105
-
106
-
107
-
108
-
109
-
110
-
111
-
112
-
113
-
114
-
115
-
116
-
117
-
118
-
119
-
120
-
121
-
122
-
123
-
124
-
125
-
126
-
127
-
128
-
129
-
130
-
131
-
132
-
133
-
134
-
135
-
136
-
137
-
138
-
139
-
140
-
141
-
142
-
143
-
144
-
145
-
146
-
147
-
148
 |
 |
