Sony HDR HC9 Operating Guide - Page 105
Attaching the supplied lens hood, Quick Reference
 |
UPC - 027242727717
View all Sony HDR HC9 manuals
Add to My Manuals
Save this manual to your list of manuals |
Page 105 highlights
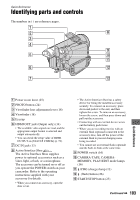
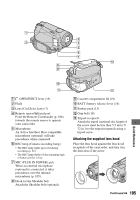
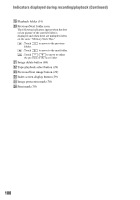
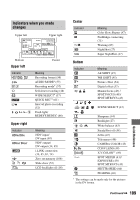
1 3 2 4 5 6 7 qs 8 9 q; qa A OPEN/EJECT lever (19) B Flash C Lens (Carl Zeiss Lens) (7) D Remote sensor/Infrared port Point the Remote Commander (p. 106) towards the remote sensor to operate your camcorder. E Microphone An Active Interface Shoe compatible microphone (optional) will take precedence when connected. F REC lamp (Camera recording lamp) • The REC lamp lights up in red during recording (p. 61). • The REC lamp flashes if the remaining tape or battery power is low. G MIC (PLUG IN POWER) jack When an external microphone (optional) is connected, it takes precedence over the internal microphone (p. 105). H Hook for the Shoulder belt Attach the Shoulder belt (optional). qd I Cassette compartment lid (19) J BATT (battery release) lever (14) K Battery pack (13) L Grip belt (18) M Tripod receptacle Attach the tripod (optional: the length of the screw must be less than 5.5 mm (7/ 32 in.)) to the tripod receptacle using a tripod screw. Attaching the supplied lens hood Place the lens hood against the lens hood receptacle of the camcorder, and turn it in the direction of the arrow. Continued , 105 Quick Reference
-
 1
1 -
2
-
3
-
4
-
5
-
6
-
7
-
8
-
9
-
10
-
11
-
12
-
13
-
14
-
15
-
16
-
17
-
18
-
19
-
20
-
21
-
22
-
23
-
24
-
25
-
26
-
27
-
28
-
29
-
30
-
31
-
32
-
33
-
34
-
35
-
36
-
37
-
38
-
39
-
40
-
41
-
42
-
43
-
44
-
45
-
46
-
47
-
48
-
49
-
50
-
51
-
52
-
53
-
54
-
55
-
56
-
57
-
58
-
59
-
60
-
61
-
62
-
63
-
64
-
65
-
66
-
67
-
68
-
69
-
70
-
71
-
72
-
73
-
74
-
75
-
76
-
77
-
78
-
79
-
80
-
81
-
82
-
83
-
84
-
85
-
86
-
87
-
88
-
89
-
90
-
91
-
92
-
93
-
94
-
95
-
96
-
97
-
98
-
99
-
 100
100 -
 101
101 -
 102
102 -
 103
103 -
 104
104 -
 105
105 -
 106
106 -
 107
107 -
 108
108 -
 109
109 -
 110
110 -
111
-
112
-
113
-
114
-
115
-
116
-
117
-
118
-
119
-
120
-
121
-
122
-
123
-
124
-
125
-
126
-
127
-
128
 |
 |
