Sony HDR HC9 Operating Guide - Page 46
Tele Macro, Peaking, Flash Set
 |
UPC - 027242727717
View all Sony HDR HC9 manuals
Add to My Manuals
Save this manual to your list of manuals |
Page 46 highlights
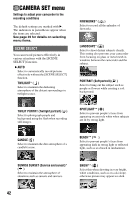
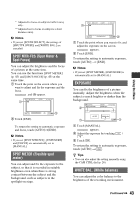
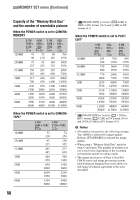
CAMERA SET menu (Continued) 1 Touch [MANUAL]. 9 appears. 2 Touch (focusing on close subjects)/ (focusing on distant subjects) to sharpen the focus. appears when the focus cannot be adjusted any closer, and appears when the focus cannot be adjusted farther away. If you touch , appears, and you can adjust the focus to infinity. 3 Touch . To adjust the focus automatically, touch [AUTO] t . b Notes • The minimum possible distance between camcorder and subject while maintaining sharp focus is about 1 cm (about 13/32 in.) for wide angle and about 80 cm (about 2 5/8 feet) for telephoto. z Tips • It is easier to focus on the subject by moving the power zoom lever towards T (telephoto) to adjust the focus, then towards W (wide angle) to adjust the zoom for recording. When you want to record a subject at close range, move the power zoom lever to W (wide angle), then adjust the focus. • You can also adjust the focus manually using the CAM CTRL dial (p. 26). TELE MACRO This is useful to shoot small subjects, such as flowers or insects. You can blur out backgrounds and the subject stands out clearer. When you set [TELE MACRO] to [ON] ( ), the zoom (p. 25) moves to the top of the T (Telephoto) side automatically and allows for recording subjects at a close distance down to about 45 cm (17 3/4 in.). 46 To cancel, touch [OFF], or zoom to wideangle (W side). b Notes • When recording a distant subject, focusing may be difficult and can take some time. • Adjust the focus manually ([FOCUS], p. 45) when it is hard to focus automatically. PEAKING The outline of the subject on the screen is enhanced for easier focusing. You can set the outline color displayed on the screen during peaking. If you change the default setting, is displayed on the screen. B OFF Do not set this function. WHITE Makes the outline color white. RED Makes the outline color red. YELLOW Makes the outline color yellow. z Tips • The peaking is not recorded on the tape. FLASH SET You can set this function when you use the built-in flash or an external flash (optional) that is compatible with your camcorder. x FLASH LEVEL HIGH( ) Makes the flash level higher. B NORMAL( ) LOW( ) Makes the flash level lower.
-
 1
1 -
2
-
3
-
4
-
5
-
6
-
7
-
8
-
9
-
10
-
11
-
12
-
13
-
14
-
15
-
16
-
17
-
18
-
19
-
20
-
21
-
22
-
23
-
24
-
25
-
26
-
27
-
28
-
29
-
30
-
31
-
32
-
33
-
34
-
35
-
36
-
37
-
38
-
39
-
40
-
 41
41 -
 42
42 -
 43
43 -
 44
44 -
 45
45 -
 46
46 -
 47
47 -
 48
48 -
 49
49 -
 50
50 -
 51
51 -
52
-
53
-
54
-
55
-
56
-
57
-
58
-
59
-
60
-
61
-
62
-
63
-
64
-
65
-
66
-
67
-
68
-
69
-
70
-
71
-
72
-
73
-
74
-
75
-
76
-
77
-
78
-
79
-
80
-
81
-
82
-
83
-
84
-
85
-
86
-
87
-
88
-
89
-
90
-
91
-
92
-
93
-
94
-
95
-
96
-
97
-
98
-
99
-
100
-
101
-
102
-
103
-
104
-
105
-
106
-
107
-
108
-
109
-
110
-
111
-
112
-
113
-
114
-
115
-
116
-
117
-
118
-
119
-
120
-
121
-
122
-
123
-
124
-
125
-
126
-
127
-
128
 |
 |
