Sony HDR HC9 Operating Guide - Page 38
When connecting to your TV viaVCR, When your TV is monaural When your, TV has only one audio input - video resolution
 |
UPC - 027242727717
View all Sony HDR HC9 manuals
Add to My Manuals
Save this manual to your list of manuals |
Page 38 highlights
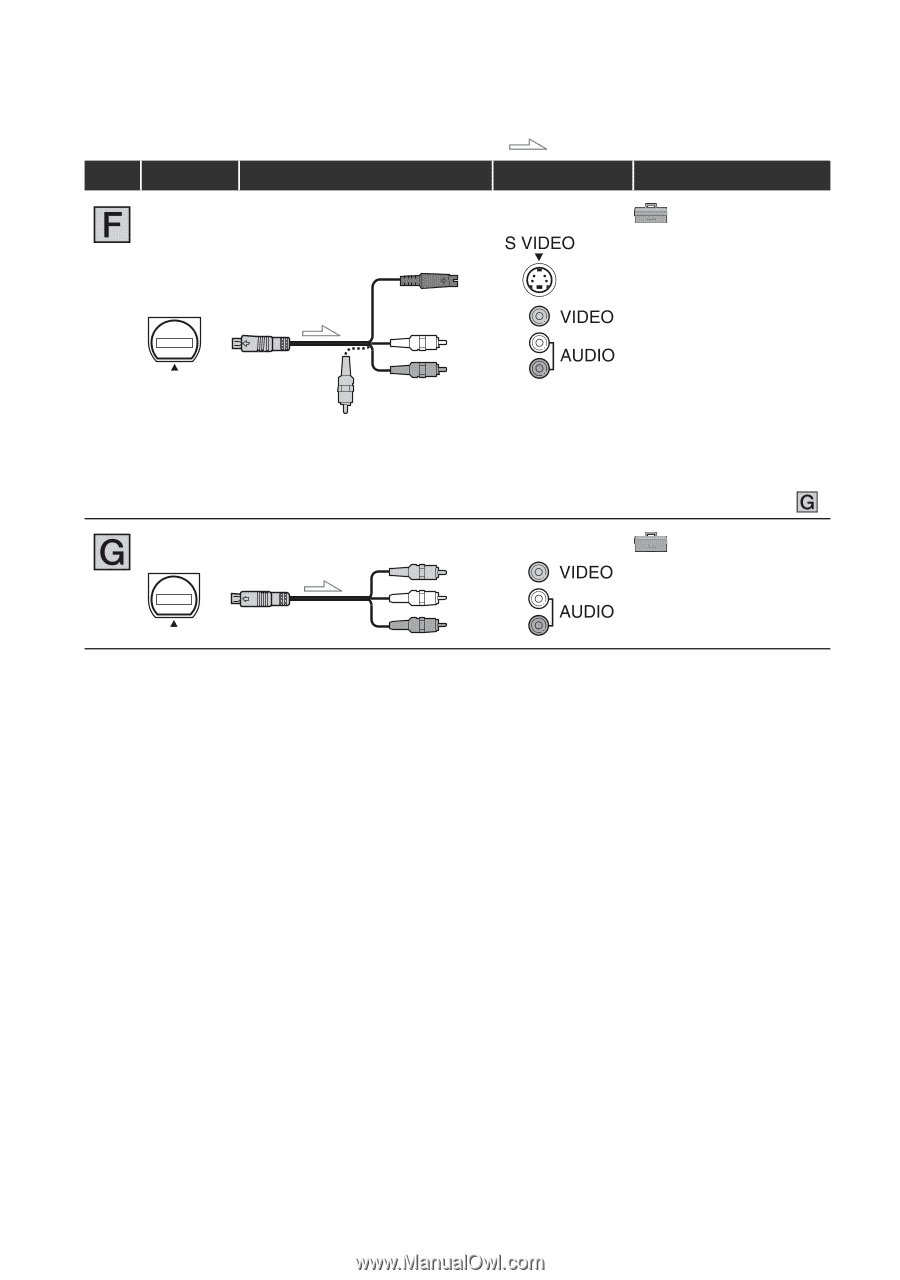
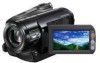
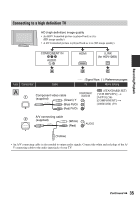
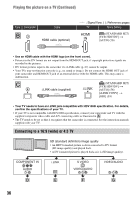
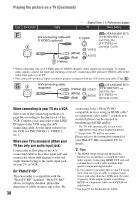
Playing the picture on a TV (Continued) Type Camcorder Cable A/V connecting cable with S VIDEO (optional) 2 (Yellow) (White) (Red) : Signal flow, ( ): Reference pages TV Menu Setting (STANDARD SET) [VCR HDV/DV] t [AUTO] (56) [TV TYPE] t [16:9]/[4:3] (59) • When connecting only an S VIDEO plug (S VIDEO channel), audio signals are not output. To output audio signals, connect the white and red plugs of the A/V connecting cable with an S VIDEO cable to the audio input jack of your TV. • This connection produces higher resolution pictures compared with the A/V connecting cable (Type ). 2 A/V connecting cable (supplied) (Yellow) (White) (Red) (STANDARD SET) [VCR HDV/DV] t [AUTO] (56) [TV TYPE] t [16:9]/[4:3] (59) When connecting to your TV via a VCR Select one of the connecting methods on page 64, according to the input jack of the VCR. Connect your camcorder to the LINE IN input on the VCR using the A/V connecting cable. Set the input selector on the VCR to LINE (VIDEO 1, VIDEO 2, etc.). When your TV is monaural (When your TV has only one audio input jack) Connect the yellow plug of the A/V connecting cable to the video input jack and connect the white (left channel) or the red (right channel) plug to the audio input jack of your TV or VCR. On"PhotoTV HD" This camcorder is compatible with the "PhotoTV HD" standard. "PhotoTV HD" allows for highly-detailed, photo-like depiction of subtle textures and colors. By 38 connecting Sony's PhotoTV HDcompatible devices using an HDMI cable* or component video cable**, a whole new world of photos can be enjoyed in breathtaking full HD quality. * The TV will automatically switch to the appropriate mode when displaying photos. ** Setup of the TV will be necessary. Please refer to the instruction manual of your PhotoTV HD-compatible TV for details. z Tips • The HDMI (High Definition Multimedia Interface) is an interface to send both video/ audio signals. Connecting HDMI OUT jack and external device with a cable supplies high quality images and digital audio. • If you connect your camcorder to your TV using more than one type of cable to output images from a jack other than the i.LINK jack, the order of priority of the output signals is as follows: HDMI t component video t S VIDEO t audio/video. • See page 95 for the details of i.LINK.
-
 1
1 -
2
-
3
-
4
-
5
-
6
-
7
-
8
-
9
-
10
-
11
-
12
-
13
-
14
-
15
-
16
-
17
-
18
-
19
-
20
-
21
-
22
-
23
-
24
-
25
-
26
-
27
-
28
-
29
-
30
-
31
-
32
-
 33
33 -
 34
34 -
 35
35 -
 36
36 -
 37
37 -
 38
38 -
 39
39 -
 40
40 -
 41
41 -
 42
42 -
 43
43 -
44
-
45
-
46
-
47
-
48
-
49
-
50
-
51
-
52
-
53
-
54
-
55
-
56
-
57
-
58
-
59
-
60
-
61
-
62
-
63
-
64
-
65
-
66
-
67
-
68
-
69
-
70
-
71
-
72
-
73
-
74
-
75
-
76
-
77
-
78
-
79
-
80
-
81
-
82
-
83
-
84
-
85
-
86
-
87
-
88
-
89
-
90
-
91
-
92
-
93
-
94
-
95
-
96
-
97
-
98
-
99
-
100
-
101
-
102
-
103
-
104
-
105
-
106
-
107
-
108
-
109
-
110
-
111
-
112
-
113
-
114
-
115
-
116
-
117
-
118
-
119
-
120
-
121
-
122
-
123
-
124
-
125
-
126
-
127
-
128
 |
 |