Sony HDR HC9 Operating Guide - Page 76
Installing the First Step Guide and software Continued, Read [License Agreement], select
 |
UPC - 027242727717
View all Sony HDR HC9 manuals
Add to My Manuals
Save this manual to your list of manuals |
Page 76 highlights
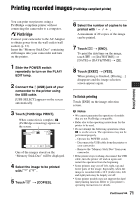
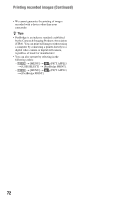
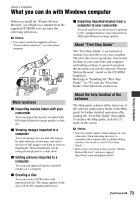
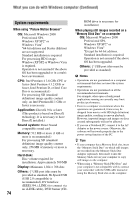
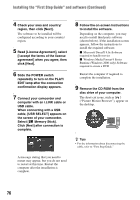
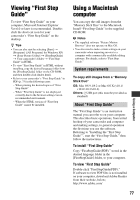
Installing the "First Step Guide" and software (Continued) 4 Check your area and country/ region, then click [Next]. The software to be installed will be configured according to your country/ region. 5 Read [License Agreement], select [I accept the terms of the license agreement] when you agree, then click [Next]. 6 Slide the POWER switch repeatedly to turn on the PLAY/ EDIT lamp after the connection confirmation display appears. 7 Connect your camcorder and computer with an i.LINK cable or USB cable. When connecting with a USB cable, [USB SELECT] appears on the screen of your camcorder. Select [ Memory Stick]. Click [Next] after connection is complete. 8 Follow the on-screen instructions to install the software. Depending on the computer, you may need to install third party software (shown below). If the installation screen appears, follow the instructions to install the required software. x Microsoft DirectX 9.0c-Software required to handle movies x Windows Media Format 9 Series Runtime (Windows 2000 only)-Software required to create a DVD Restart the computer if required to complete the installation. 9 Remove the CD-ROM from the disc drive of your computer. The short-cut icons, such as [ ] ("Picture Motion Browser"), appear on the desktop. z Tips • For the information about disconnecting the cable, refer to "First Step Guide." A message stating that you need to restart may appear, but you do not need to restart at this time. Restart the computer after the installation is complete. 76
-
 1
1 -
2
-
3
-
4
-
5
-
6
-
7
-
8
-
9
-
10
-
11
-
12
-
13
-
14
-
15
-
16
-
17
-
18
-
19
-
20
-
21
-
22
-
23
-
24
-
25
-
26
-
27
-
28
-
29
-
30
-
31
-
32
-
33
-
34
-
35
-
36
-
37
-
38
-
39
-
40
-
41
-
42
-
43
-
44
-
45
-
46
-
47
-
48
-
49
-
50
-
51
-
52
-
53
-
54
-
55
-
56
-
57
-
58
-
59
-
60
-
61
-
62
-
63
-
64
-
65
-
66
-
67
-
68
-
69
-
70
-
 71
71 -
 72
72 -
 73
73 -
 74
74 -
 75
75 -
 76
76 -
 77
77 -
 78
78 -
 79
79 -
 80
80 -
 81
81 -
82
-
83
-
84
-
85
-
86
-
87
-
88
-
89
-
90
-
91
-
92
-
93
-
94
-
95
-
96
-
97
-
98
-
99
-
100
-
101
-
102
-
103
-
104
-
105
-
106
-
107
-
108
-
109
-
110
-
111
-
112
-
113
-
114
-
115
-
116
-
117
-
118
-
119
-
120
-
121
-
122
-
123
-
124
-
125
-
126
-
127
-
128
 |
 |