Sony HDR HC9 Operating Guide - Page 19
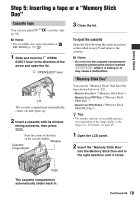
Step 5: Inserting a tape or a “Memory Stick Duo”, Cassette tape, Memory Stick Duo
 |
UPC - 027242727717
View all Sony HDR HC9 manuals
Add to My Manuals
Save this manual to your list of manuals |
Page 19 highlights
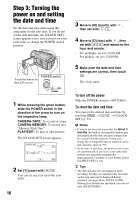
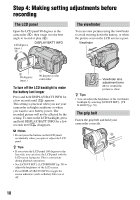
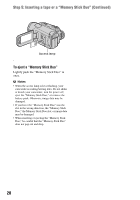
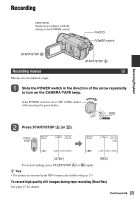
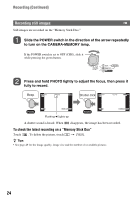
Getting Started Step 5: Inserting a tape or a "Memory Stick Duo" Cassette tape You can use mini DV (p. 91). cassettes only b Notes • The recordable time varies depending on [ REC MODE] (p. 57). 1 Slide and hold the OPEN/ EJECT lever in the direction of the arrow and open the lid. OPEN/EJECT lever Lid The cassette compartment automatically comes out and opens up. 2 Insert a cassette with its window facing outwards, then press . Push the center of the back of the cassette lightly. Window Cassette compartment 3 Close the lid. To eject the cassette Open the lid following the same procedure as described in step 1 and remove the cassette. b Notes • Do not force the cassette compartment closed by pressing the portion marked {DO NOT PUSH} while it is sliding in. It may cause a malfunction. "Memory Stick Duo" You can use "Memory Stick" that have the logo shown below (p. 92). - ("Memory Stick Duo") - PRO Duo") ("Memory Stick - PRO-HG Duo") ("Memory Stick z Tips • The number and time of recordable pictures vary depending on the image quality or the image size. For details, see page 49. 1 Open the LCD panel. 2 Insert the "Memory Stick Duo" into the Memory Stick Duo slot in the right direction until it clicks. The cassette compartment automatically slides back in. Continued , 19
-
 1
1 -
2
-
3
-
4
-
5
-
6
-
7
-
8
-
9
-
10
-
11
-
12
-
13
-
 14
14 -
 15
15 -
 16
16 -
 17
17 -
 18
18 -
 19
19 -
 20
20 -
 21
21 -
 22
22 -
 23
23 -
 24
24 -
25
-
26
-
27
-
28
-
29
-
30
-
31
-
32
-
33
-
34
-
35
-
36
-
37
-
38
-
39
-
40
-
41
-
42
-
43
-
44
-
45
-
46
-
47
-
48
-
49
-
50
-
51
-
52
-
53
-
54
-
55
-
56
-
57
-
58
-
59
-
60
-
61
-
62
-
63
-
64
-
65
-
66
-
67
-
68
-
69
-
70
-
71
-
72
-
73
-
74
-
75
-
76
-
77
-
78
-
79
-
80
-
81
-
82
-
83
-
84
-
85
-
86
-
87
-
88
-
89
-
90
-
91
-
92
-
93
-
94
-
95
-
96
-
97
-
98
-
99
-
100
-
101
-
102
-
103
-
104
-
105
-
106
-
107
-
108
-
109
-
110
-
111
-
112
-
113
-
114
-
115
-
116
-
117
-
118
-
119
-
120
-
121
-
122
-
123
-
124
-
125
-
126
-
127
-
128
 |
 |