Sony HDR HC9 Operating Guide - Page 27
Recording in dark places (NightShot), Adjusting the exposure for backlit subjects, Recording
 |
UPC - 027242727717
View all Sony HDR HC9 manuals
Add to My Manuals
Save this manual to your list of manuals |
Page 27 highlights
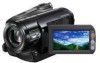
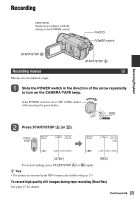
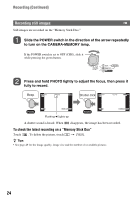
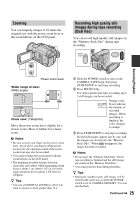
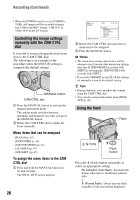
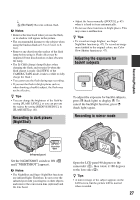
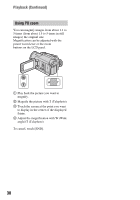
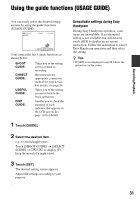
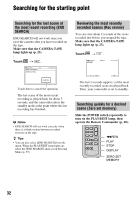
Recording/Playback r (No flash): Records without flash. b Notes • Remove the lens hood when you use the flash, or its shadow will appear in the picture. • The recommended distance to the subject when using the built-in flash is 0.3 to 2.5 m (1 to 8 feet). • Remove any dust from the surface of the flash lamp before using it. Flash effect may be impaired if heat discoloration or dust obscures the lamp. • The /CHG (charge) lamp flickers when charging the flash, and remains lit when the flash charge is ready. (In [STBY] of the CAMERA-TAPE mode, it takes a while to fully charge the flash.) • You cannot use the flash during tape recording. • If you use the flash in bright places such as when shooting a backlit subject, the flash may not be effective. z Tips • You can change the brightness of the flash by setting [FLASH LEVEL], or you can prevent the redeye by setting [REDEYE REDUC], in [FLASH SET] (p. 46). Recording in dark places (NightShot) • Adjust the focus manually ([FOCUS], p. 45) when it is hard to focus automatically. • Do not use these functions in bright places. This may cause a malfunction. z Tips • To record an image brighter, use Super NightShot function (p. 47). To record an image more faithful to the original colors, use Color Slow Shutter function (p. 47). Adjusting the exposure for backlit subjects To adjust the exposure for backlit subjects, press . (back light) to display .. To cancel the backlight function, press . (back light) again. Recording in mirror mode Infrared port Set the NIGHTSHOT switch to ON ( and ["NIGHTSHOT"] appear). b Notes • The NightShot and Super NightShot functions use infrared light. Therefore, do not cover the infrared port with your fingers or other objects and remove the conversion lens (optional) and the lens hood. Open the LCD panel 90 degrees to the camcorder (1), then rotate it 180 degrees to the lens side (2). z Tips • A mirror-image of the subject appears on the LCD screen, but the picture will be normal when recorded. 27
-
 1
1 -
2
-
3
-
4
-
5
-
6
-
7
-
8
-
9
-
10
-
11
-
12
-
13
-
14
-
15
-
16
-
17
-
18
-
19
-
20
-
21
-
 22
22 -
 23
23 -
 24
24 -
 25
25 -
 26
26 -
 27
27 -
 28
28 -
 29
29 -
 30
30 -
 31
31 -
 32
32 -
33
-
34
-
35
-
36
-
37
-
38
-
39
-
40
-
41
-
42
-
43
-
44
-
45
-
46
-
47
-
48
-
49
-
50
-
51
-
52
-
53
-
54
-
55
-
56
-
57
-
58
-
59
-
60
-
61
-
62
-
63
-
64
-
65
-
66
-
67
-
68
-
69
-
70
-
71
-
72
-
73
-
74
-
75
-
76
-
77
-
78
-
79
-
80
-
81
-
82
-
83
-
84
-
85
-
86
-
87
-
88
-
89
-
90
-
91
-
92
-
93
-
94
-
95
-
96
-
97
-
98
-
99
-
100
-
101
-
102
-
103
-
104
-
105
-
106
-
107
-
108
-
109
-
110
-
111
-
112
-
113
-
114
-
115
-
116
-
117
-
118
-
119
-
120
-
121
-
122
-
123
-
124
-
125
-
126
-
127
-
128
 |
 |