Sony HDR HC9 Operating Guide - Page 16
Step 3: Turning the power on and setting the date and time, To turn off the power - handycam
 |
UPC - 027242727717
View all Sony HDR HC9 manuals
Add to My Manuals
Save this manual to your list of manuals |
Page 16 highlights
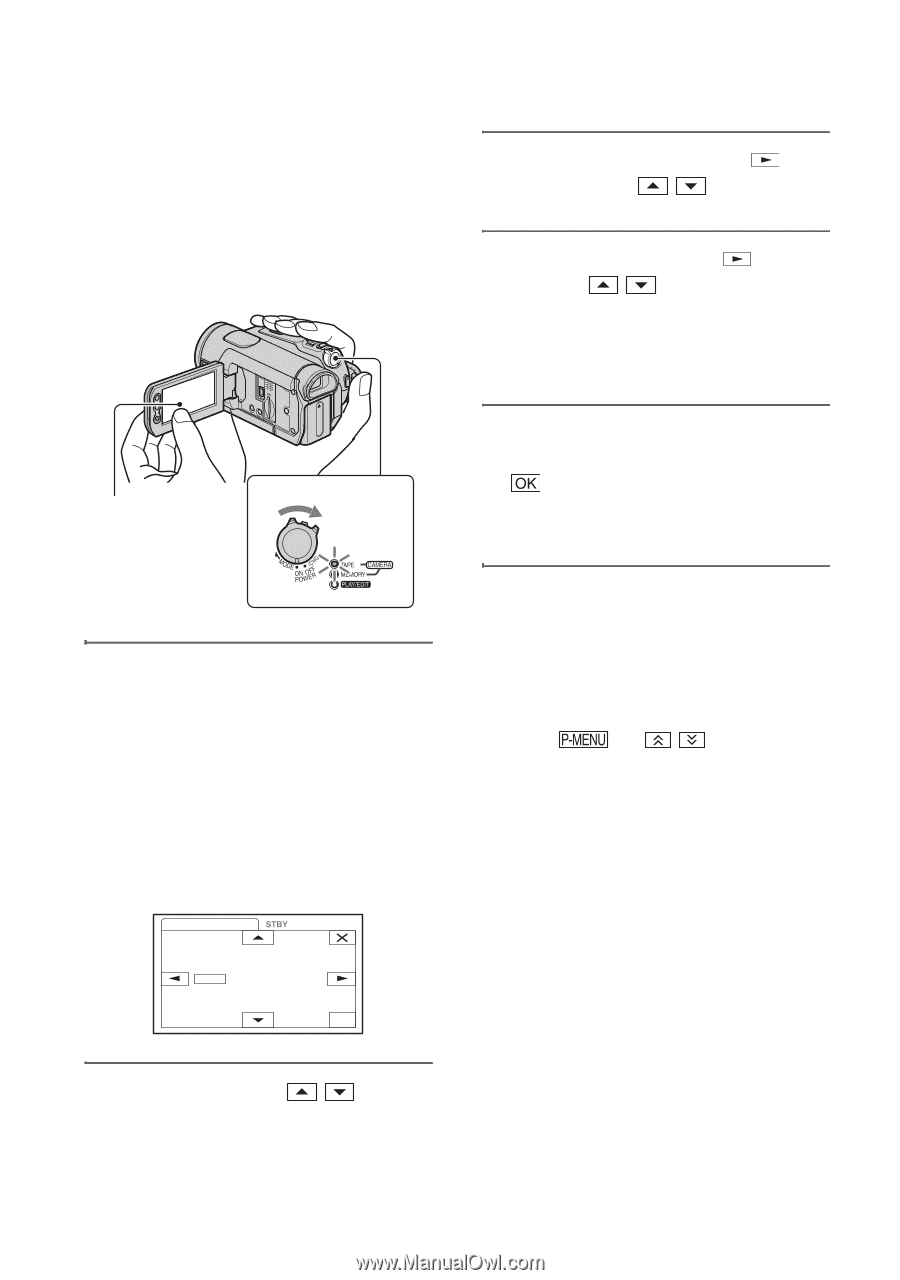
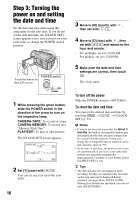
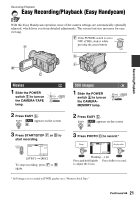
Step 3: Turning the power on and setting the date and time Set the date and time when using this camcorder for the first time. If you do not set the date and time, the [CLOCK SET] screen appears every time you turn on your camcorder or change the POWER switch position. POWER switch Touch the button on the LCD screen. 3 Move to [M] (month) with , then set with / . 4 Move to [D] (day) with , then set with / and repeat for the hour and minute. For midnight, set it to 12:00 AM. For midday, set it to 12:00 PM. 5 Make sure the date and time settings are correct, then touch . The clock starts. 1 While pressing the green button, slide the POWER switch in the direction of the arrow to turn on the respective lamp. CAMERA-TAPE: To record on a tape. CAMERA-MEMORY: To record on a "Memory Stick Duo." PLAY/EDIT: To play or edit pictures. The [CLOCK SET] screen appears. CLOCK SET -:--:-- Y MD 2008 JAN 1 12:00 AM OK 2 Set [Y] (year) with / . You can set any year up to the year 2079. 16 To turn off the power Slide the POWER switch to OFF (CHG). To reset the date and time You can set the desired date and time by touching t / t [CLOCK SET] (p. 39). b Notes • If you do not use your camcorder for about 3 months, the built-in rechargeable battery gets discharged and the date and time settings may be cleared from the memory. In that case, charge the rechargeable battery and then set the date and time again (p. 99). • At the time of purchase, the power is set to turn off automatically if you leave your camcorder without any operation attempted for approximately 5 minutes, to save battery power ([A.SHUT OFF], p. 61). z Tips • The date and time are not displayed while recording, but they are automatically recorded on the tape, and can be displayed during playback (see page 60 for [DATA CODE] (During Easy Handycam operation, you can set only [DATE/TIME])).
-
 1
1 -
2
-
3
-
4
-
5
-
6
-
7
-
8
-
9
-
10
-
 11
11 -
 12
12 -
 13
13 -
 14
14 -
 15
15 -
 16
16 -
 17
17 -
 18
18 -
 19
19 -
 20
20 -
 21
21 -
22
-
23
-
24
-
25
-
26
-
27
-
28
-
29
-
30
-
31
-
32
-
33
-
34
-
35
-
36
-
37
-
38
-
39
-
40
-
41
-
42
-
43
-
44
-
45
-
46
-
47
-
48
-
49
-
50
-
51
-
52
-
53
-
54
-
55
-
56
-
57
-
58
-
59
-
60
-
61
-
62
-
63
-
64
-
65
-
66
-
67
-
68
-
69
-
70
-
71
-
72
-
73
-
74
-
75
-
76
-
77
-
78
-
79
-
80
-
81
-
82
-
83
-
84
-
85
-
86
-
87
-
88
-
89
-
90
-
91
-
92
-
93
-
94
-
95
-
96
-
97
-
98
-
99
-
100
-
101
-
102
-
103
-
104
-
105
-
106
-
107
-
108
-
109
-
110
-
111
-
112
-
113
-
114
-
115
-
116
-
117
-
118
-
119
-
120
-
121
-
122
-
123
-
124
-
125
-
126
-
127
-
128
 |
 |