Sony PEG-NX73V CLIE Handbook - Page 108
Setup, Local, Serial port, Infrared Monitor, Control Panel, Speed, As Fast As Possible
 |
View all Sony PEG-NX73V manuals
Add to My Manuals
Save this manual to your list of manuals |
Page 108 highlights
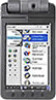
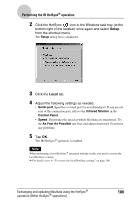
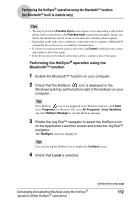
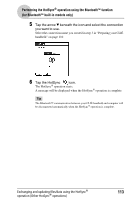
Performing the IR HotSync® operation 2 Click the HotSync icon in the Windows task tray (at the bottom right of the taskbar) once again and select Setup from the shortcut menu. The Setup dialog box is displayed. 3 Click the Local tab. 4 Adjust the following settings as needed. • Serial port: Specifies a virtual port for an infrared port. If you are not sure of the connection port, refer to the Infrared Monitor in the Control Panel. • Speed: Determines the speed at which files/data are transferred. Try the As Fast As Possible rate first, and adjust downward if you have any problems. 5 Tap OK. The IR HotSync® operation is enabled. Note When performing a local HotSync® operation with the cradle, you need to restore the local HotSync settings. b For details, refer to "To restore the local HotSync settings" on page 109. Exchanging and updating files/data using the HotSync® 108 operation (Other HotSync® operations)
-
 1
1 -
2
-
3
-
4
-
5
-
6
-
7
-
8
-
9
-
10
-
11
-
12
-
13
-
14
-
15
-
16
-
17
-
18
-
19
-
20
-
21
-
22
-
23
-
24
-
25
-
26
-
27
-
28
-
29
-
30
-
31
-
32
-
33
-
34
-
35
-
36
-
37
-
38
-
39
-
40
-
41
-
42
-
43
-
44
-
45
-
46
-
47
-
48
-
49
-
50
-
51
-
52
-
53
-
54
-
55
-
56
-
57
-
58
-
59
-
60
-
61
-
62
-
63
-
64
-
65
-
66
-
67
-
68
-
69
-
70
-
71
-
72
-
73
-
74
-
75
-
76
-
77
-
78
-
79
-
80
-
81
-
82
-
83
-
84
-
85
-
86
-
87
-
88
-
89
-
90
-
91
-
92
-
93
-
94
-
95
-
96
-
97
-
98
-
99
-
100
-
101
-
102
-
 103
103 -
 104
104 -
 105
105 -
 106
106 -
 107
107 -
 108
108 -
 109
109 -
 110
110 -
 111
111 -
 112
112 -
 113
113 -
114
-
115
-
116
-
117
-
118
-
119
-
120
-
121
-
122
-
123
-
124
-
125
-
126
-
127
-
128
-
129
-
130
-
131
-
132
-
133
-
134
-
135
-
136
-
137
-
138
-
139
-
140
-
141
-
142
-
143
-
144
-
145
-
146
-
147
-
148
-
149
-
150
-
151
-
152
-
153
-
154
-
155
-
156
-
157
-
158
-
159
-
160
-
161
-
162
-
163
-
164
-
165
-
166
-
167
-
168
-
169
-
170
-
171
-
172
-
173
-
174
-
175
-
176
-
177
-
178
-
179
-
180
-
181
-
182
-
183
-
184
-
185
-
186
-
187
-
188
-
189
-
190
-
191
-
192
-
193
-
194
-
195
-
196
-
197
-
198
-
199
-
200
 |
 |