Sony PEG-NX73V CLIE Handbook - Page 118
Selecting the conduits for a modem HotSync, operation, Conduit Setup, Options
 |
View all Sony PEG-NX73V manuals
Add to My Manuals
Save this manual to your list of manuals |
Page 118 highlights
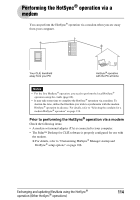
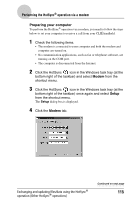
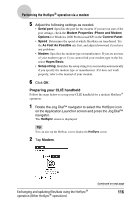
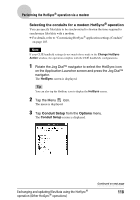
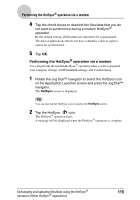
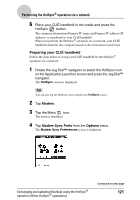
Performing the HotSync® operation via a modem Selecting the conduits for a modem HotSync® operation You can specify files/data to be synchronized to shorten the time required to synchronize files/data with a modem. b For details, refer to "Customizing HotSync® application settings (Conduit)" on page 103. Note If your CLIÉ handheld settings do not match those made in the Change HotSync Action window, the operation complies with the CLIÉ handheld's configurations. 1 Rotate the Jog Dial™ navigator to select the HotSync icon on the Application Launcher screen and press the Jog Dial™ navigator. The HotSync screen is displayed. Tip You can also tap the HotSync icon to display the HotSync screen. 2 Tap the Menu icon. The menu is displayed. 3 Tap Conduit Setup from the Options menu. The Conduit Setup screen is displayed. Exchanging and updating files/data using the HotSync® operation (Other HotSync® operations) Continued on next page 118
-
 1
1 -
2
-
3
-
4
-
5
-
6
-
7
-
8
-
9
-
10
-
11
-
12
-
13
-
14
-
15
-
16
-
17
-
18
-
19
-
20
-
21
-
22
-
23
-
24
-
25
-
26
-
27
-
28
-
29
-
30
-
31
-
32
-
33
-
34
-
35
-
36
-
37
-
38
-
39
-
40
-
41
-
42
-
43
-
44
-
45
-
46
-
47
-
48
-
49
-
50
-
51
-
52
-
53
-
54
-
55
-
56
-
57
-
58
-
59
-
60
-
61
-
62
-
63
-
64
-
65
-
66
-
67
-
68
-
69
-
70
-
71
-
72
-
73
-
74
-
75
-
76
-
77
-
78
-
79
-
80
-
81
-
82
-
83
-
84
-
85
-
86
-
87
-
88
-
89
-
90
-
91
-
92
-
93
-
94
-
95
-
96
-
97
-
98
-
99
-
100
-
101
-
102
-
103
-
104
-
105
-
106
-
107
-
108
-
109
-
110
-
111
-
112
-
 113
113 -
 114
114 -
 115
115 -
 116
116 -
 117
117 -
 118
118 -
 119
119 -
 120
120 -
 121
121 -
 122
122 -
 123
123 -
124
-
125
-
126
-
127
-
128
-
129
-
130
-
131
-
132
-
133
-
134
-
135
-
136
-
137
-
138
-
139
-
140
-
141
-
142
-
143
-
144
-
145
-
146
-
147
-
148
-
149
-
150
-
151
-
152
-
153
-
154
-
155
-
156
-
157
-
158
-
159
-
160
-
161
-
162
-
163
-
164
-
165
-
166
-
167
-
168
-
169
-
170
-
171
-
172
-
173
-
174
-
175
-
176
-
177
-
178
-
179
-
180
-
181
-
182
-
183
-
184
-
185
-
186
-
187
-
188
-
189
-
190
-
191
-
192
-
193
-
194
-
195
-
196
-
197
-
198
-
199
-
200
 |
 |