Toshiba Excite AT205-SP0101M User Guide 1 - Page 91
Operation of files/folders, Action bar
 |
View all Toshiba Excite AT205-SP0101M manuals
Add to My Manuals
Save this manual to your list of manuals |
Page 91 highlights
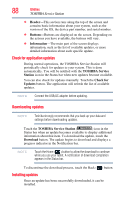
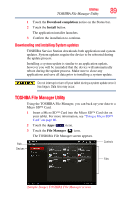
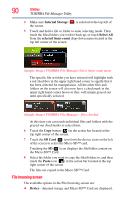
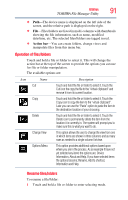
Utilities TOSHIBA File Manager Utility 91 ❖ Path-The device name is displayed on the left side of the screen, and the relative path is displayed on the right. ❖ File-Files/folders are listed in multi-columns with thumbnails showing the file information, such as name, modified date/time, etc. The selected files/folders are tagged in red. ❖ Action bar-You can create folders, change views and manipulate files from this menu bar. Operation of files/folders Touch and hold a file or folder to select it. This will change the action bar at the top of the screen to provide the options you can use for file or folder manipulation. The available options are: Icon Name Description Cut Copy Delete Change View Options Menu Touch and hold the file or folder to select it. Touch the Cut icon the copy the file to the "virtual clipboard" and remove it from its current location. Touch and hold the file or folder to select it. Touch the Copy icon to copy the item to the "virtual clipboard". Later you can use the "Paste" option to paste the item to the destination location of your choosing. Touch and hold the file or folder to select it. Touch the Delete icon to permanently delete the item from the location it is currently in. The system will prompt you to make sure this is what you want to do. This option allows the user to change the view from one in which items are shown in three columns and as many rows as needed to a single column list view. This option provides additional options based upon where you are in the process. As an example if have not yet selected any items the options are; Device Information, About and Help. If you have selected items the options become; Rename, Add to shortcut, Information and Help. Rename files/folders To rename a file/folder: 1 Touch and hold a file or folder to enter selecting mode.
-
 1
1 -
2
-
3
-
4
-
5
-
6
-
7
-
8
-
9
-
10
-
11
-
12
-
13
-
14
-
15
-
16
-
17
-
18
-
19
-
20
-
21
-
22
-
23
-
24
-
25
-
26
-
27
-
28
-
29
-
30
-
31
-
32
-
33
-
34
-
35
-
36
-
37
-
38
-
39
-
40
-
41
-
42
-
43
-
44
-
45
-
46
-
47
-
48
-
49
-
50
-
51
-
52
-
53
-
54
-
55
-
56
-
57
-
58
-
59
-
60
-
61
-
62
-
63
-
64
-
65
-
66
-
67
-
68
-
69
-
70
-
71
-
72
-
73
-
74
-
75
-
76
-
77
-
78
-
79
-
80
-
81
-
82
-
83
-
84
-
85
-
 86
86 -
 87
87 -
 88
88 -
 89
89 -
 90
90 -
 91
91 -
 92
92 -
 93
93 -
 94
94 -
 95
95 -
 96
96 -
97
-
98
-
99
-
100
-
101
-
102
-
103
-
104
-
105
-
106
-
107
-
108
-
109
-
110
-
111
-
112
-
113
-
114
-
115
-
116
-
117
 |
 |