Western Digital My Cloud PR4100 User Manual - Page 14
Pre-installation Instructions, Handling Precautions, Back Panel Ethernet Network LEDs
 |
View all Western Digital My Cloud PR4100 manuals
Add to My Manuals
Save this manual to your list of manuals |
Page 14 highlights
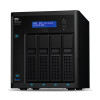
PRODUCT OVERVIEW Back Panel Ethernet (Network) LEDs The following table describes the network and activity LEDs: Note: Looking at the Ethernet port with the cable latch on top, the top-right LED is the Link LED, and the top-left LED is the Activity LED. State Link down Link up - 10/100 Mbps connection LED Link Link Appearance Off Yellow Link up - 1000 Mbps Link connection Green Link idle Link busy Activity Solid Activity Green - Blinks State Description Cable or device is not plugged in, or other end of link is not operational. Cable is plugged in, and both ends of the link have successfully established communications. 10/100 Mbps network connection. Cable is plugged in, and both ends of the link have successfully established communications. 10/100/1000 Mbps network connection. Active communication is not in progress. Active communication is in progress. Pre-installation Instructions Before beginning installation, select a suitable location for your device to obtain maximum efficiency. Place it in a location that is: Near a grounded power outlet. Clean and dust free. On a stable surface free from vibration. Well ventilated, with nothing blocking or covering the slots and openings. Away from fields of electrical devices such as air conditioners, radio, and television receivers. Handling Precautions WD products are precision instruments and must be handled with care during unpacking and installation. Rough handling, shock, or vibration can damage the device drives. Observe the following precautions when unpacking and installing your external storage product: Do not drop or jolt the device. Do not move the device while it is powered on. Do not use this product as a portable device. Do not remove both data drives at the same time. This will cause your device to become unresponsive. MY CLOUD USER MANUAL 8
-
 1
1 -
2
-
3
-
4
-
5
-
6
-
7
-
8
-
 9
9 -
 10
10 -
 11
11 -
 12
12 -
 13
13 -
 14
14 -
 15
15 -
 16
16 -
 17
17 -
 18
18 -
 19
19 -
20
-
21
-
22
-
23
-
24
-
25
-
26
-
27
-
28
-
29
-
30
-
31
-
32
-
33
-
34
-
35
-
36
-
37
-
38
-
39
-
40
-
41
-
42
-
43
-
44
-
45
-
46
-
47
-
48
-
49
-
50
-
51
-
52
-
53
-
54
-
55
-
56
-
57
-
58
-
59
-
60
-
61
-
62
-
63
-
64
-
65
-
66
-
67
-
68
-
69
-
70
-
71
-
72
-
73
-
74
-
75
-
76
-
77
-
78
-
79
-
80
-
81
-
82
-
83
-
84
-
85
-
86
-
87
-
88
-
89
-
90
-
91
-
92
-
93
-
94
-
95
-
96
-
97
-
98
-
99
-
100
-
101
-
102
-
103
-
104
-
105
-
106
-
107
-
108
-
109
-
110
-
111
-
112
-
113
-
114
-
115
-
116
-
117
-
118
-
119
-
120
-
121
 |
 |
