Western Digital My Cloud PR4100 User Manual - Page 16
Physically Connecting your Device, Cloud Online Setup.
 |
View all Western Digital My Cloud PR4100 manuals
Add to My Manuals
Save this manual to your list of manuals |
Page 16 highlights
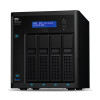
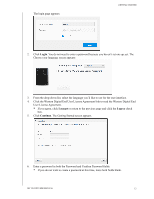
Physically Connecting your Device GETTING STARTED Follow the steps below to connect the My Cloud device to a home or small office network. Important: To avoid overheating, make sure the device is upright as shown in the illustration above and nothing is blocking or covering the slots and openings on the top and bottom of the device. In the event of overheating, the device will perform a safe shutdown, interrupting all processes currently being performed. If this occurs, data may be lost. Important: The provided shielded Ethernet cable must be used between the unit and network connection to comply with FCC Part 15 Class B and EN-55022/ EN-55024 Class B. 1. Using the Ethernet cable, connect one end of the Ethernet cable to the Ethernet port located on the back of the device. 2. Connect the other end of the Ethernet cable directly into a router or network switch port. 3. Connect one end of the power adapter into the power supply socket on the back of the device. 4. Plug the other end of the power adapter into a power outlet. The unit powers up automatically. Important: Wait for the My Cloud device to finish powering up (approximately three minutes) before configuring it. You will know it is ready when the power LED stops blinking and turns a solid blue. 5. When the power LED on your device turns a solid blue, continue to Getting Started with My Cloud Online Setup. MY CLOUD USER MANUAL 10
-
 1
1 -
2
-
3
-
4
-
5
-
6
-
7
-
8
-
9
-
10
-
 11
11 -
 12
12 -
 13
13 -
 14
14 -
 15
15 -
 16
16 -
 17
17 -
 18
18 -
 19
19 -
 20
20 -
 21
21 -
22
-
23
-
24
-
25
-
26
-
27
-
28
-
29
-
30
-
31
-
32
-
33
-
34
-
35
-
36
-
37
-
38
-
39
-
40
-
41
-
42
-
43
-
44
-
45
-
46
-
47
-
48
-
49
-
50
-
51
-
52
-
53
-
54
-
55
-
56
-
57
-
58
-
59
-
60
-
61
-
62
-
63
-
64
-
65
-
66
-
67
-
68
-
69
-
70
-
71
-
72
-
73
-
74
-
75
-
76
-
77
-
78
-
79
-
80
-
81
-
82
-
83
-
84
-
85
-
86
-
87
-
88
-
89
-
90
-
91
-
92
-
93
-
94
-
95
-
96
-
97
-
98
-
99
-
100
-
101
-
102
-
103
-
104
-
105
-
106
-
107
-
108
-
109
-
110
-
111
-
112
-
113
-
114
-
115
-
116
-
117
-
118
-
119
-
120
-
121
 |
 |
