Western Digital My Cloud PR4100 User Manual - Page 80
Services, Clearing your Recycle Bin
 |
View all Western Digital My Cloud PR4100 manuals
Add to My Manuals
Save this manual to your list of manuals |
Page 80 highlights
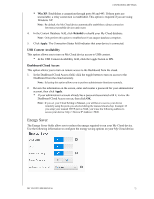
CONFIGURING SETTINGS 3. From the Select a Share drop-down list, select a share you'd like to use to back up your Mac data. 4. In the Maximum Size field, move the slider to indicate the maximum value you'd like to use for your backup. Note: Increasing the maximum backup value after the initial backup has no effect on existing backups. WD recommends leaving this setting at the maximum value for your initial backup. After the first backup is complete, you can change the backup size by dragging the Maximum Size slider. 5. Click Save. Important: Once Time Machine begins to back up your files to a selected share, we recommend that you continue to back up to that share. Switching shares generates a new backup file which will not contain your previously saved information. Services This section of the General screen enables or disables the Recycle service available on your My Cloud device. Clearing your Recycle Bin Use the following steps to clear your device's Recycle Bin. Automatically Clear Recycle Bin: 1. In the Services > Recycle Bin area, click Configure. 2. In the Auto clear Recycle Bin field, click the toggle button to turn ON the Auto clear function. 3. In the File retention time field, enter the number of days you'd like to retain your data before it is cleared. 4. Click Save. Manually Clear Recycle Bin: 1. To manually clear the Recycle Bin on your device, click Clear. 2. Click OK to confirm. MY CLOUD USER MANUAL 74
-
 1
1 -
2
-
3
-
4
-
5
-
6
-
7
-
8
-
9
-
10
-
11
-
12
-
13
-
14
-
15
-
16
-
17
-
18
-
19
-
20
-
21
-
22
-
23
-
24
-
25
-
26
-
27
-
28
-
29
-
30
-
31
-
32
-
33
-
34
-
35
-
36
-
37
-
38
-
39
-
40
-
41
-
42
-
43
-
44
-
45
-
46
-
47
-
48
-
49
-
50
-
51
-
52
-
53
-
54
-
55
-
56
-
57
-
58
-
59
-
60
-
61
-
62
-
63
-
64
-
65
-
66
-
67
-
68
-
69
-
70
-
71
-
72
-
73
-
74
-
 75
75 -
 76
76 -
 77
77 -
 78
78 -
 79
79 -
 80
80 -
 81
81 -
 82
82 -
 83
83 -
 84
84 -
 85
85 -
86
-
87
-
88
-
89
-
90
-
91
-
92
-
93
-
94
-
95
-
96
-
97
-
98
-
99
-
100
-
101
-
102
-
103
-
104
-
105
-
106
-
107
-
108
-
109
-
110
-
111
-
112
-
113
-
114
-
115
-
116
-
117
-
118
-
119
-
120
-
121
 |
 |
