ZyXEL ARMOR G1 User Guide - Page 13
Resetting the NBG6818, 1.5.1 How to Use the RESET Button, 1.6 The WPS Button
 |
View all ZyXEL ARMOR G1 manuals
Add to My Manuals
Save this manual to your list of manuals |
Page 13 highlights
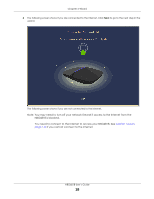
Chapter 1 Introduction 1.5 Resetting the NBG6818 If you forget your password or IP address, or you cannot access the Web Configurator, insert a thin object into the Reset hole on the side of the NBG6818 to reload the factory-default configuration file. This means that you will lose all settings that you had previously saved. 1.5.1 How to Use the RESET Button 1 Make sure the power LED is on. 2 Locate the Reset hole. 3 Insert a thin object into the Reset hole for longer than eight seconds to reset the NBG6818 back to its factory-default configuration. 1.6 The WPS Button Your NBG6818 supports Wi-Fi Protected Setup (WPS), which is an easy way to set up a secure wireless network. WPS is an industry standard specification, defined by the Wi-Fi Alliance. WPS allows you to quickly set up a wireless network with strong security, without having to configure security settings manually. Each WPS connection works between two devices. Both devices must support WPS (check each device's documentation to make sure). Depending on the devices you have, you can either press a button (on the device itself, or in its configuration utility) or enter a PIN (a unique Personal Identification Number that allows one device to authenticate the other) in each of the two devices. When WPS is activated on a device, it has two minutes to find another device that also has WPS activated. Then, the two devices connect and set up a secure network by themselves. You can use the WPS button in the Web Configurator of the NBG6818 to activate WPS in order to quickly set up a wireless network with strong security. 1 Make sure the power LED is on (not blinking). 2 Open the Web Configurator. 3 Click Settings > WiFi > WPS, and the press the WPS button. 4 Press the WPS button on another WPS-enabled device within range of the NBG6818. Note: You must activate WPS in the NBG6818 and in another wireless device within two minutes of each other. For more information on using WPS, see Section 7.2 on page 42. NBG6818 User's Guide 13
-
 1
1 -
2
-
3
-
4
-
5
-
6
-
7
-
 8
8 -
 9
9 -
 10
10 -
 11
11 -
 12
12 -
 13
13 -
 14
14 -
 15
15 -
 16
16 -
 17
17 -
 18
18 -
19
-
20
-
21
-
22
-
23
-
24
-
25
-
26
-
27
-
28
-
29
-
30
-
31
-
32
-
33
-
34
-
35
-
36
-
37
-
38
-
39
-
40
-
41
-
42
-
43
-
44
-
45
-
46
-
47
-
48
-
49
-
50
-
51
-
52
-
53
-
54
-
55
-
56
-
57
-
58
-
59
-
60
-
61
-
62
-
63
-
64
-
65
-
66
-
67
-
68
-
69
-
70
-
71
-
72
-
73
-
74
-
75
-
76
-
77
-
78
-
79
-
80
-
81
-
82
-
83
-
84
-
85
-
86
-
87
-
88
-
89
-
90
-
91
-
92
-
93
-
94
-
95
-
96
-
97
-
98
-
99
-
100
-
101
-
102
-
103
-
104
-
105
-
106
-
107
-
108
-
109
-
110
-
111
-
112
-
113
-
114
-
115
-
116
-
117
-
118
-
119
-
120
-
121
-
122
-
123
-
124
-
125
-
126
-
127
-
128
-
129
-
130
-
131
-
132
-
133
-
134
-
135
-
136
-
137
-
138
-
139
-
140
-
141
-
142
-
143
-
144
-
145
-
146
-
147
-
148
-
149
-
150
-
151
-
152
-
153
-
154
-
155
-
156
-
157
-
158
-
159
-
160
-
161
-
162
-
163
-
164
-
165
-
166
-
167
-
168
-
169
-
170
-
171
-
172
-
173
-
174
-
175
-
176
-
177
-
178
-
179
-
180
-
181
-
182
-
183
 |
 |
