ZyXEL DMA-2500 User Guide - Page 55
Configuring the TV Mode Setup, Table 7
 |
View all ZyXEL DMA-2500 manuals
Add to My Manuals
Save this manual to your list of manuals |
Page 55 highlights
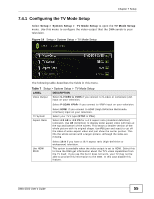
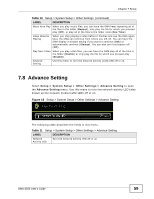
Chapter 7 Setup 7.4.1 Configuring the TV Mode Setup Select Setup > System Setup > TV Mode Setup to open the TV Mode Setup menu. Use this menu to configure the video output that the DMA sends to your television. Figure 14 Setup > System Setup > TV Mode Setup The following table describes the fields in this menu. Table 7 Setup > System Setup > TV Mode Setup LABEL DESCRIPTION Video Output Select S-VIDEO & CVBS if you connect to S-video or composite (AV) input on your television. Select P-SCAN YPbPr if you connect to YPbPr input on your television. TV System Aspect Ratio Select HDMI if you connect to HDMI (High Definition Multimedia Interface) input on your television. Select your TV's type (NTSC or PAL). Select 4:3 LB or 4:3 PS for a 4:3 aspect ratio (standard-definition) television. Use LB (letterbox) to display wider aspect video with bars at the top and bottom of the screen. This shows a smaller version of the whole picture with its original shape. Use PS (pan and scan) to cut off the sides of wider aspect video and just show the center portion. This fills the whole screen with a larger picture, although the sides are missing. Use HDMI EDID Select 16:9 if you have a 16:9 aspect ratio (high-definition or widescreen) television. This option is available when the video output is set to HDMI. Select this to have the DMA get information about the TV's video capabilities from the TV itself. If you use this but it does not work, your TV may not be able to provide this information to the DMA. In this case disable this feature. DMA-2500 User's Guide 55
-
 1
1 -
2
-
3
-
4
-
5
-
6
-
7
-
8
-
9
-
10
-
11
-
12
-
13
-
14
-
15
-
16
-
17
-
18
-
19
-
20
-
21
-
22
-
23
-
24
-
25
-
26
-
27
-
28
-
29
-
30
-
31
-
32
-
33
-
34
-
35
-
36
-
37
-
38
-
39
-
40
-
41
-
42
-
43
-
44
-
45
-
46
-
47
-
48
-
49
-
 50
50 -
 51
51 -
 52
52 -
 53
53 -
 54
54 -
 55
55 -
 56
56 -
 57
57 -
 58
58 -
 59
59 -
 60
60 -
61
-
62
-
63
-
64
-
65
-
66
-
67
-
68
-
69
-
70
-
71
-
72
-
73
-
74
-
75
-
76
-
77
-
78
-
79
-
80
-
81
-
82
-
83
-
84
-
85
-
86
-
87
-
88
-
89
-
90
-
91
-
92
-
93
-
94
-
95
-
96
-
97
-
98
-
99
-
100
-
101
-
102
-
103
-
104
-
105
-
106
-
107
-
108
-
109
-
110
-
111
-
112
-
113
-
114
-
115
-
116
 |
 |
