Brother International HE-800A Instruction Manual - English - Page 18
Installing the power switch, Installing the bed base
 |
View all Brother International HE-800A manuals
Add to My Manuals
Save this manual to your list of manuals |
Page 18 highlights
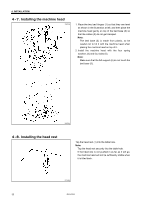
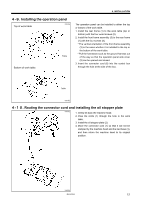
4-5. Installing the power switch 4. INSTALLATION 1. Install the power switch (1) with the two screws (2). 2. Secure the power switch (1) cord and the motor (4) cord with the six staples (3). 3859Q 4-6. Installing the bed base 3860Q 1. Place the bed base (1) on top of the work table, and insert the four collars (2). 2. Provisionally tighten the four flange nuts (4) onto the four bolts (3), and then position the bed base (1). 3. Install the bed base (1) with the three flat washers (5) and wood screws (6), and then install the two rubber caps (7). 4. Remove the four bolts (3). HE-800A 10
-
 1
1 -
2
-
3
-
4
-
5
-
6
-
7
-
8
-
9
-
10
-
11
-
12
-
 13
13 -
 14
14 -
 15
15 -
 16
16 -
 17
17 -
 18
18 -
 19
19 -
 20
20 -
 21
21 -
 22
22 -
 23
23 -
24
-
25
-
26
-
27
-
28
-
29
-
30
-
31
-
32
-
33
-
34
-
35
-
36
-
37
-
38
-
39
-
40
-
41
-
42
-
43
-
44
-
45
-
46
-
47
-
48
-
49
-
50
-
51
-
52
-
53
-
54
-
55
-
56
-
57
-
58
-
59
-
60
-
61
-
62
-
63
-
64
-
65
-
66
-
67
-
68
-
69
-
70
-
71
-
72
-
73
-
74
-
75
-
76
-
77
-
78
-
79
-
80
-
81
-
82
-
83
-
84
-
85
-
86
-
87
-
88
-
89
-
90
-
91
-
92
-
93
-
94
-
95
-
96
-
97
-
98
-
99
-
100
-
101
-
102
-
103
-
104
-
105
-
106
-
107
-
108
-
109
-
110
-
111
-
112
-
113
-
114
-
115
-
116
-
117
-
118
 |
 |

HE-800A
4. INSTALLATION
10
4
-
5
. Installing the power switch
1. Install the power switch (1) with the two screws (2).
2. Secure the power switch (1) cord and the motor (4)
cord with the six staples (3).
4
-
6
. Installing the bed base
1. Place the bed base (1) on top of the work table, and insert the four collars (2).
2. Provisionally tighten the four flange nuts (4) onto the four bolts (3), and then position the bed base (1).
3. Install the bed base (1) with the three flat washers (5) and wood screws (6), and then install the two rubber caps (7).
4. Remove the four bolts (3).
3859Q
3860Q